OpenEMR 7 Create User Accounts
From OpenEMR Project Wiki
3. Create User Accounts
- Authorize any people who will use this system
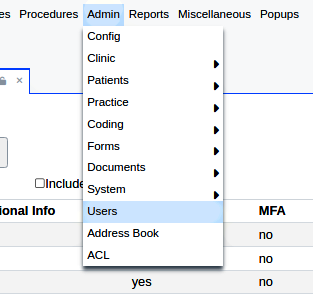
- Open the main menu item Admin/ Users
- This screen below shows the controls to:
- A. add a user account
- B. view user accounts grouped by facility
- C. show or hide inactive users.
- This screen below shows the controls to:
- Columns:
- Username - AKA 'login'
- Real Name - what it says
- Additional Info - freetext note of approximately as much text as desired.
- Authorized - these users are displayed in the Calendar where they can have appointments scheduled.
- MFA - do they have Multifactor Authentication enabled
- Note: MFA is NOT required for OpenEMR function; if desired by an individual user it is activated from their User Preferences panel.
- Failed Login Counter - what it says
- Columns:
- At the initial setup only the Administrative user will have been created, named whatever was specified in the OpenEMR's installation setup script. At this point you are the only administrator and you can create additional user accounts.
These pictured users are the defaults found in the online demos.
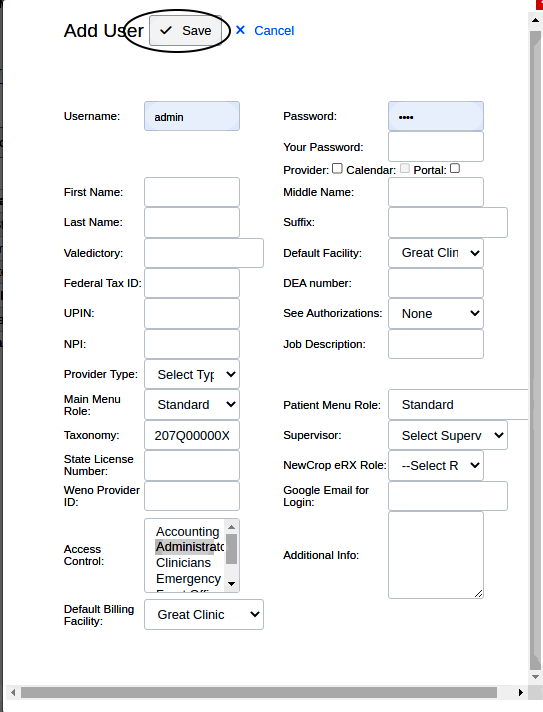
- To create an additional user account, click the 'Add User' button to display the 'Add User' dialog
- Fill in the requested information.
Input items: Username: Initially is auto-filled as 'admin'. Change for each new user.
- in OpenEMR the username is CASE SENSITIVE, and cannot be changed once created
- Password: the new user's password; will display in plain text until user is created
- Your Password: the password of the person creating the user account, to confirm they are authorized to do so.
- Checkboxes:
- Provider: select if user is a Provider
- Calendar: select if user is going to be displayed on the practice calendar
- Portal: select if user can configure and use the Patient Portal
- *AFTER user creation an 'Active' checkbox will appear and can be de-selected if user is inactivated
- First / Middle/ Last name: only use alphabetic characters
- Suffix: Sr, Jr, III etc. though may also use for professional title
- Valedictory: user's professional or Job Title, e.g., 'MD', 'ARNP'. Will appear with user's real names in some of the official correspondence.
- Default Facility: dropdown menu lists all facilities that have been set up (in previous step). Select this user's primary treatment location if necessary.
- Federal Tax ID: If the user is a provider, enter their tax ID
- DEA Number: If user is a prescriber enter their State- issued credential fot prescribing controlled substances.
- If they do not have one enter all uppercase, 'NONE'
- UPIN and NPI: If a provider, enter those provider's numbers
- See Authorizations: which user authorizations this user may view. Leave as None unless you know different.
- Job Description: freetext; appears in the 'Address Book' search module as "Specialty"
- Provider Type: customizable list of provider types
- Main / Patient Menu Role: select to assign to custom menu if one has been created
- Taxonomy: Automatically generated for use if a provider
- Supervisor: list contains all users who have the 'Provider' checkbox selected above. Select this user's clinical supervisor and it will appear as 'Supervising' provider when this user fills out an encounter Fee Sheet.
- State License Number: If a licensed professional enter license number
- NewCrop eRx Role: role titles for NewCrop eRx activities; unused if not subscribed to NewCrop eRx
- weno Provider ID: use only if subscribed to weno eRx
- Google Email for Login: enter if used
- Access Contol: select the type of access to OpenEMR (AKA, 'ACL') this user will be authorized.
- Additional Info: freetext display on the User/ Groups list. Technically, it mY be as much as 4 GB though that large of a display may be hard to manage.
- Default Billing Facility: select if billing from a different facility
- Click the Save button (oval at top) and see the new username listed on the User/ Groups screen.
Back to >>> OpenEMR_7_New_Clinic_Setup <<<


