Difference between revisions of "LBV Forms for Opthalmology"
m (Pete Boyd moved page LBV FORMS FOR OPHTHALMOLOGY to LBV Forms for Opthalmology: Don't shout) |
|||
| (158 intermediate revisions by one other user not shown) | |||
| Line 1: | Line 1: | ||
== INTRODUCTION == | =='''INTRODUCTION'''== | ||
Ophthalmologists don't use SOAP notes and thus the Layout Based Visit | Ophthalmologists don't use SOAP notes and thus the Layout Based Visit Forms serve this community very well. The specialized LBV Form, NationNotes, are particularly helpful to incorporate scanned images such as hand drawings or copies of Perimetry. They are equally useful for the construction of clinical notes which minimizes key strokes. | ||
The majority of the forms are intended for colleagues who are comfortable typing their entries in the medical record. | |||
Colleagues, who were never taught touch typing while in high school, will find the last form with NationNotes and Listboxes better suited to their needs. | |||
A preliminary step requires identification of the forms in Administration/Lists/Layout-Based Visit Forms. Here is an example. | |||
[[File:Lo20a.png]] | |||
== COMPREHENSIVE OPHTHALMIC EXAM == | Pay close attention to Order, ID, Label, UOR, Data Type, Size, and Lists. | ||
Options are used if you want to get fancy with your forms. | |||
In regards to UOR, if "Required" is chosen for an item, that Field must be populated before the note is saved. If you don't want to be "nagged" by the form, choose "Optional". If a particular field needs to be hidden, choose "Unused" instead of deleting it. Should the field be required at a future date, the Field could be readily put back into service. If deleted, the Field would have to be reconstructed. | |||
The size of the Textbox or Textarea, if less than 50 characters/spaces, is fairly easy to manipulate. If greater than 50, trial and error will render a nice and neat layout. The values supplied are merely jumping off points because the graphics on your device will be different and therefore the values that you will use need to be customized. | |||
Label Columns and Data Columns are a bit more difficult to understand. Even though it is possible to put 9 Fields into a single line, only 2 will fit if large Textboxes and Textareas are deployed. Start off by using 0, 0 for the left most Field on a particular line and use 0, 0 for subsequent Fields in this line. To achieve symmetry, trial and error is required. If a Field needs to occupy an entire line, use 1, 3. | |||
Some of the screenshots had to be divided because one screenshot could not contain the entire image. The first screenshot depicts the top of the form while the following screenshot will display the balance. | |||
Changing the order of each Field in a LBV Form and editing are self-explanatory. | |||
After creating the list of forms, another tab will appear (it's magic, isn't it?) to the right of the "Administrative" tab for a particular encounter and it will have the label "Layout Based". Click the drop down menu to select the specific form. | |||
The Demo provides a safe environment to hone your skills before actual implementation of the Layout Based Value Form. | |||
If time is a scarce commodity, proceed directly to Section 12.1 of this article. Importation of all the forms will take about 15 minutes ''in toto'', provided that the instructions are observed meticulously. | |||
=='''COMPREHENSIVE OPHTHALMIC EXAM'''== | |||
Refraction is included in this form. The four subsections are History, Exam, Impression and Plan. | Refraction is included in this form. The four subsections are History, Exam, Impression and Plan. | ||
=== History === | === History === | ||
[[File:CE_fig_1.png]] | [[File:CE_fig_1.png]] | ||
[[File: | |||
===Layout=== | |||
[[File:Lo16.png]] | |||
=== Exam === | === Exam === | ||
[[File: | [[File:Lo26.png]] | ||
[[File: | ===Layout=== | ||
[[File: | [[File:Lo8.png]] | ||
[[File:Lo8a.png]] | |||
=== Impression and Plan === | === Impression and Plan === | ||
[[File: | [[File:Lo22a.png]] | ||
[[File: | ===Layout=== | ||
[[File:Lo22.png]] | |||
== INTERMEDIATE OPHTHALMIC EXAM == | =='''INTERMEDIATE OPHTHALMIC EXAM'''== | ||
The four subsections are History, Exam, Impression and Plan. | The four subsections are History, Exam, Impression and Plan. | ||
=== History and Exam === | === History and Exam === | ||
[[File:IE fig 1.png]] | [[File:IE fig 1.png]] | ||
[[File: | |||
===Layout=== | |||
[[File:Lo23a.png]] | |||
=== Impression and Plan === | === Impression and Plan === | ||
[[File:IE fig 3b.png]] | [[File:IE fig 3b.png]] | ||
===Layout=== | |||
[[File:IE fig 4.png]] | [[File:IE fig 4.png]] | ||
== ILLUSTRATION == | |||
This form provides entry for 2 scanned images using NationNotes. The image must be scanned first and uploaded to the "Documents" module of the Patient | =='''ILLUSTRATION/ADDENDUM'''== | ||
This form provides entry for 2 scanned images using NationNotes. The image must be scanned first and uploaded to the "Documents" module of the Patient Summary screen. Right click on the image to copy it. Click within the body of the NationNote, paste (Ctrl + v) the image and save it in the NationNote. | |||
This form can be used separately or in conjunction with another form such as the Intermediate Ophthalmic Exam. If you have only 1 image for a particular encounter, the unused NationNote will disappear. | |||
To avoid the appearance of medical-legal impropriety and alteration ("spoliation") of the medical record, this form can be used to correct or expand upon a prior note. | |||
[[File:Ill fig 1.png]] | [[File:Ill fig 1.png]] | ||
===Layout=== | |||
[[File:Ill fig 2.png]] | [[File:Ill fig 2.png]] | ||
=='''PERIMETRY EXAM'''== | |||
== PERIMETRY EXAM == | |||
History, Exam, Visual Fields, Interpretation, Impression and Plan comprise the 6 subsections. | History, Exam, Visual Fields, Interpretation, Impression and Plan comprise the 6 subsections. | ||
=== History and Exam === | === History and Exam === | ||
[[File:PE fig 1.png]] | [[File:PE fig 1.png]] | ||
===Layout=== | |||
[[File:PE fig 2.png]] | [[File:PE fig 2.png]] | ||
=== Visual Fields and Interpretation === | === Visual Fields and Interpretation === | ||
There are 2 NationNotes for bilateral Visual Fields. Follow the instructions given above to incorporate them into the medical record. | There are 2 NationNotes for bilateral Visual Fields. Follow the instructions given above to incorporate them into the medical record. | ||
[[File:PE fig 3b.png]] | [[File:PE fig 3b.png]] | ||
===Layout=== | |||
[[File:PE fig 4.png]] | [[File:PE fig 4.png]] | ||
=== Impression and Plan === | === Impression and Plan === | ||
[[File:PE fig 5.png]] | [[File:PE fig 5.png]] | ||
[[File: | ===Layout=== | ||
[[File:Lo24.png]] | |||
=='''SPECTACLE CHECK'''== | |||
This is a form for a visit wherein a patient is having difficulties with glasses that had been previously prescribed. The 3 subsections are the Spectacle Check, Impression and Plan. | This is a form for a visit wherein a patient is having difficulties with glasses that had been previously prescribed. The 3 subsections are the Spectacle Check, Impression and Plan. | ||
[[File:SC fig 1.png]] | [[File:SC fig 1.png]] | ||
== A-SCAN EXAM == | ===Layout=== | ||
[[File:Lo9.png]] | |||
[[File:Lo9a.png]] | |||
=='''A-SCAN EXAM'''== | |||
This form is used for the measurement of the Intra-ocular Lens to be implanted during Cataract Extraction. A NationNote was added for the scanned A-scan print-out. | This form is used for the measurement of the Intra-ocular Lens to be implanted during Cataract Extraction. A NationNote was added for the scanned A-scan print-out. | ||
[[File:Scan fig 1.png]] | [[File:Scan fig 1.png]] | ||
[[File: | ===Layout=== | ||
[[File:Lo25.png]] | |||
== PRE-OPERATIVE EXAM == | |||
=='''PRE-OPERATIVE EXAM'''== | |||
This form has 4 subsections: History, Exam, Impression and Plan. | This form has 4 subsections: History, Exam, Impression and Plan. | ||
=== History and Exam === | === History and Exam === | ||
[[File:Pre fig 1.png]] | [[File:Pre fig 1.png]] | ||
===Layout=== | |||
[[File:Pre fig 2.png]] | [[File:Pre fig 2.png]] | ||
=== Impression and Plan === | === Impression and Plan === | ||
[[File:Pre fig 3.png]] | [[File:Pre fig 3.png]] | ||
[[File: | ===Layout=== | ||
[[File:Lo10.png]] | |||
=='''POST-OPERATIVE EXAM'''== | |||
== POST-OPERATIVE EXAM == | |||
There are also 4 subsections in this form, namely, History, Exam, Impression and Plan. | There are also 4 subsections in this form, namely, History, Exam, Impression and Plan. | ||
=== History and Exam === | === History and Exam === | ||
A NationNote had been included for an unusual finding that cannot be described adequately in words alone and where a hand drawing or a photograph contributes to a better understanding of the clinical finding. | A NationNote had been included for an unusual finding that cannot be described adequately in words alone and where a hand drawing or a photograph contributes to a better understanding of the clinical finding. | ||
[[File:Pt fig 1.png]] | [[File:Pt fig 1.png]] | ||
===Layout=== | |||
[[File:Pt fig 2.png]] | [[File:Pt fig 2.png]] | ||
=== Impression and Plan === | === Impression and Plan === | ||
[[File:Pt fig 3.png]] | [[File:Pt fig 3.png]] | ||
[[File: | ===Layout=== | ||
[[File:Lo10.png]] | |||
== COMPREHENSIVE OPHTHALMIC EXAM FOR THE NON-TYPIST == | =='''COMPREHENSIVE OPHTHALMIC EXAM FOR THE NON-TYPIST'''== | ||
This form is analogous to the Comprehensive Ophthalmic Exam above. | This form is analogous to the Comprehensive Ophthalmic Exam above. | ||
=== History === | === History === | ||
With exception of the field for the time, the other fields are constructed with NationNotes and stock phrases or | ==== Form and Components ==== | ||
With exception of the field for the time, the other fields are constructed with NationNotes and stock phrases or Components. Clicking one of these phrases will transfer it into the body of the WYSIWYG editor. Editing of the Components is quite simple as well as their addition or deletion. Free text can be entered in the body of the editor. | |||
[[Building_the_Sample_NationNotes_Form|Building the Sample NationNotes Form]] and [http://www.youtube.com/watch?v=5cRmhg0D7Qw this video tutorial] are two great resources to understanding the many features of this editor. | |||
[[File:eye1.png]] | |||
[[File: | Components are the ''raison d'être'' for these NationNotes. | ||
[[File: | [[File:Cc.png]] | ||
[[File: | [[File:Hpi.png]] | ||
[[File: | [[File:Pmh.png]] | ||
[[File: | [[File:Meds.png]] | ||
[[File: | [[File:Psh.png]] | ||
[[File: | |||
[[File: | |||
[[File: | |||
[[File: | The Components can be re-ordered using Drag and Drop. To prevent the Component from appearing in the editor, stay within the non-text area (background). | ||
[[File: | |||
[[File: | [[File:Dragdrop6.PNG]] | ||
[[File: | |||
[[File:Hxform.png]] | |||
[[File:Fhx.png]] | |||
[[File:Roscon.png]] | |||
[[File:Roscor.png]] | |||
[[File:Rospul.png]] | |||
[[File:Rosendo.png]] | |||
[[File:Rosall.png]] | |||
==== Layout ==== | |||
[[File:Lo11.png]] | |||
=== Exam === | === Exam === | ||
[[File: | The Visual Acuities, old prescription and the Refraction were constructed with Listboxes and drop down menus. Notes were included for entries such as contact lens correction, pinhole, and built-in prisms. | ||
[[File: | |||
[[File: | ==== Form and Components ==== | ||
[[File: | |||
[[File: | [[File:eye4.png]] | ||
[[File: | [[File:Lids.png]] | ||
[[File: | [[File:Conj.png]] | ||
[[File: | [[File:Corn.png]] | ||
[[File: | [[File:Exam.png]] | ||
[[File: | [[File:Ac.png]] | ||
[[File: | [[File:Eom.png]] | ||
[[File: | [[File:Iris.png]] | ||
[[File:Pup.png]] | |||
[[File:Lens.png]] | |||
[[File:Fund.png]] | |||
==== Layout ==== | |||
[[File:Lo12.png]] | |||
[[File:Lo14.png]] | |||
[[File:Lo15.png]] | |||
=== Impression and Plan === | === Impression and Plan === | ||
Both these sections are identical to that in the Comprehensive Ophthalmic Exam above, hence no screenshots were | Both these sections are identical to that in the Comprehensive Ophthalmic Exam above, hence no screenshots were provided. | ||
== OTHER NON-TYPIST FORMS == | =='''OTHER NON-TYPIST FORMS'''== | ||
Other forms requiring minimal typing can be constructed with portions of the the last form in this article. | Other forms requiring minimal typing can be constructed with portions of the the last form in this article. | ||
== | |||
=='''SHORTCUT'''== | |||
That wasn't so bad, was it? This exercise requires patience and perseverance, not a ton of heavy duty cogitation. Now that you know how to construct a Layout Based Visit Form, go roll your own and impress your friends! | That wasn't so bad, was it? This exercise requires patience and perseverance, not a ton of heavy duty cogitation. Now that you know how to construct a Layout Based Visit Form, go roll your own and impress your friends! | ||
If your friends are well acquainted with your many fine attributes and there is no need to impress them, the | ===Import=== | ||
If your friends are well acquainted with your many fine attributes and there is no need to impress them, the NT Eye form with the Components and Lists and the 8 Eye forms can be imported with the files listed below: | |||
#[http://www.open-emr.org/wiki/index.php/File:Components.zip components.zip] | |||
#[http://www.open-emr.org/wiki/index.php/File:List_options.zip list options.zip] | |||
#[http://www.open-emr.org/wiki/index.php/File:Nt_eye_form.zip nt eye form.zip] | |||
#[http://www.open-emr.org/wiki/index.php/File:8_eye_forms.zip 8 eye forms.zip] | |||
<span style = "color:green;">'''Try it on a test copy of OpenEMR before touching your own data'''</span>. | |||
<span style = "color:red;">'''Backup all your data before importing!'''</span> | |||
The importation of the Non-Typist Comprehensive Exam must be done in the <span style="color:purple;">'''exact order'''</span> given below; otherwise the form will be missing Components and Lists. '''Strict adherence''' to the protocol below ensures a properly functioning form. | |||
The Components, then the Lists followed by the Non-Typist form will be imported. The last importation will be for the other eight Ophthalmic forms. | |||
Go to Administration->Other->Database->page 1->customlists. Click the Import tab. Click the Browse button and choose the components file. Uncheck the Partial Import box and click Go. | |||
[[File:Compimp1.PNG]] | |||
[[File:Compimp2.PNG]] | |||
If there is an apple green banner, it will tell you that the import was successful. | |||
[[File:Success.PNG]] | |||
Next go->page 5->list_options. Click the Import tab. Click the Browse button and choose the list options file. Uncheck the Partial Import box and click Go. The green banner should appear again. | |||
[[File:Listsimp.PNG]] | |||
Now it is time to import the Non-Typist form. Stay on page 5->layout_options. Click the Import tab. Click the Browse button and choose the nt eye form file. Uncheck the Partial Import box and click go. Look for the green banner again. | |||
[[File:Formimp.PNG]] | |||
Finally we will import the 8 Ophthalmic forms. Remain on page 5 and in layout_options. Click the Import tab. Click the Browse button and choose the 8 eye forms file. Uncheck the Partial Import box and click Go. Four green banners of success. <span style="color:green;">'''Kudos to you!'''</span> | |||
[[File:8imp.PNG]] | |||
The result of the importation should render 9 Ophthalmic forms, 20 sets of Components and 6 sets of Lists. Go to the Layout Based tab of the encounter, click the desired form and record your History and Physical. | |||
===Missing Custom Buttons and Components=== | |||
If the Custom Buttons are missing, they will have to be rebuilt by clicking Add Buttons and using this dialog. | |||
[[File:AC6.PNG]] | |||
If the Components don't appear automatically, they need to be coaxed into appearing. Go to the NT form, click each field to bring up the WYSIWYG editor and click Personalize on the bottom left. Rebuild the Custom Buttons before working on the Components. If the Components have been brought back into view, adding Custom Buttons will cause them to go into hiding again, therefore do the Custom Buttons '''first'''. | |||
[[File:AC7.PNG]] | |||
Move the desired Category to the box on the right and Save. | |||
[[File:AC2.PNG]] | |||
Exit '''both''' the dialog box and the editor. Go back to the field, bring up the editor again to ensure that the Components are present by clicking Select Category and the specific item. | |||
[[File:AC8.PNG]] | |||
[[File:AC9.PNG]] | |||
:::::[[File:Book.gif]] <span style="color:blue;">''You are positive now, that you don't want to roll your own and miss out on all the fun?''</span> [[File:Type.gif]] | |||
::::::::::::::::[[File:Wiggle.gif]] | |||
<br><br> | <br><br> | ||
[[Category:User Guide 4.1. | [[Category: Configuration Guide]][[Category:Forms]][[Category:User Guide]][[Category:User Guide 4.1.0]][[Category:User Guide 4.1.1]][[Category:User Guide 4.1.2]] | ||
Latest revision as of 10:15, 2 September 2022
INTRODUCTION
Ophthalmologists don't use SOAP notes and thus the Layout Based Visit Forms serve this community very well. The specialized LBV Form, NationNotes, are particularly helpful to incorporate scanned images such as hand drawings or copies of Perimetry. They are equally useful for the construction of clinical notes which minimizes key strokes.
The majority of the forms are intended for colleagues who are comfortable typing their entries in the medical record.
Colleagues, who were never taught touch typing while in high school, will find the last form with NationNotes and Listboxes better suited to their needs.
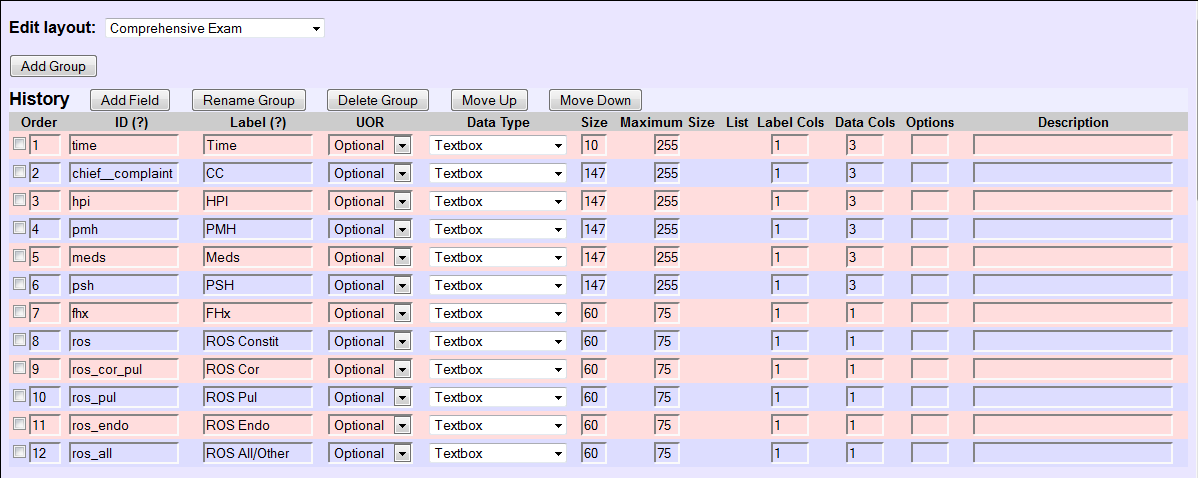
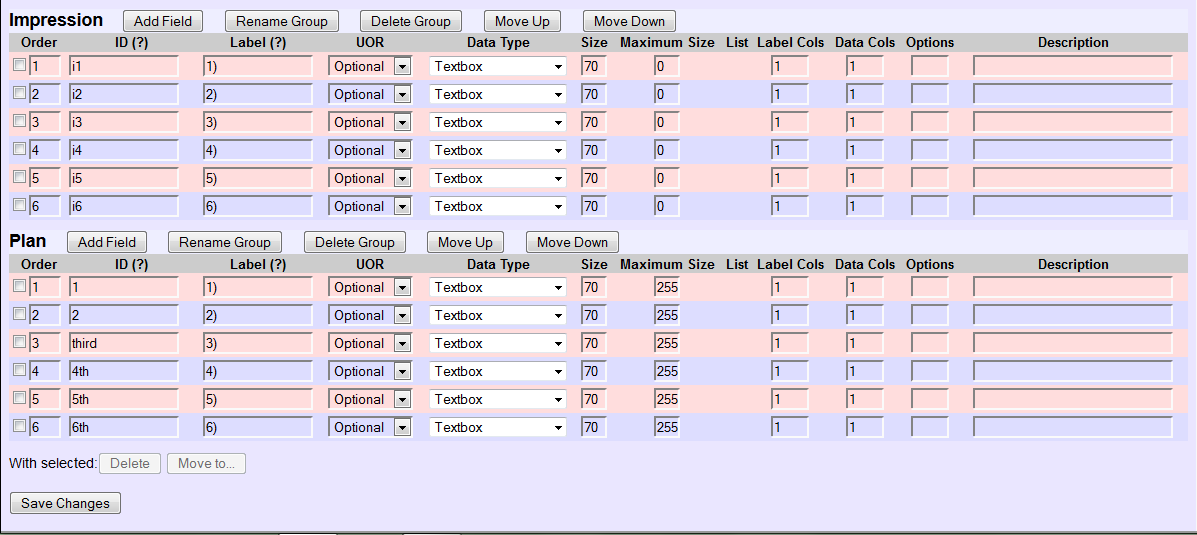
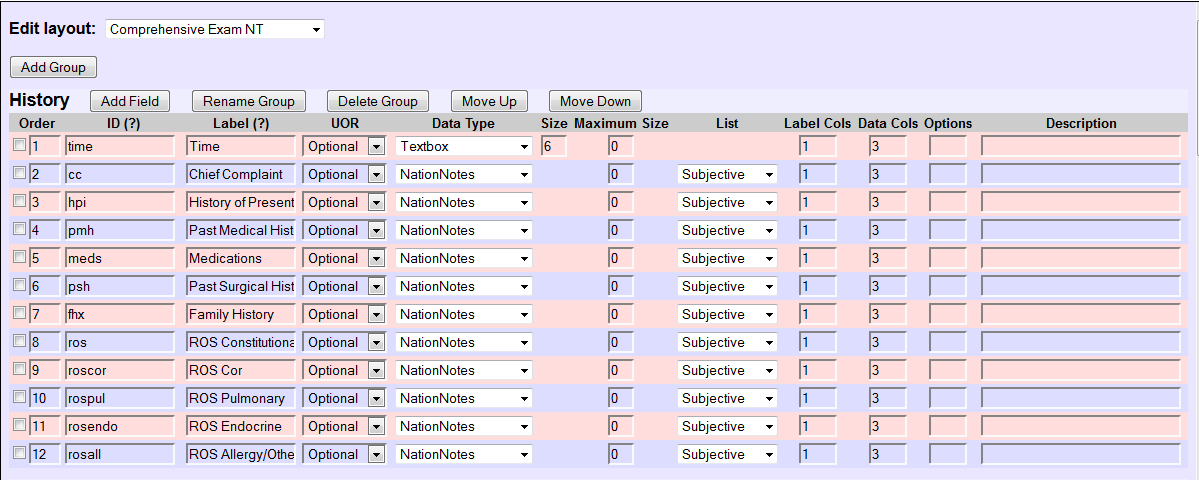
A preliminary step requires identification of the forms in Administration/Lists/Layout-Based Visit Forms. Here is an example.
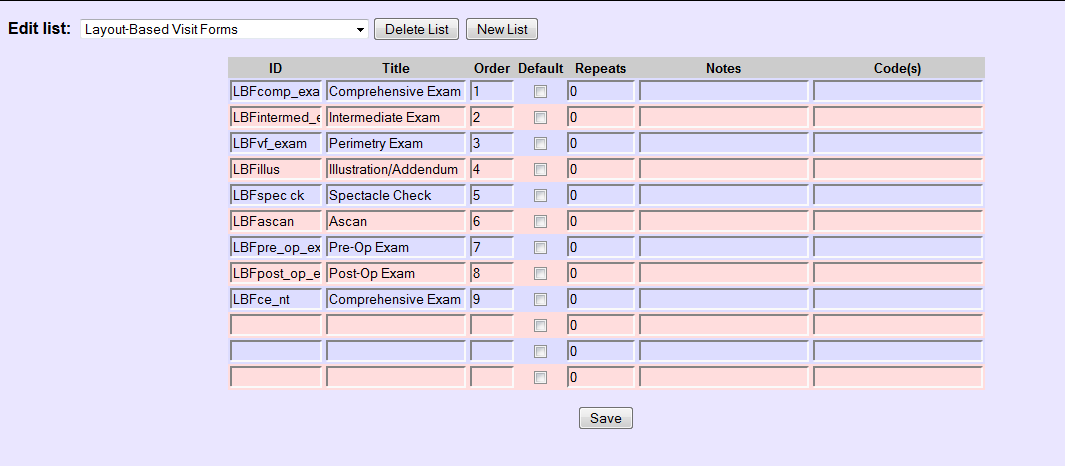
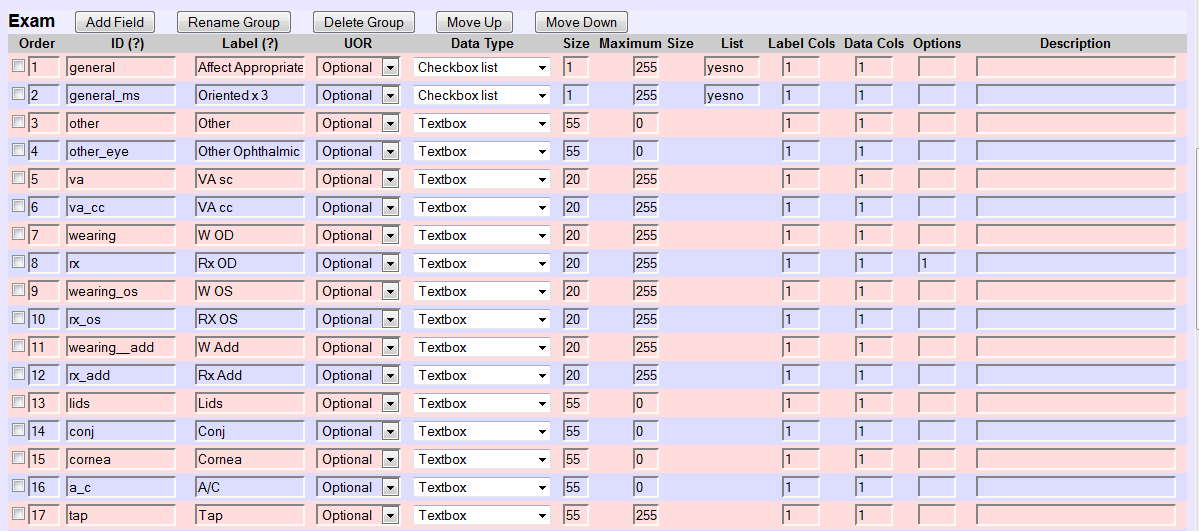
Pay close attention to Order, ID, Label, UOR, Data Type, Size, and Lists.
Options are used if you want to get fancy with your forms.
In regards to UOR, if "Required" is chosen for an item, that Field must be populated before the note is saved. If you don't want to be "nagged" by the form, choose "Optional". If a particular field needs to be hidden, choose "Unused" instead of deleting it. Should the field be required at a future date, the Field could be readily put back into service. If deleted, the Field would have to be reconstructed.
The size of the Textbox or Textarea, if less than 50 characters/spaces, is fairly easy to manipulate. If greater than 50, trial and error will render a nice and neat layout. The values supplied are merely jumping off points because the graphics on your device will be different and therefore the values that you will use need to be customized.
Label Columns and Data Columns are a bit more difficult to understand. Even though it is possible to put 9 Fields into a single line, only 2 will fit if large Textboxes and Textareas are deployed. Start off by using 0, 0 for the left most Field on a particular line and use 0, 0 for subsequent Fields in this line. To achieve symmetry, trial and error is required. If a Field needs to occupy an entire line, use 1, 3.
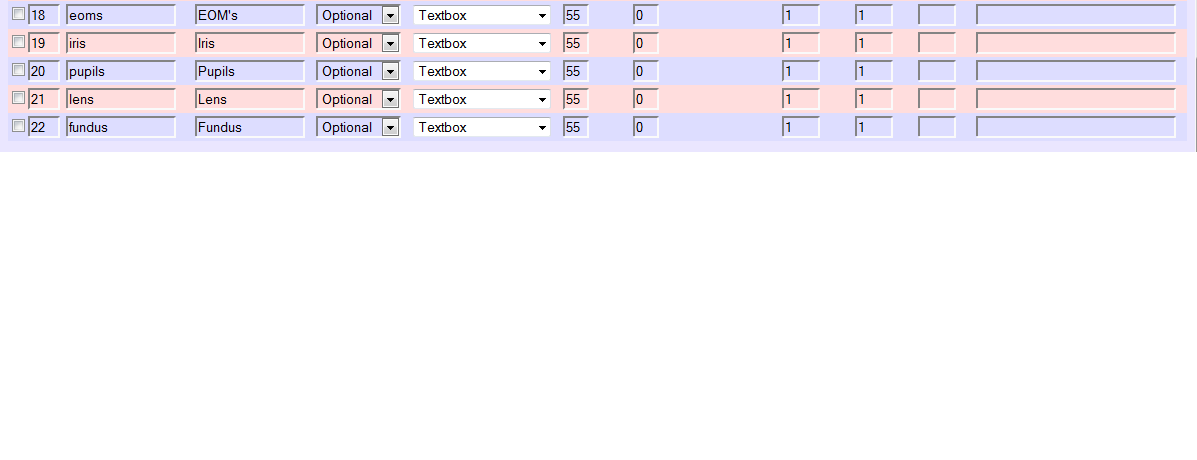
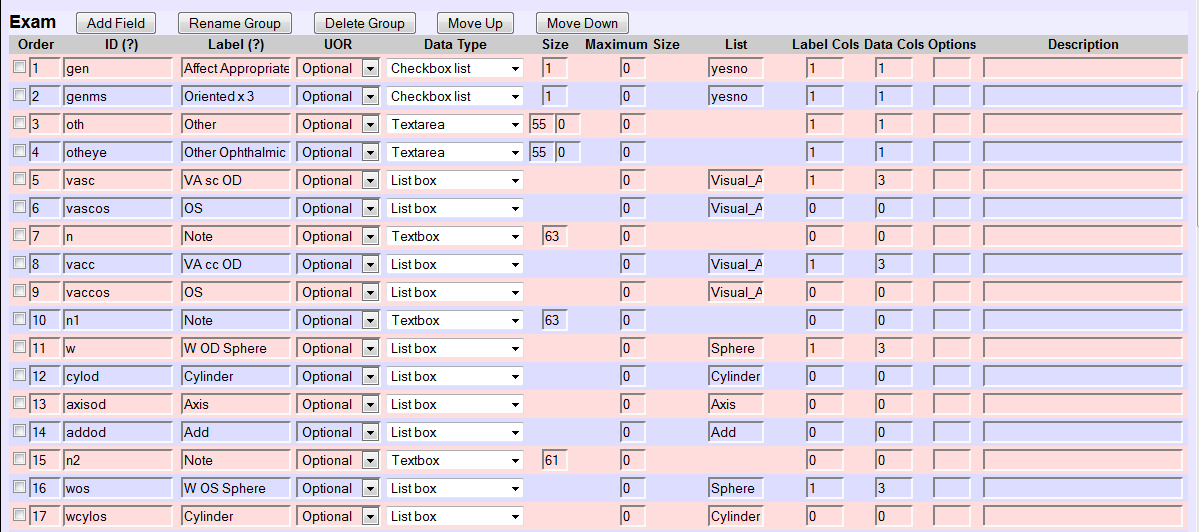
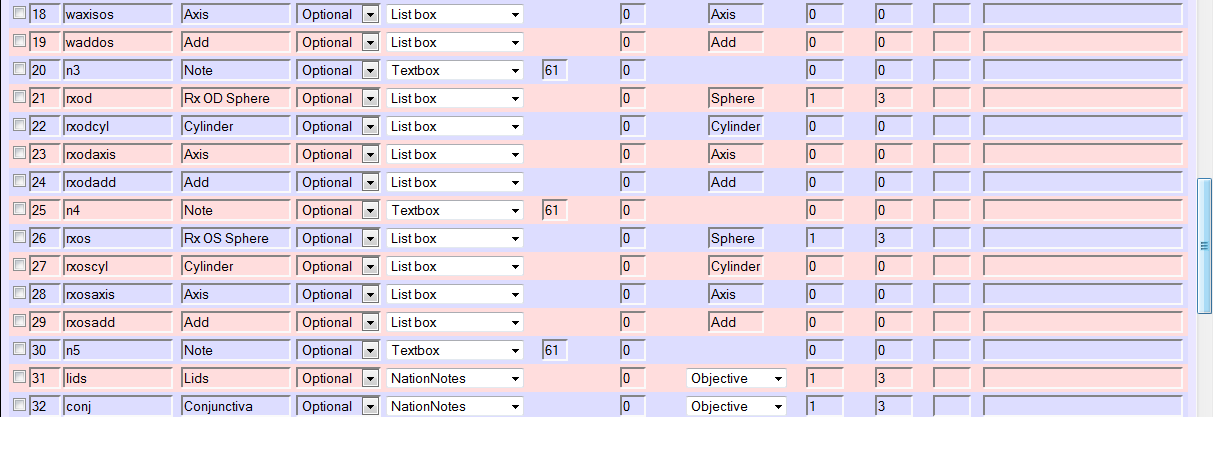
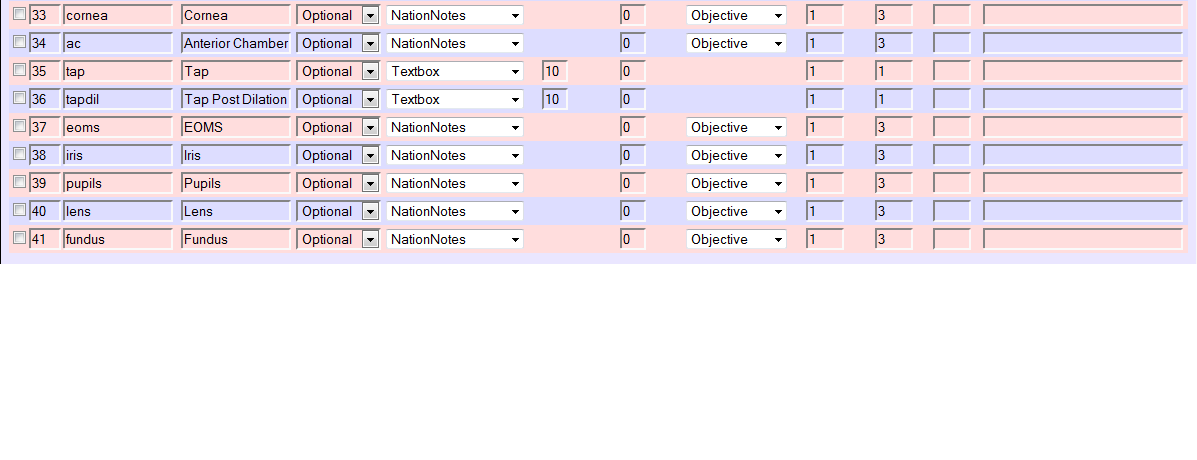
Some of the screenshots had to be divided because one screenshot could not contain the entire image. The first screenshot depicts the top of the form while the following screenshot will display the balance.
Changing the order of each Field in a LBV Form and editing are self-explanatory.
After creating the list of forms, another tab will appear (it's magic, isn't it?) to the right of the "Administrative" tab for a particular encounter and it will have the label "Layout Based". Click the drop down menu to select the specific form.
The Demo provides a safe environment to hone your skills before actual implementation of the Layout Based Value Form.
If time is a scarce commodity, proceed directly to Section 12.1 of this article. Importation of all the forms will take about 15 minutes in toto, provided that the instructions are observed meticulously.
COMPREHENSIVE OPHTHALMIC EXAM
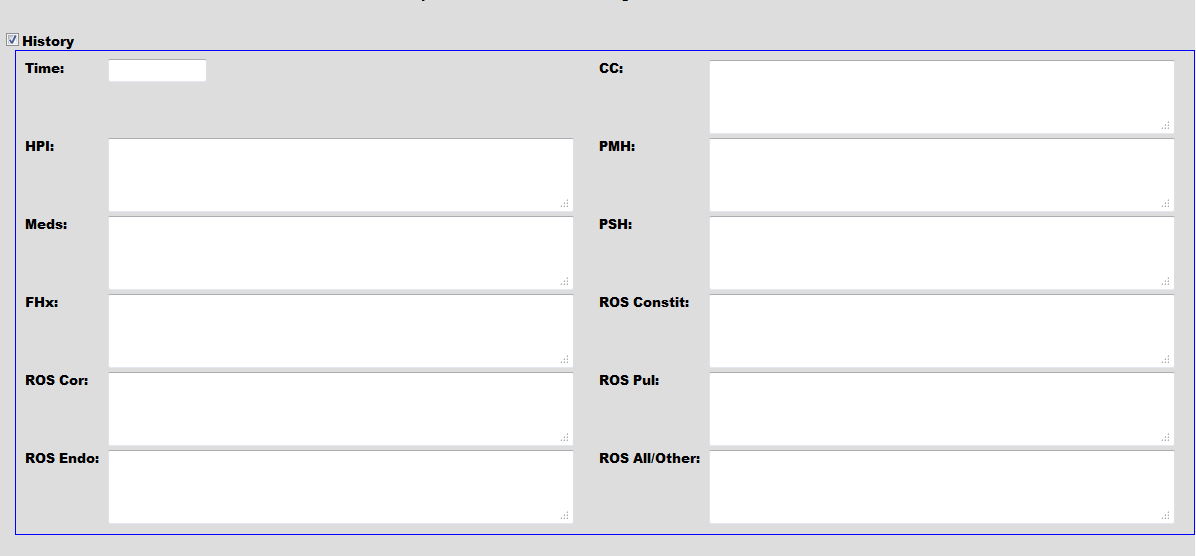
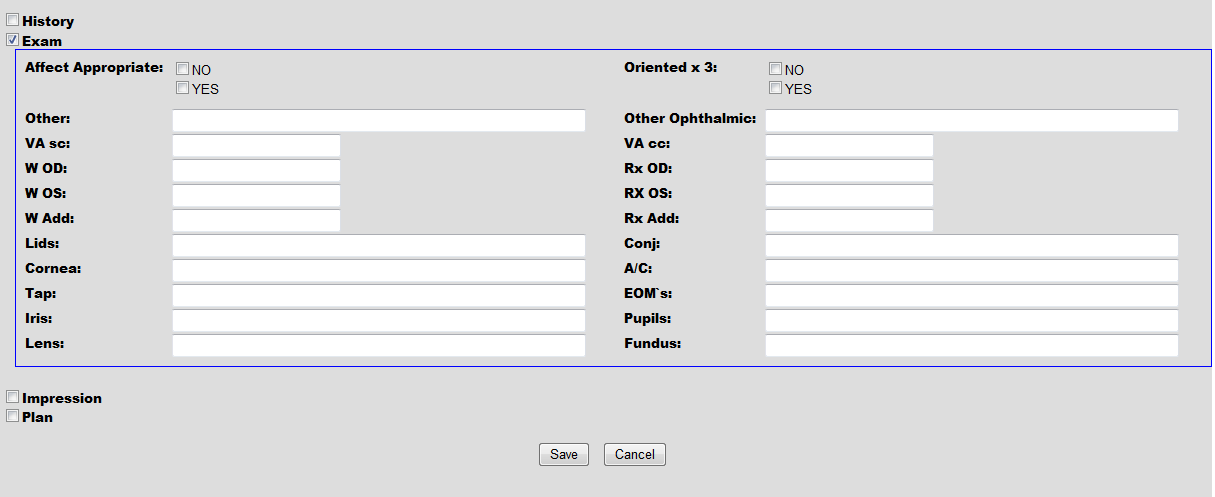
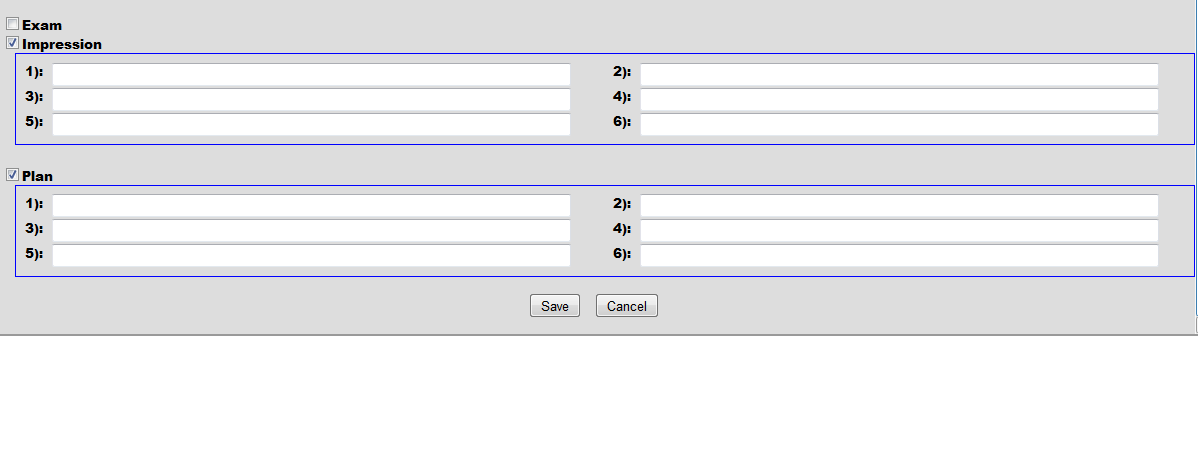
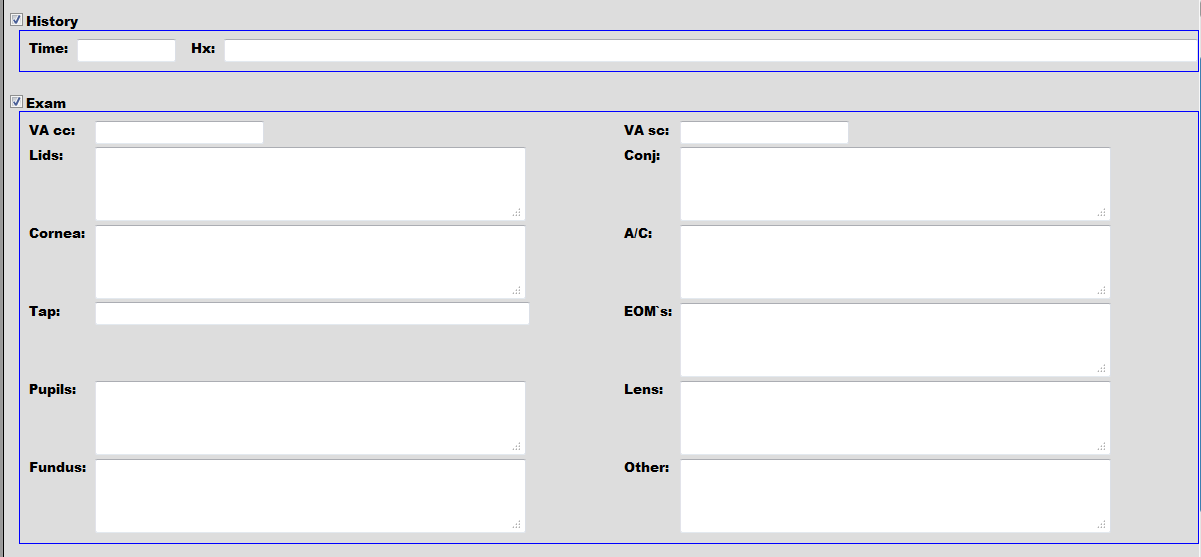
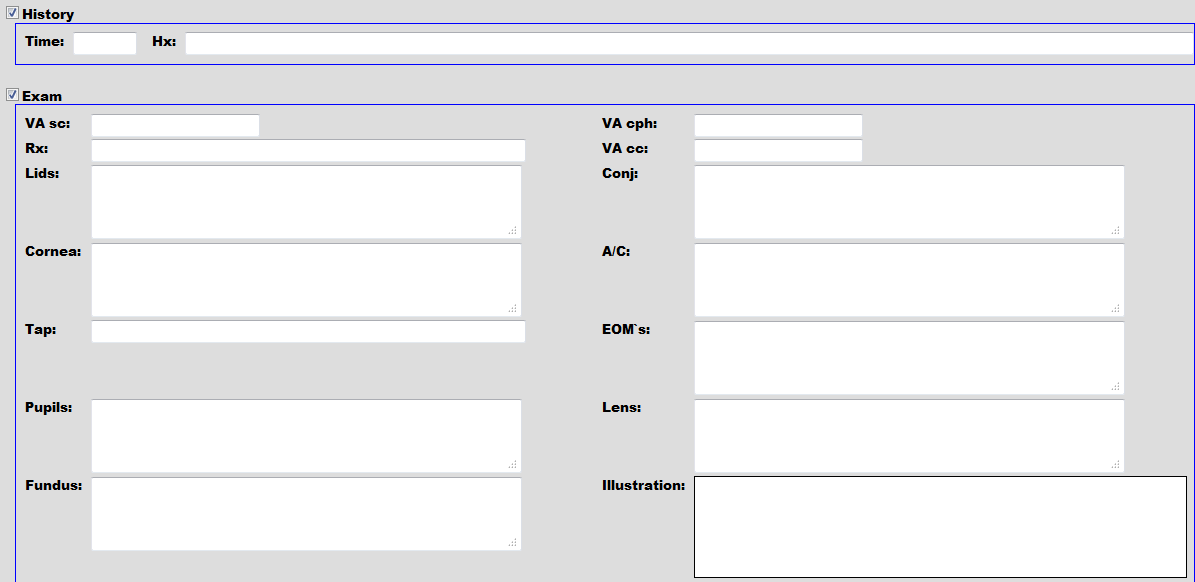
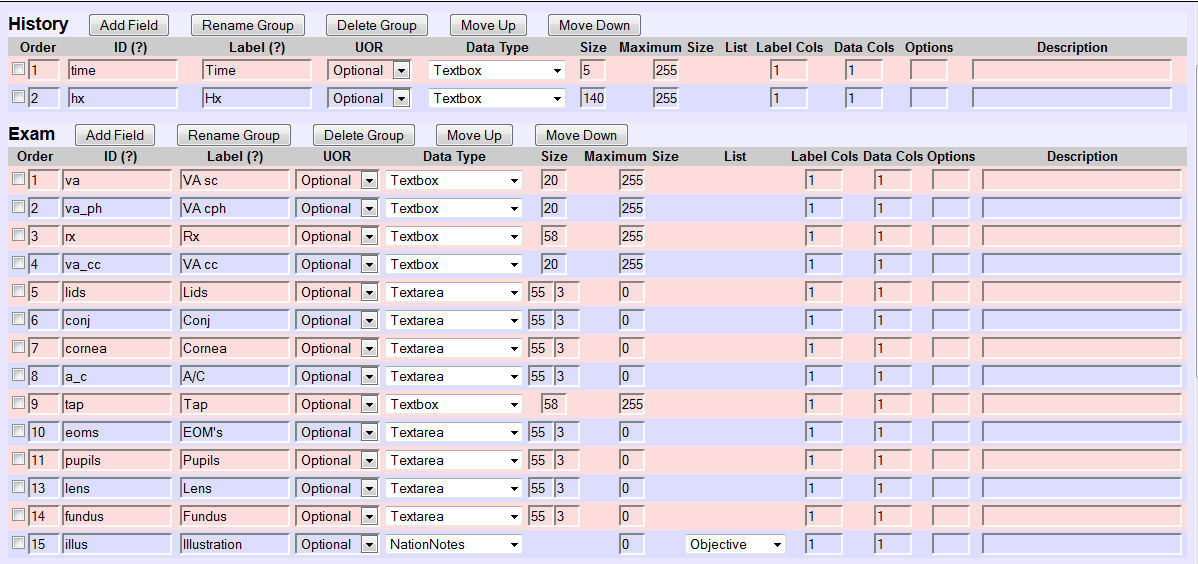
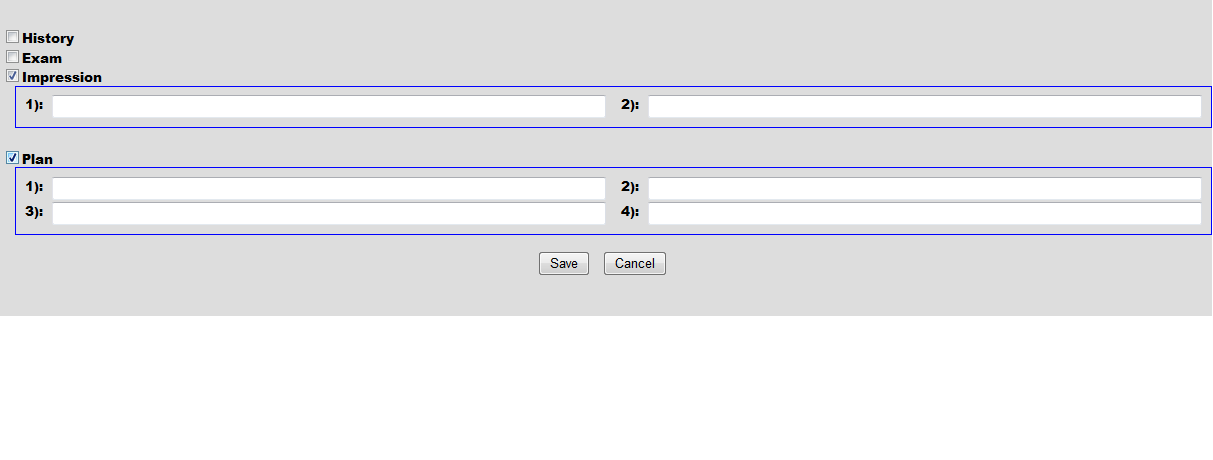
Refraction is included in this form. The four subsections are History, Exam, Impression and Plan.
History
Layout
Exam
Layout
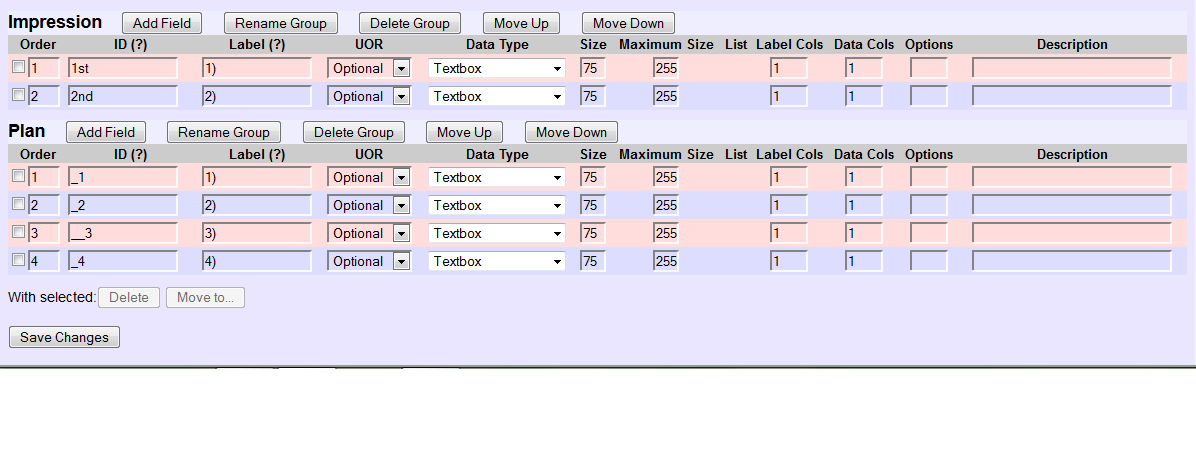
Impression and Plan
Layout
INTERMEDIATE OPHTHALMIC EXAM
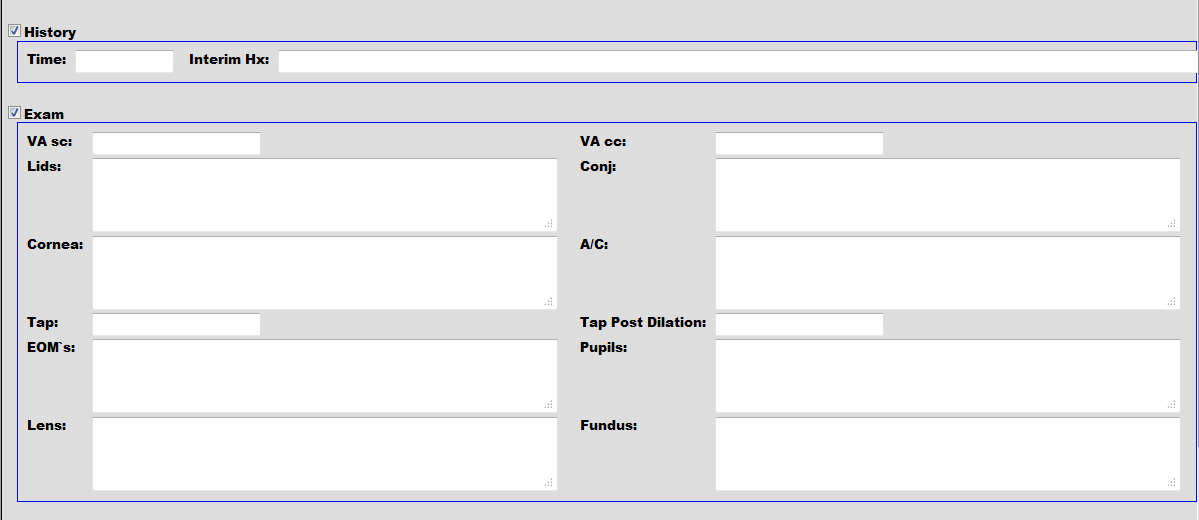
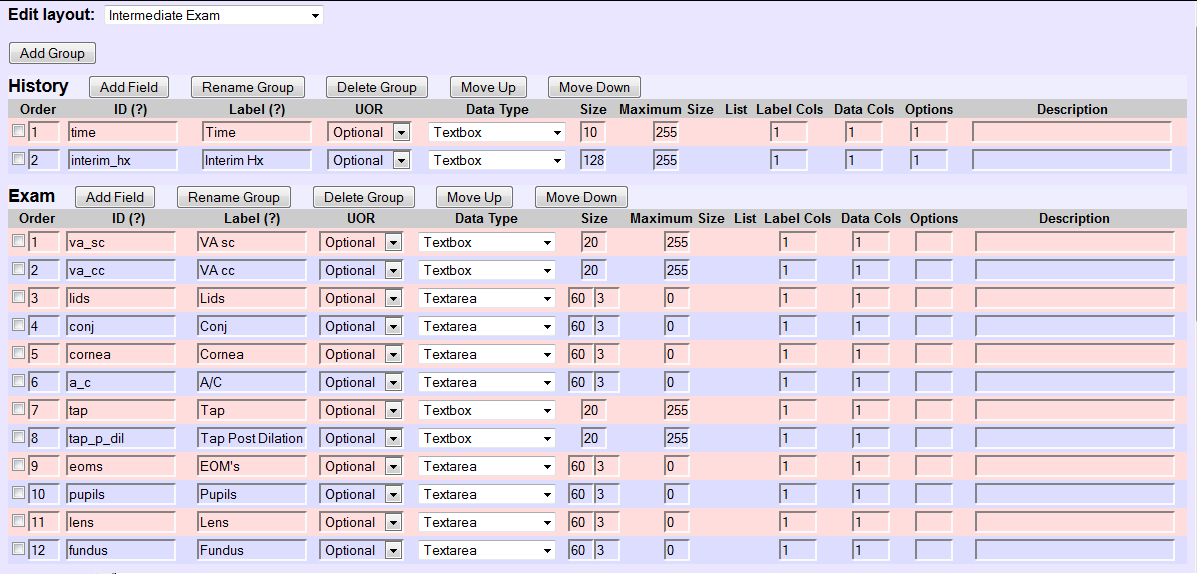
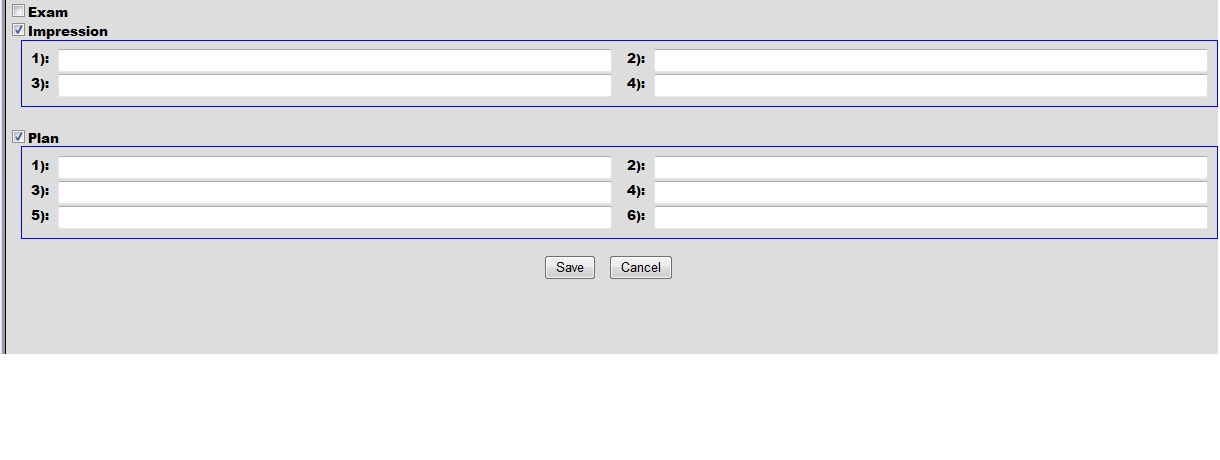
The four subsections are History, Exam, Impression and Plan.
History and Exam
Layout
Impression and Plan
Layout
ILLUSTRATION/ADDENDUM
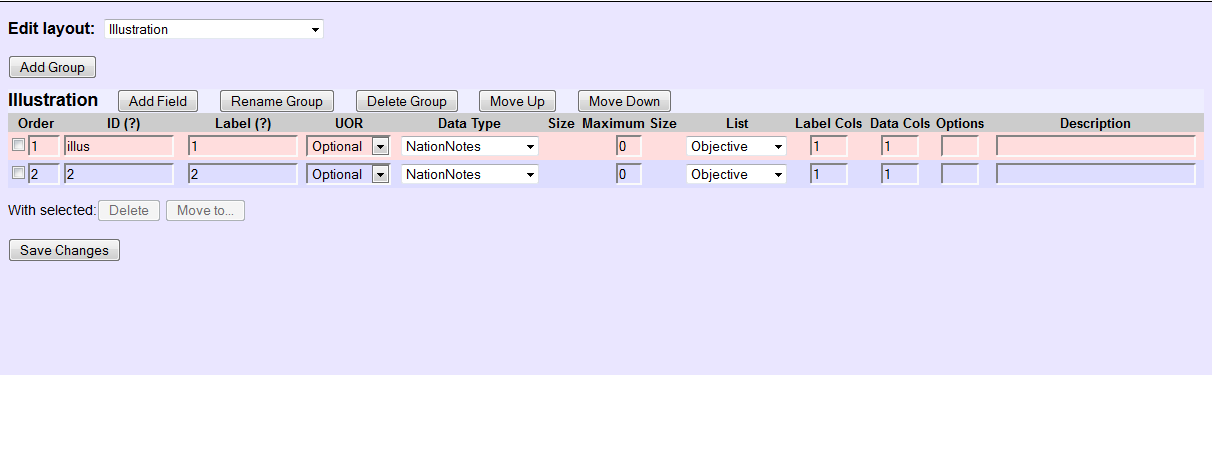
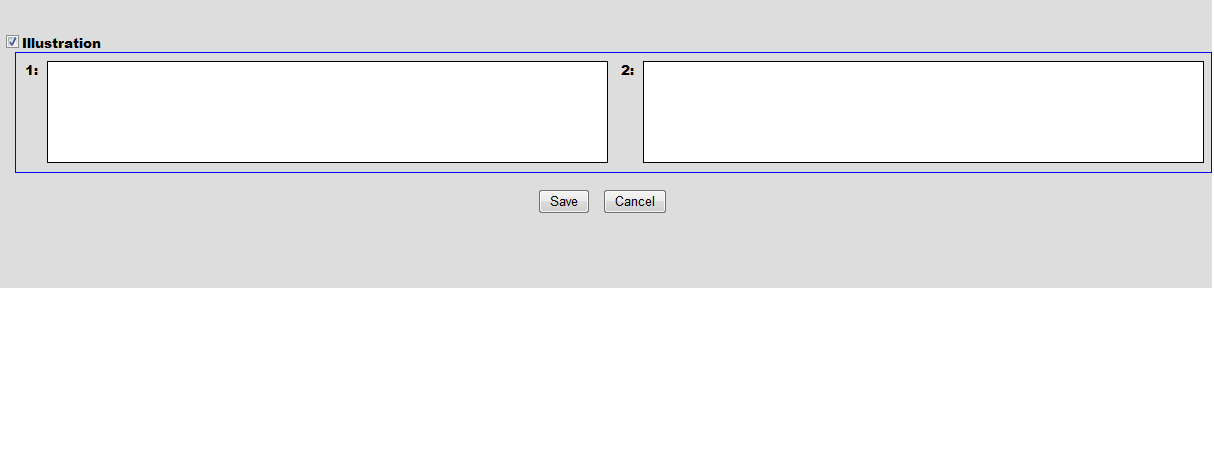
This form provides entry for 2 scanned images using NationNotes. The image must be scanned first and uploaded to the "Documents" module of the Patient Summary screen. Right click on the image to copy it. Click within the body of the NationNote, paste (Ctrl + v) the image and save it in the NationNote.
This form can be used separately or in conjunction with another form such as the Intermediate Ophthalmic Exam. If you have only 1 image for a particular encounter, the unused NationNote will disappear.
To avoid the appearance of medical-legal impropriety and alteration ("spoliation") of the medical record, this form can be used to correct or expand upon a prior note.
Layout
PERIMETRY EXAM
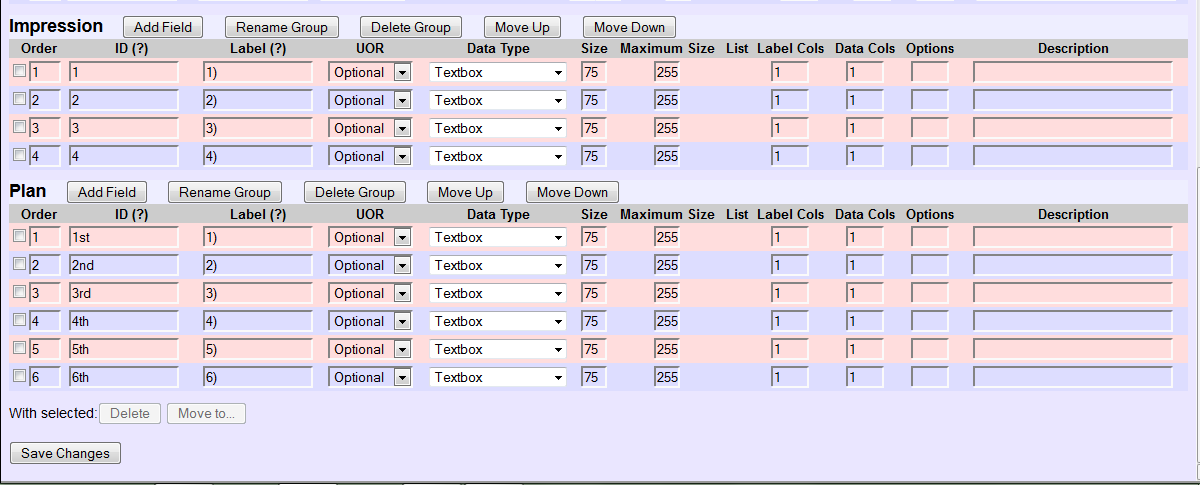
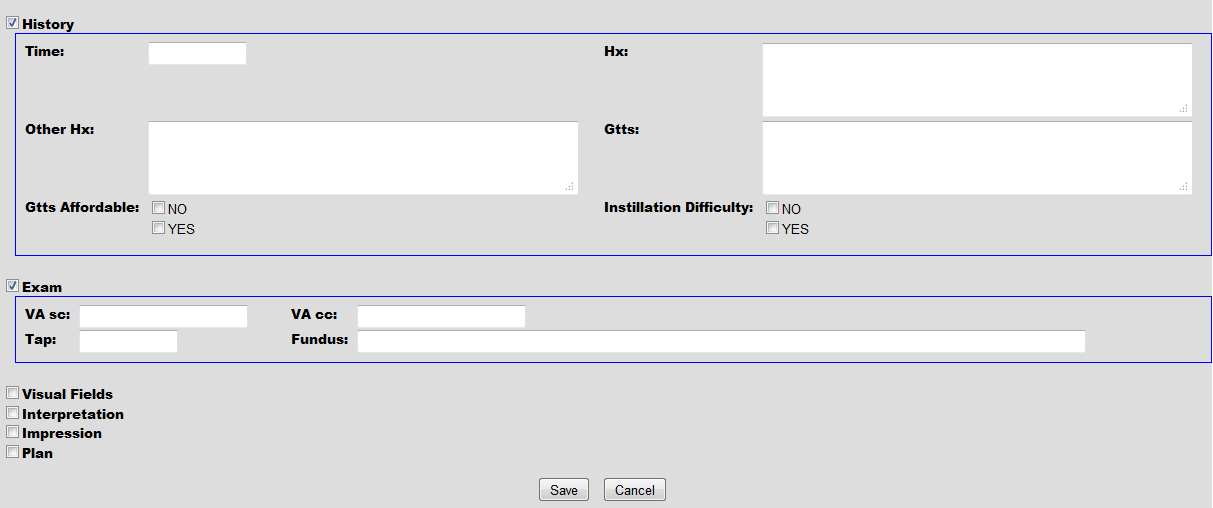
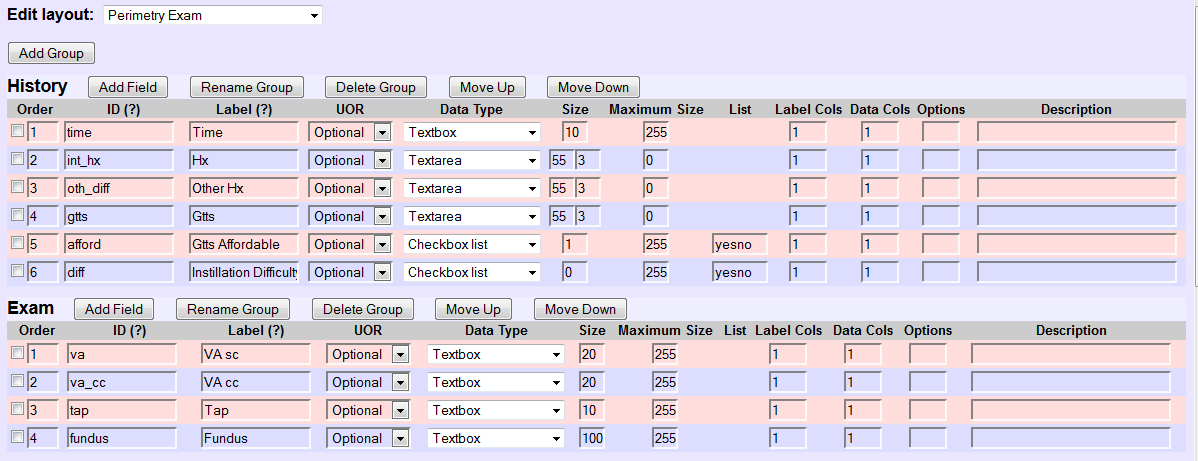
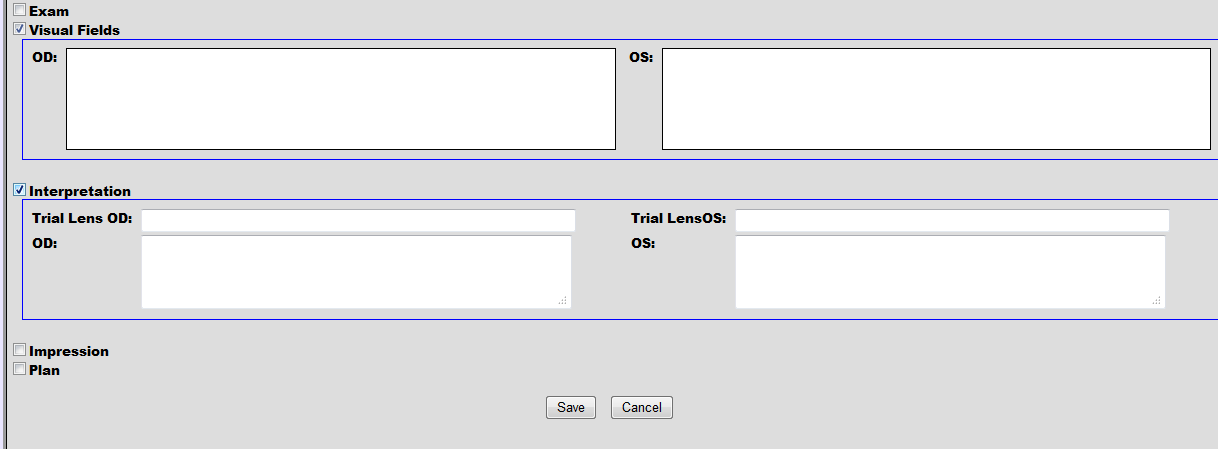
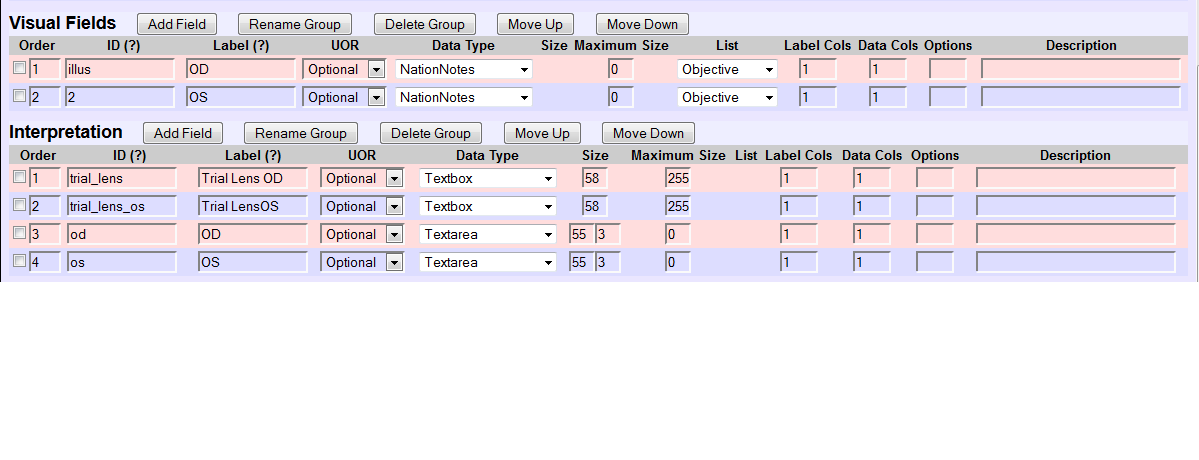
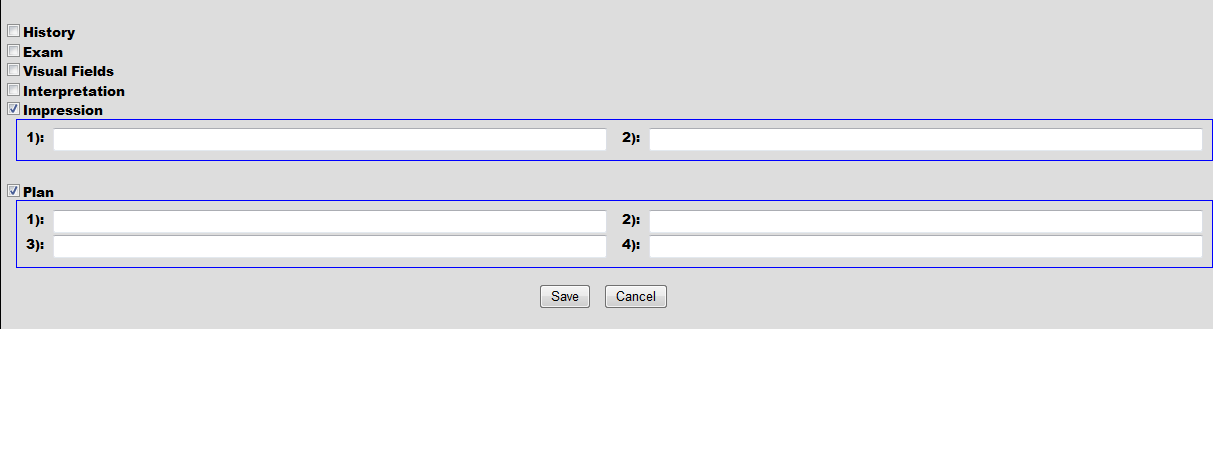
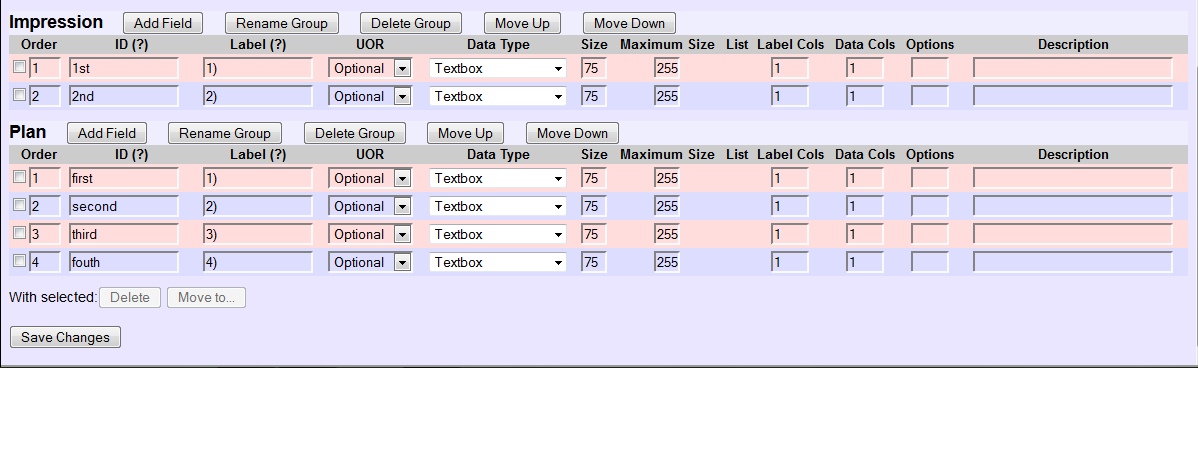
History, Exam, Visual Fields, Interpretation, Impression and Plan comprise the 6 subsections.
History and Exam
Layout
Visual Fields and Interpretation
There are 2 NationNotes for bilateral Visual Fields. Follow the instructions given above to incorporate them into the medical record.
Layout
Impression and Plan
Layout
SPECTACLE CHECK
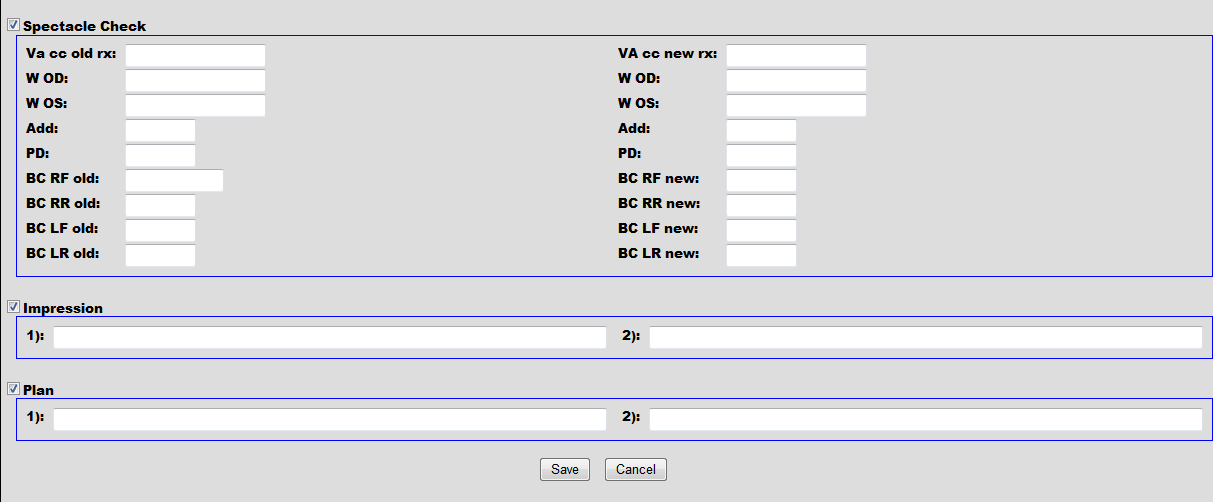
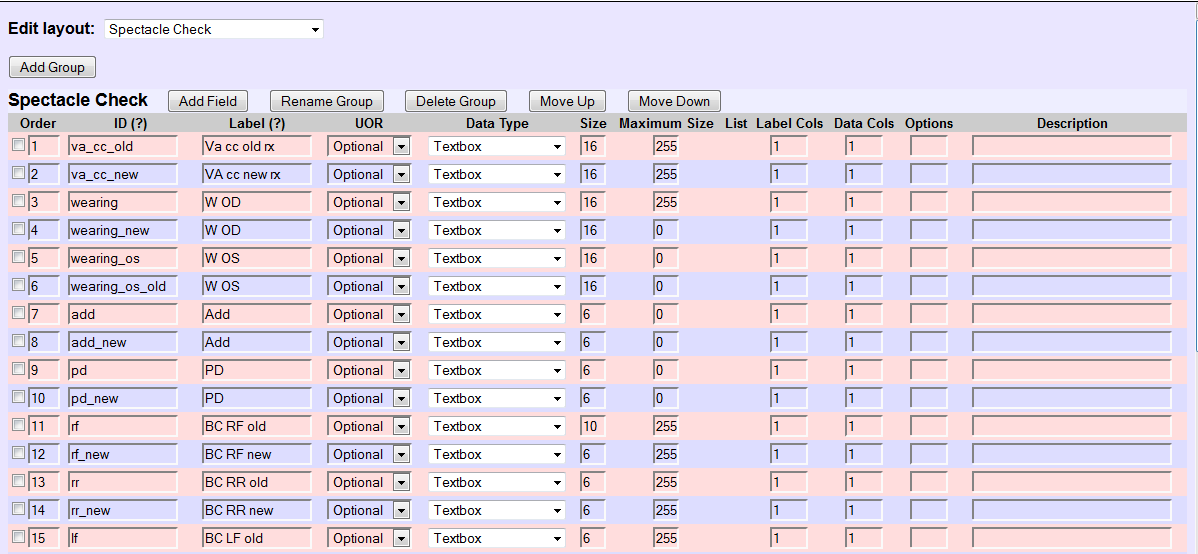
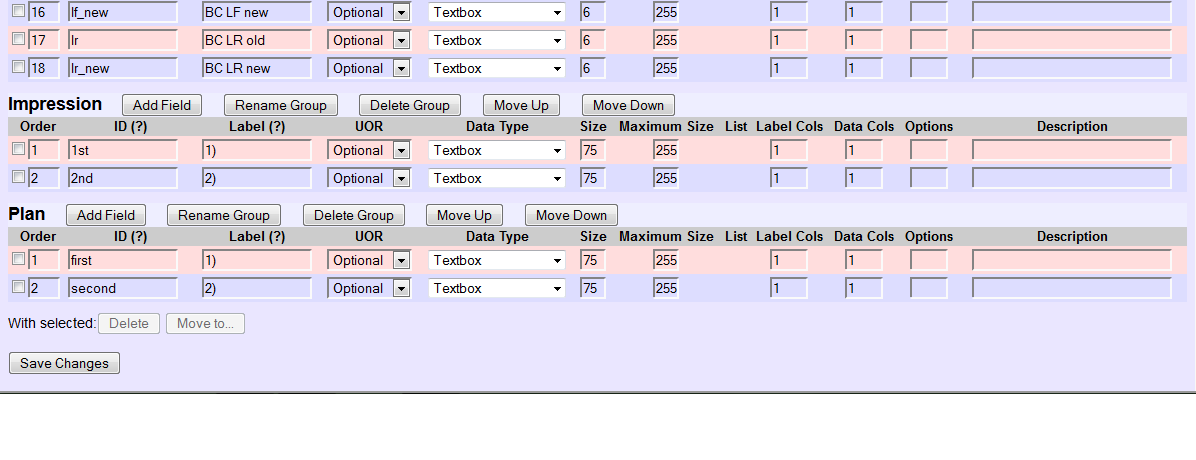
This is a form for a visit wherein a patient is having difficulties with glasses that had been previously prescribed. The 3 subsections are the Spectacle Check, Impression and Plan.
Layout
A-SCAN EXAM
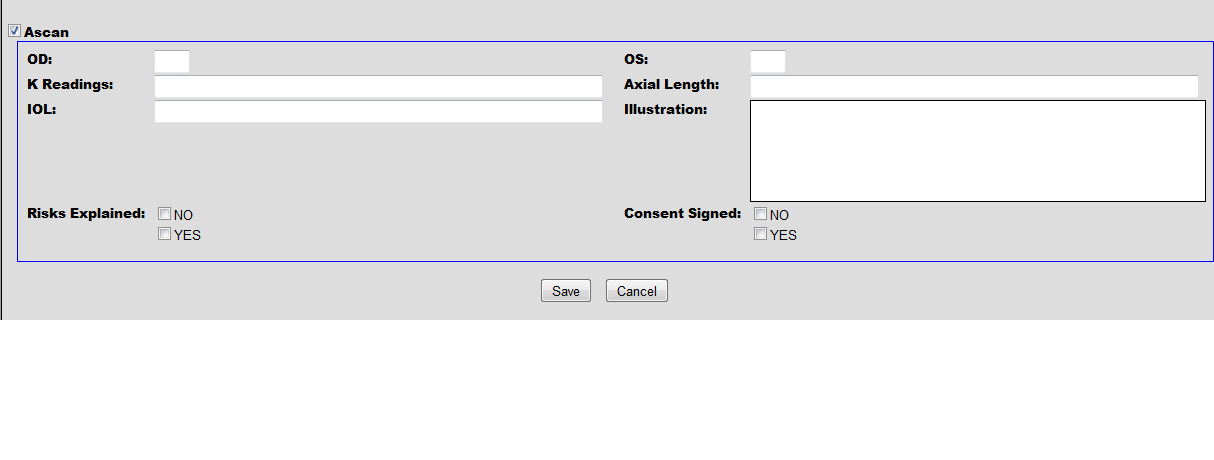
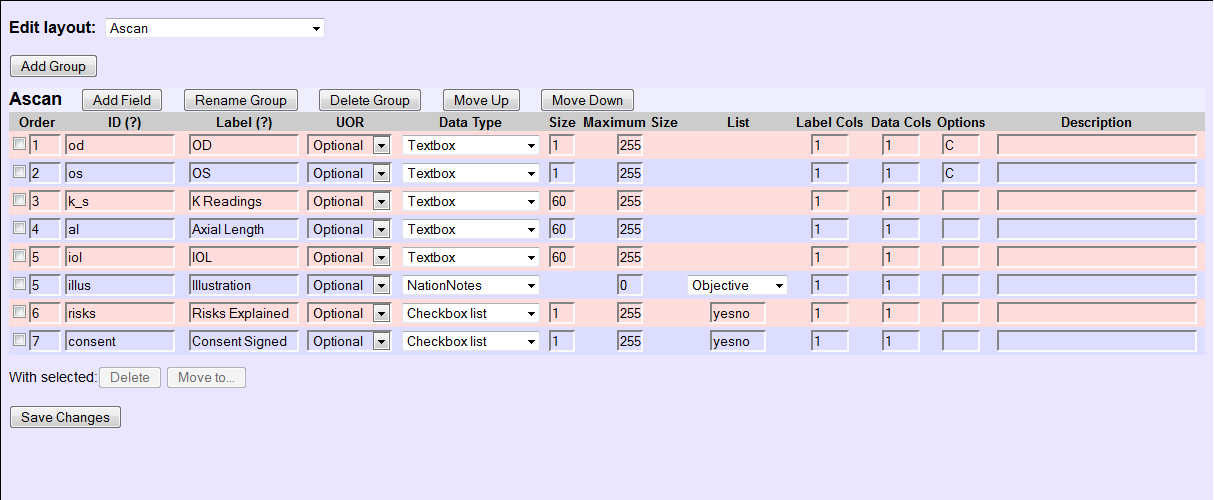
This form is used for the measurement of the Intra-ocular Lens to be implanted during Cataract Extraction. A NationNote was added for the scanned A-scan print-out.
Layout
PRE-OPERATIVE EXAM
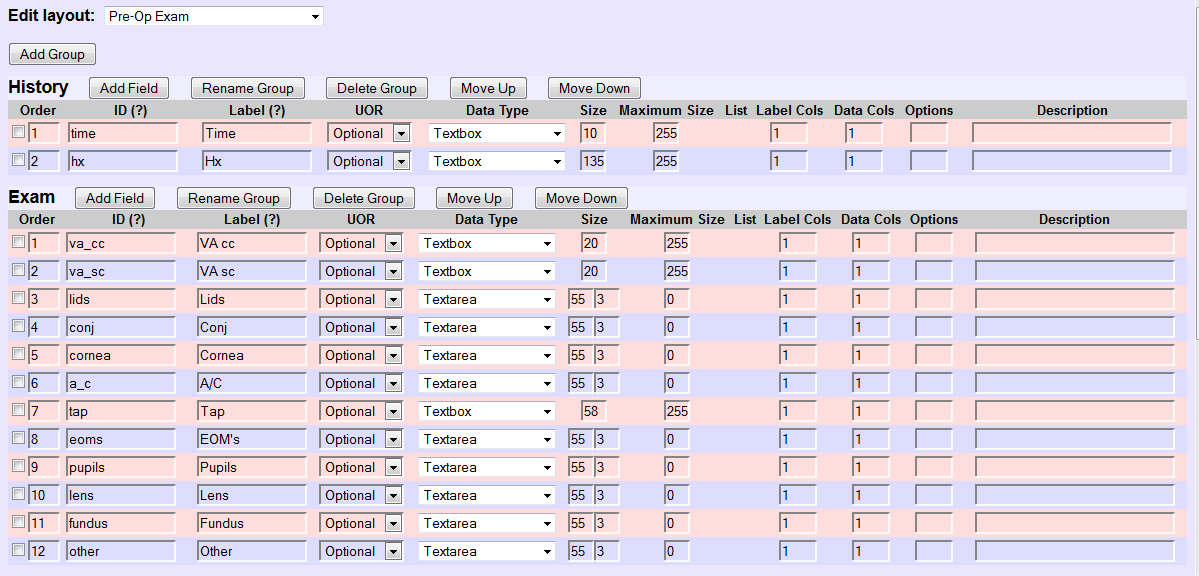
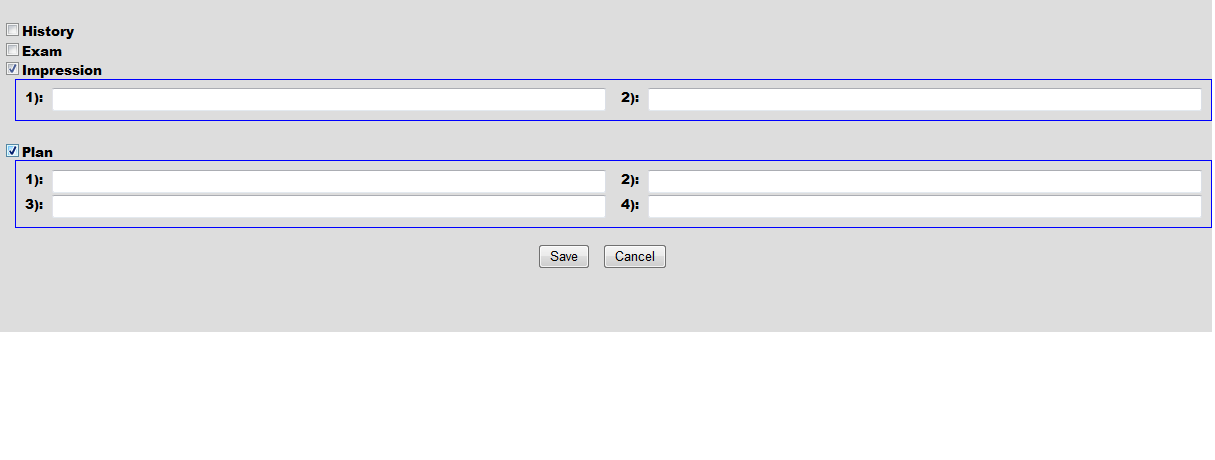
This form has 4 subsections: History, Exam, Impression and Plan.
History and Exam
Layout
Impression and Plan
Layout
POST-OPERATIVE EXAM
There are also 4 subsections in this form, namely, History, Exam, Impression and Plan.
History and Exam
A NationNote had been included for an unusual finding that cannot be described adequately in words alone and where a hand drawing or a photograph contributes to a better understanding of the clinical finding.
Layout
Impression and Plan
Layout
COMPREHENSIVE OPHTHALMIC EXAM FOR THE NON-TYPIST
This form is analogous to the Comprehensive Ophthalmic Exam above.
History
Form and Components
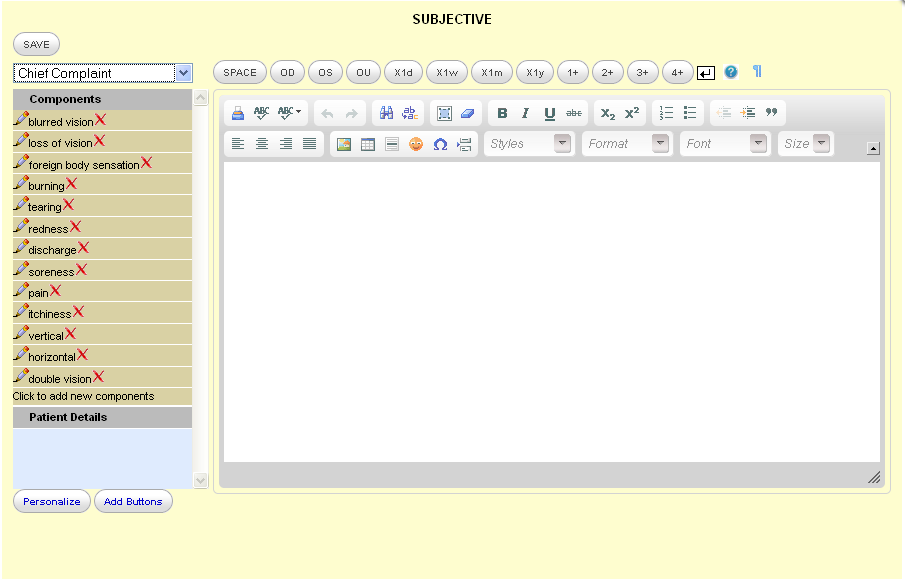
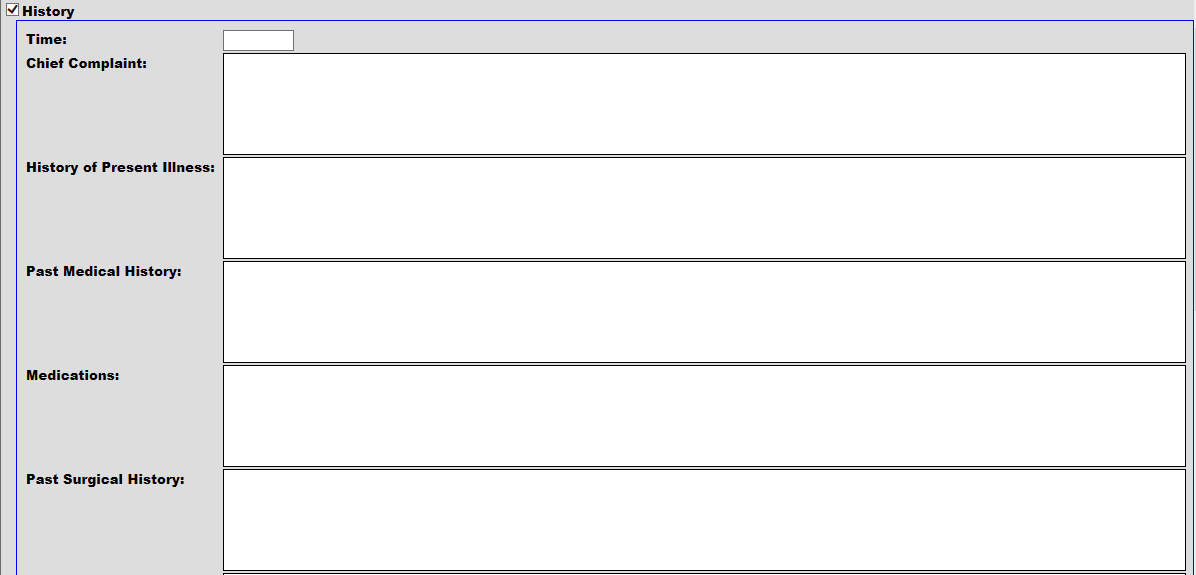
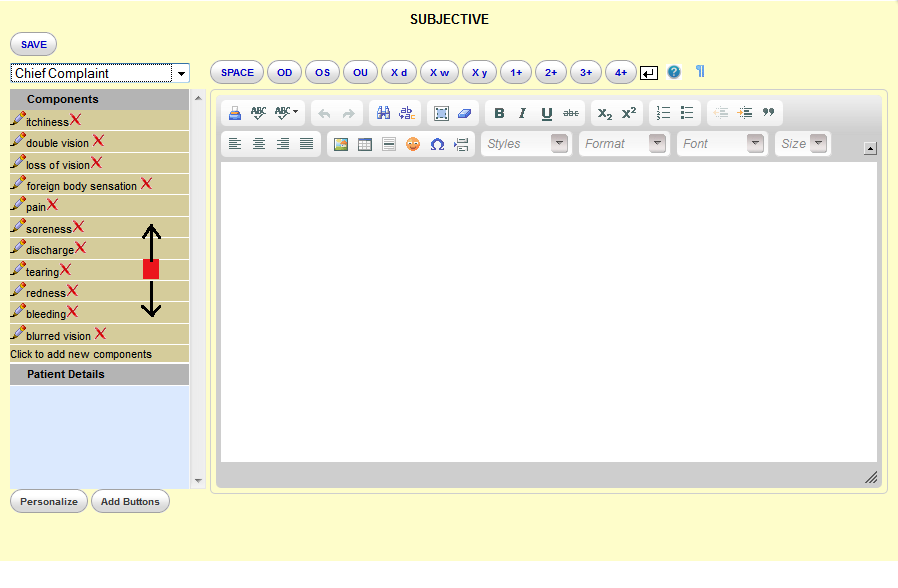
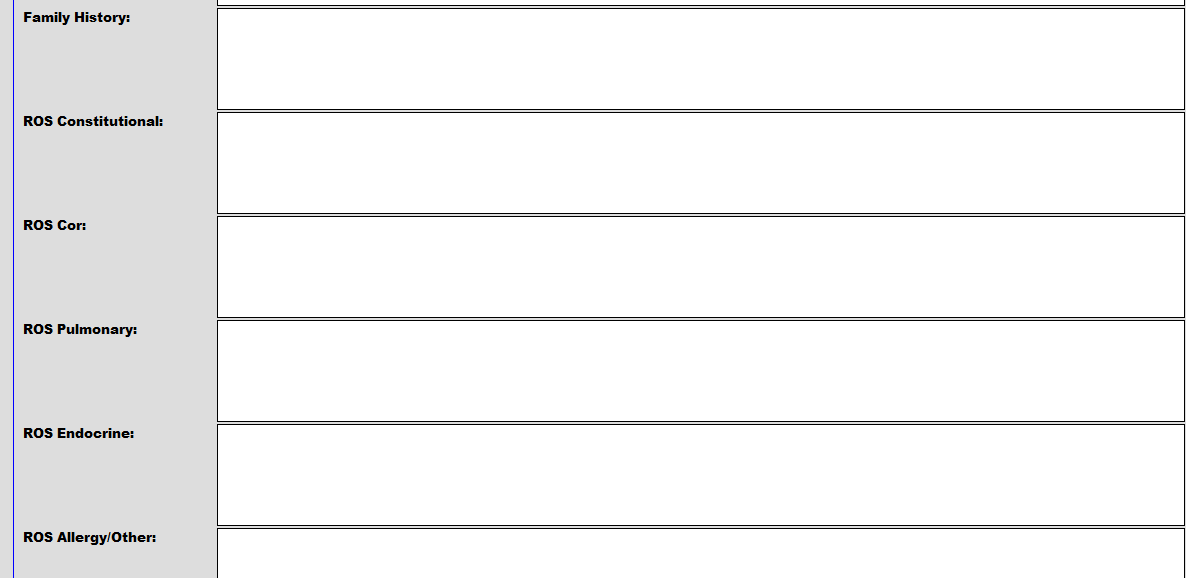
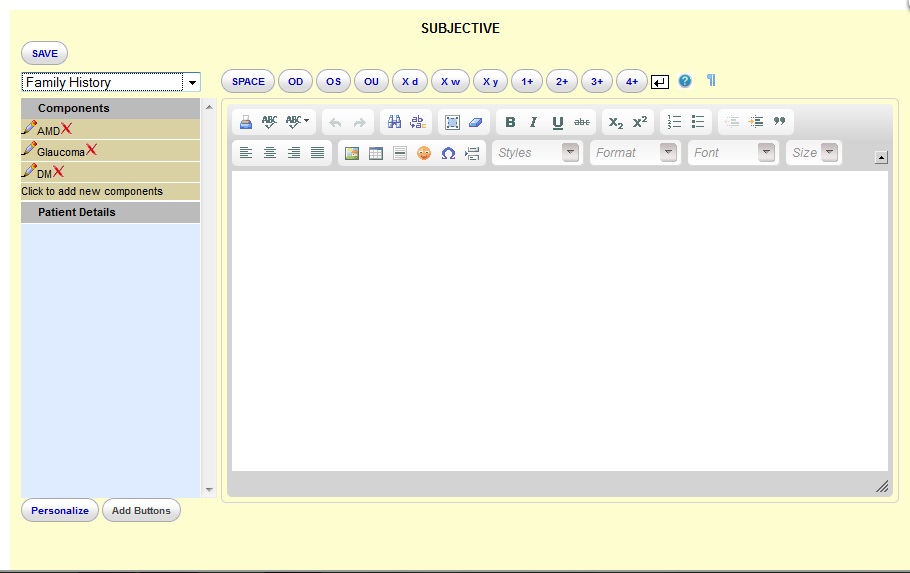
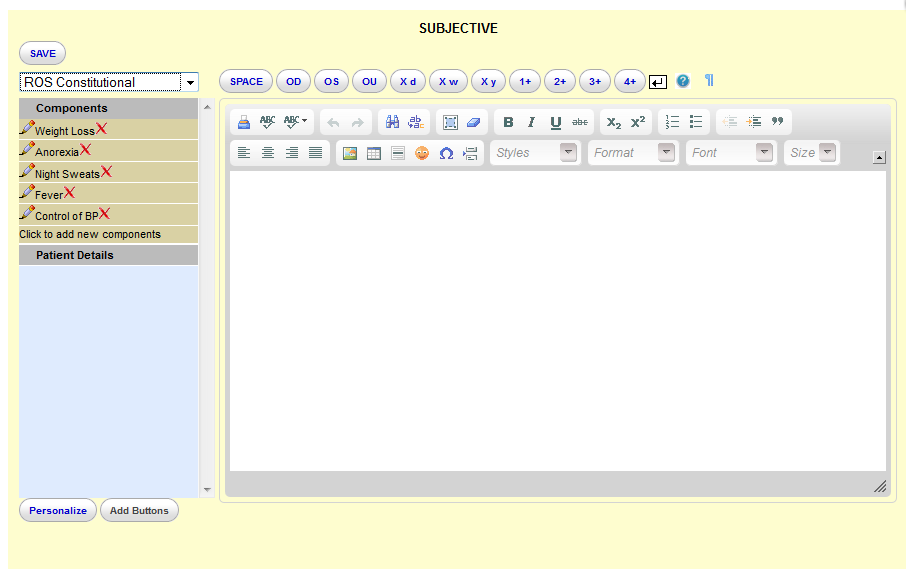
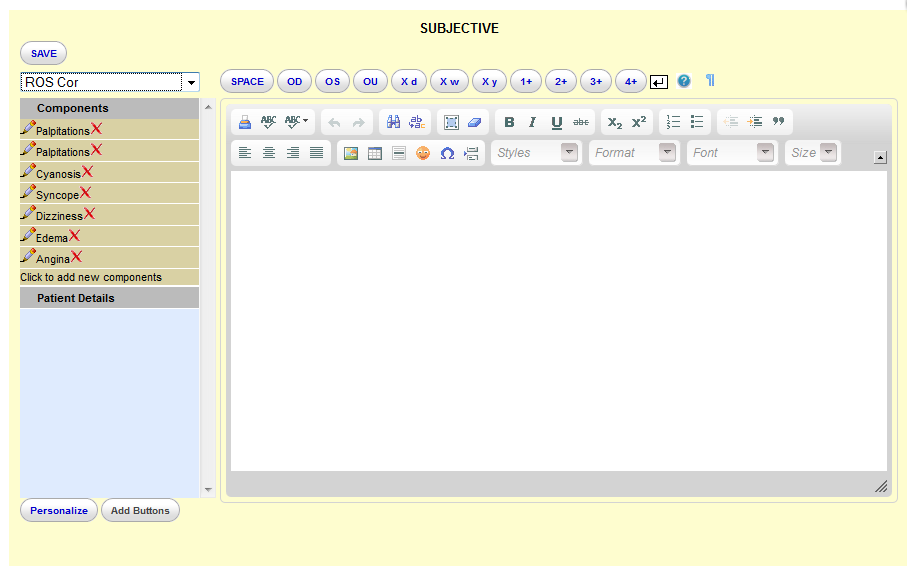
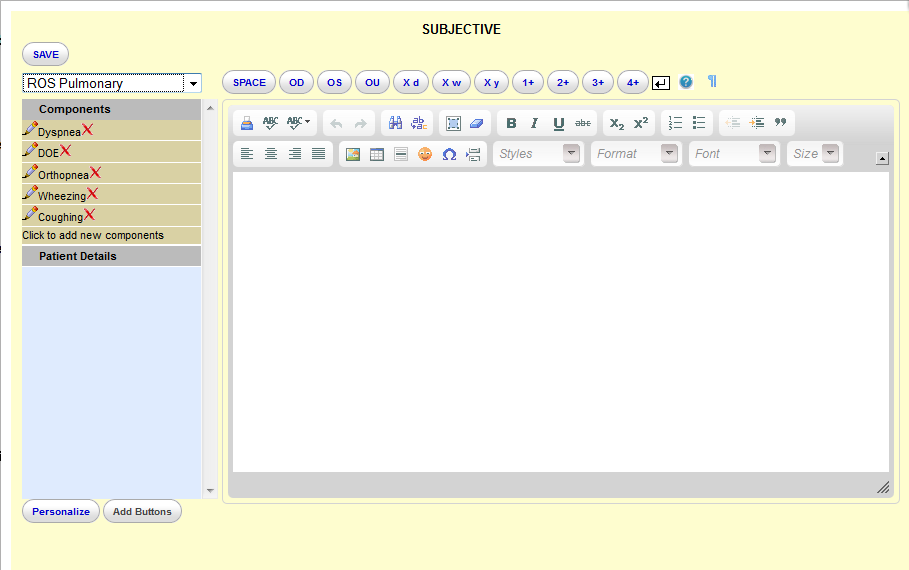
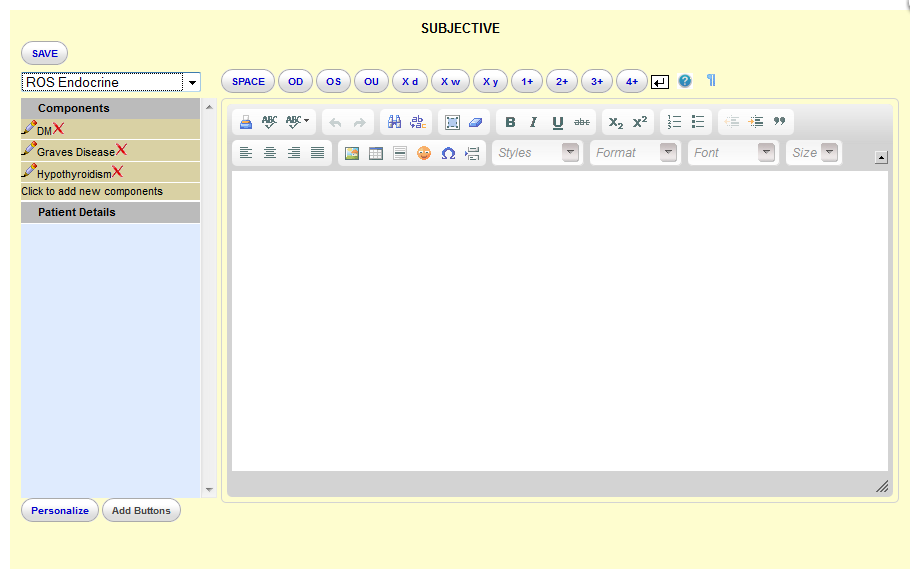
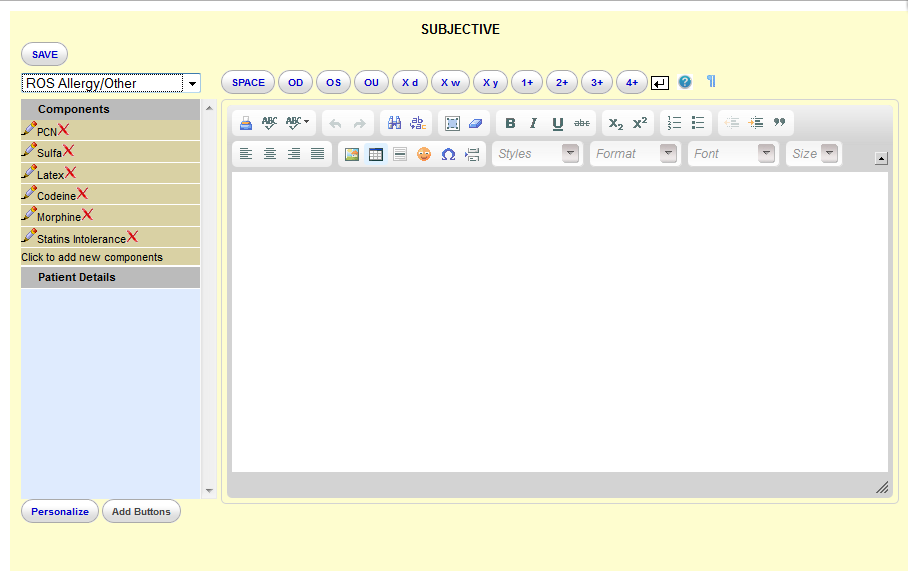
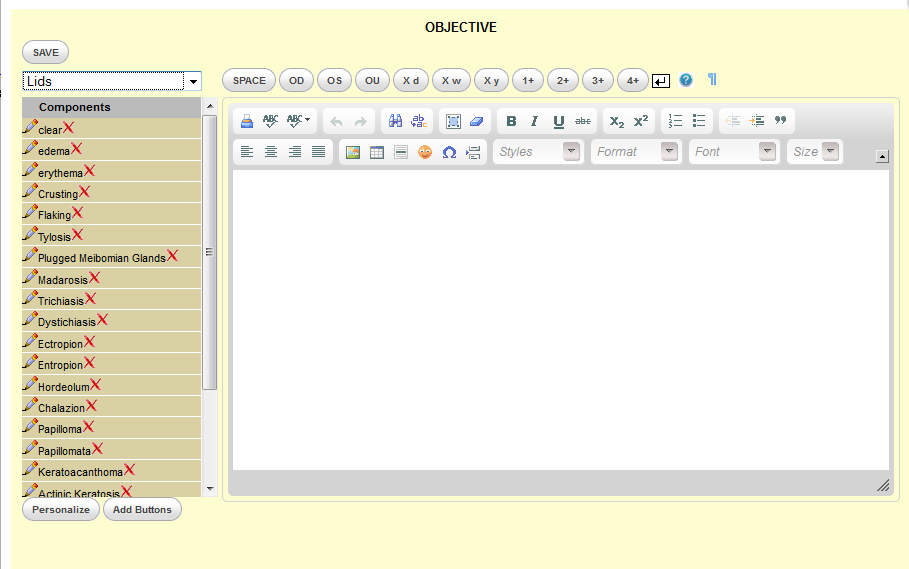
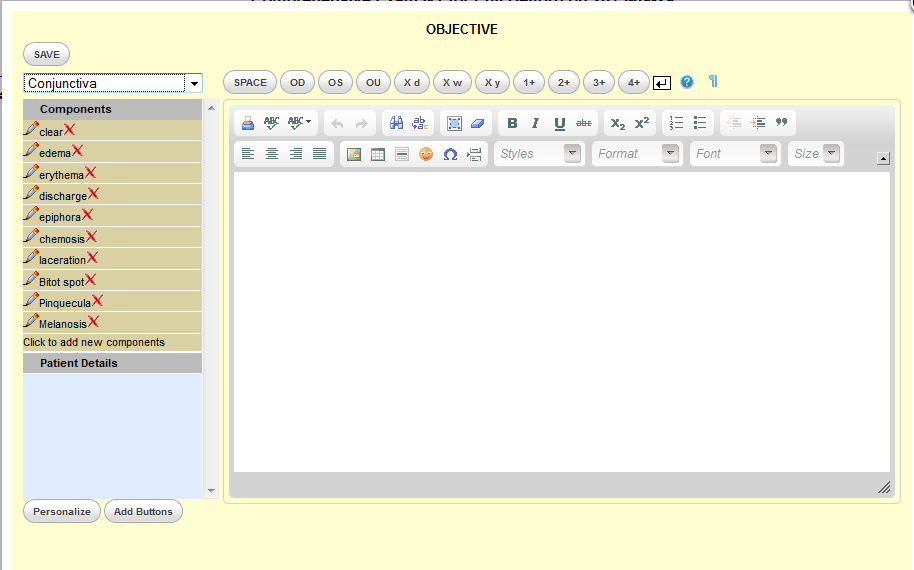
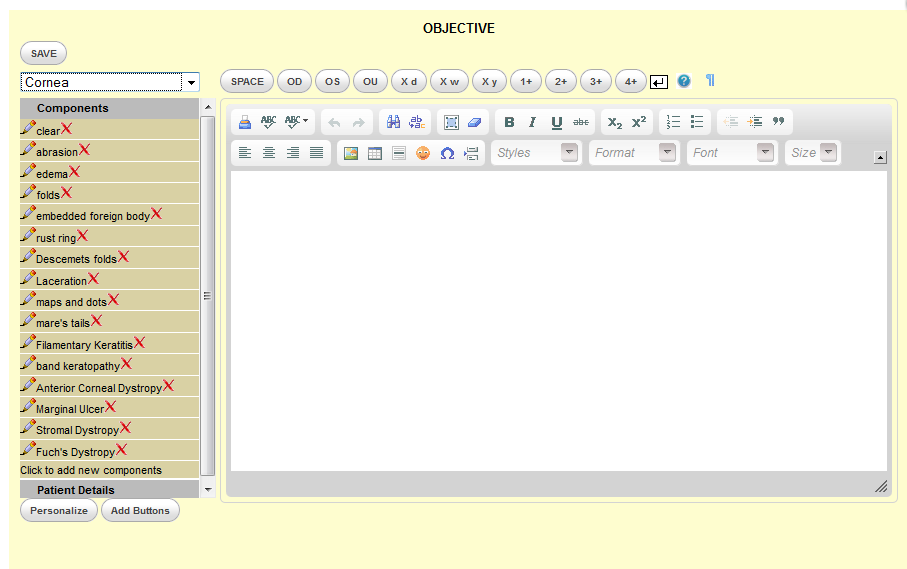
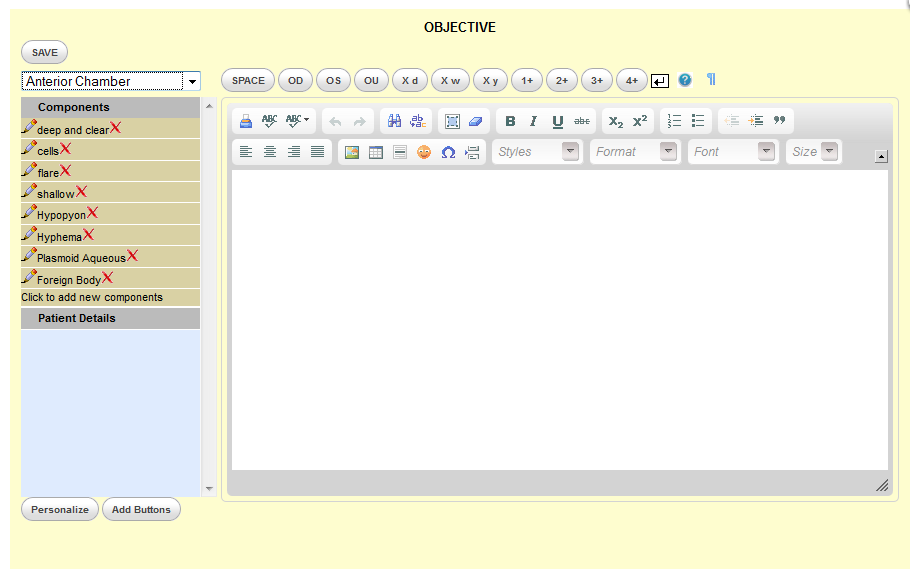
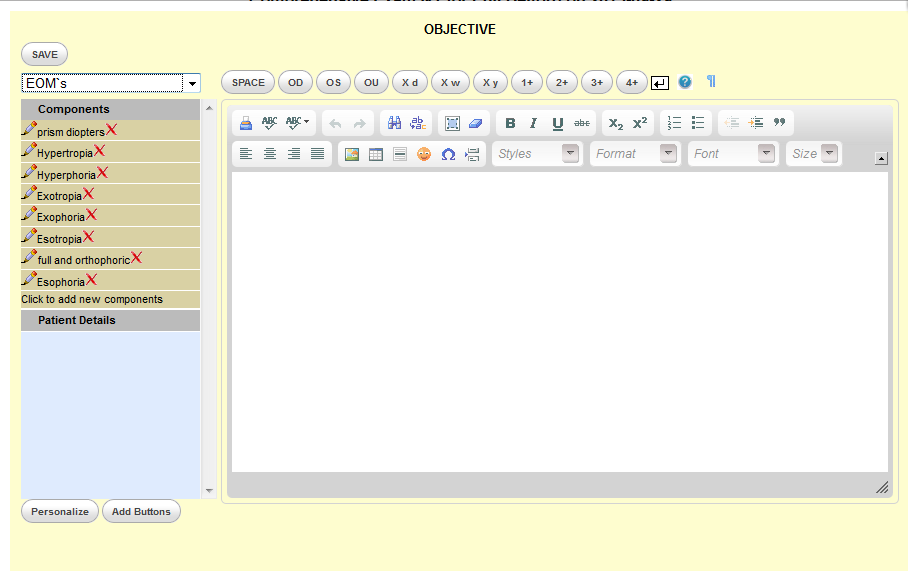
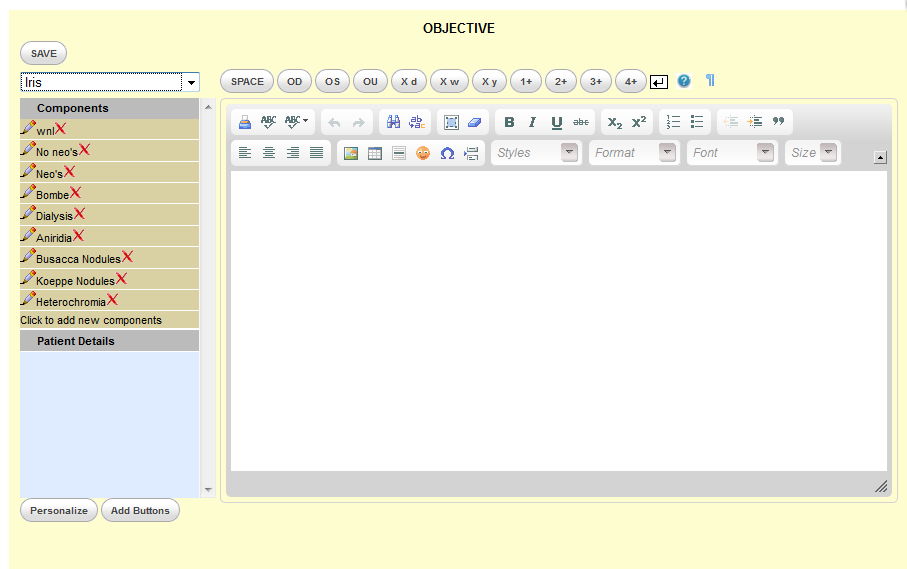
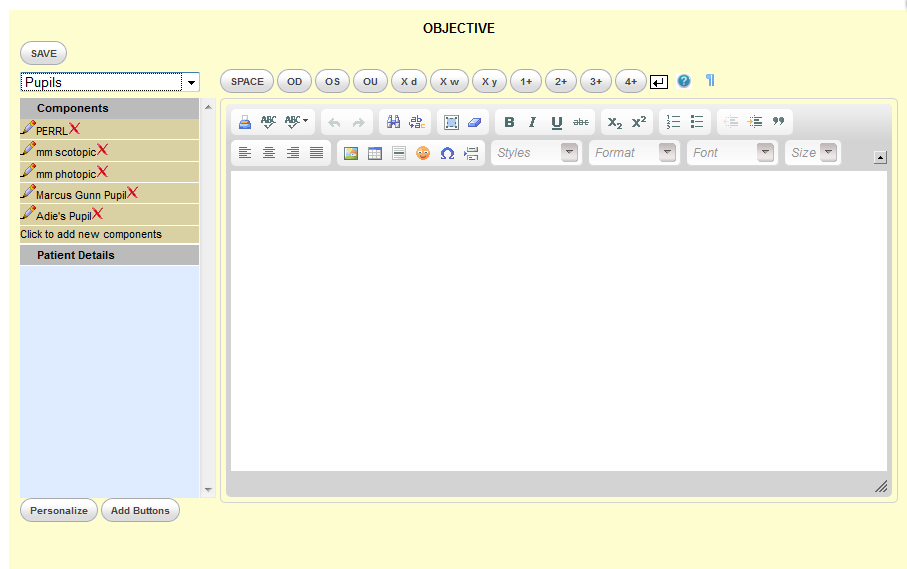
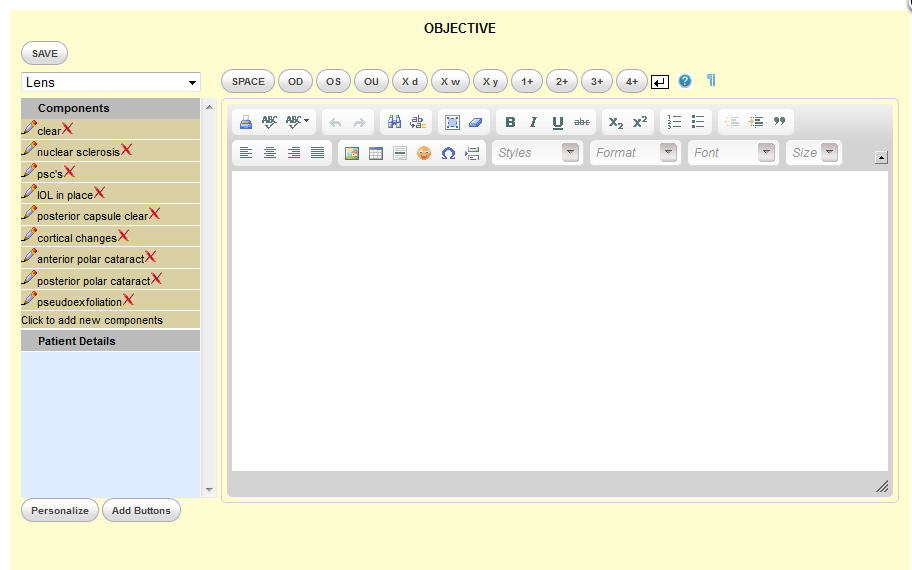
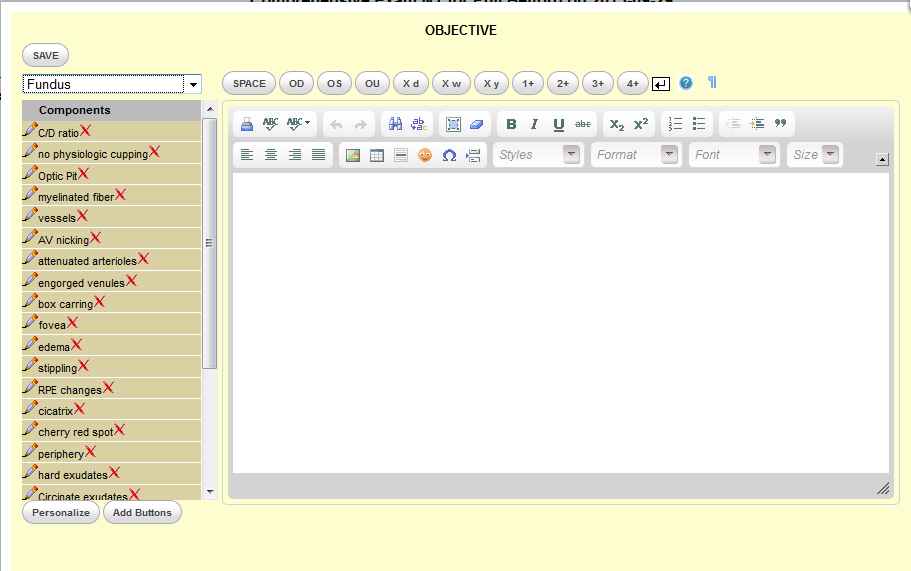
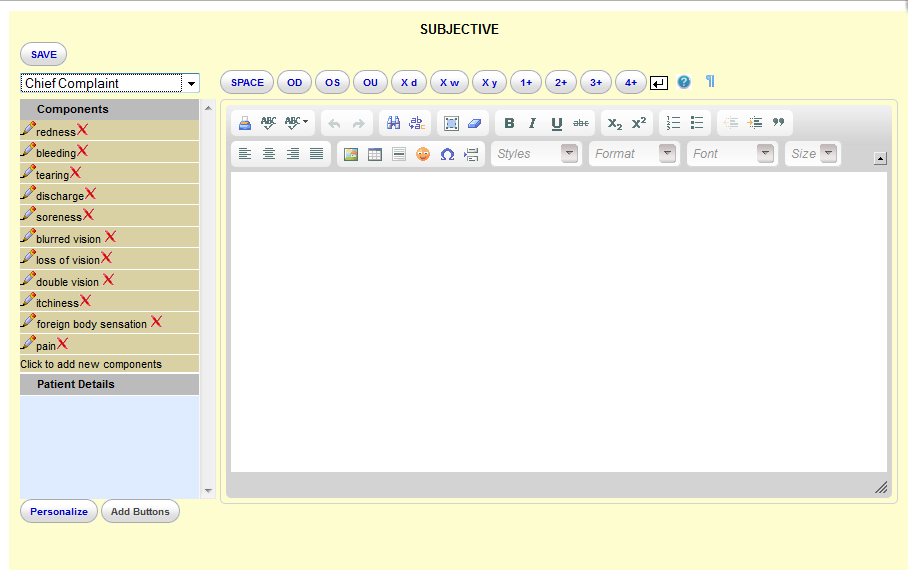
With exception of the field for the time, the other fields are constructed with NationNotes and stock phrases or Components. Clicking one of these phrases will transfer it into the body of the WYSIWYG editor. Editing of the Components is quite simple as well as their addition or deletion. Free text can be entered in the body of the editor.
Building the Sample NationNotes Form and this video tutorial are two great resources to understanding the many features of this editor.
Components are the raison d'être for these NationNotes.
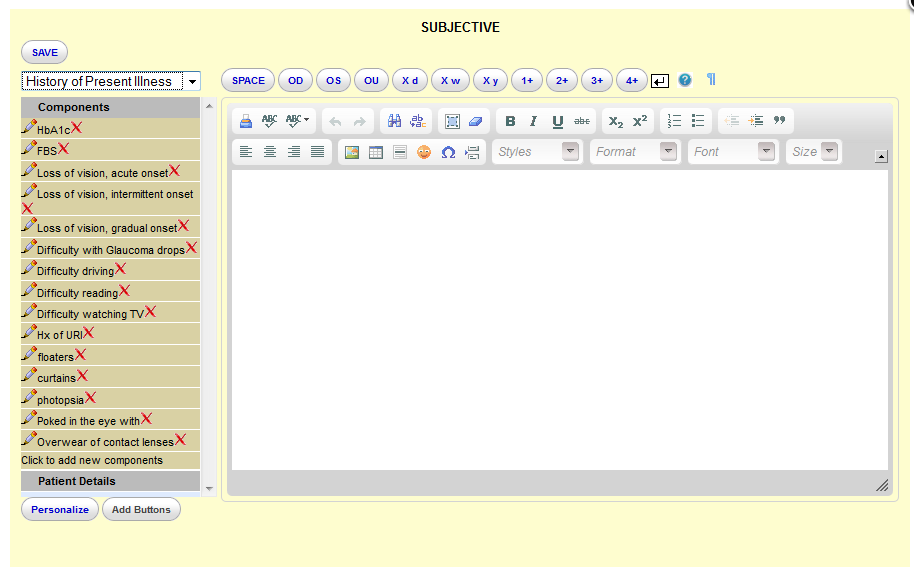
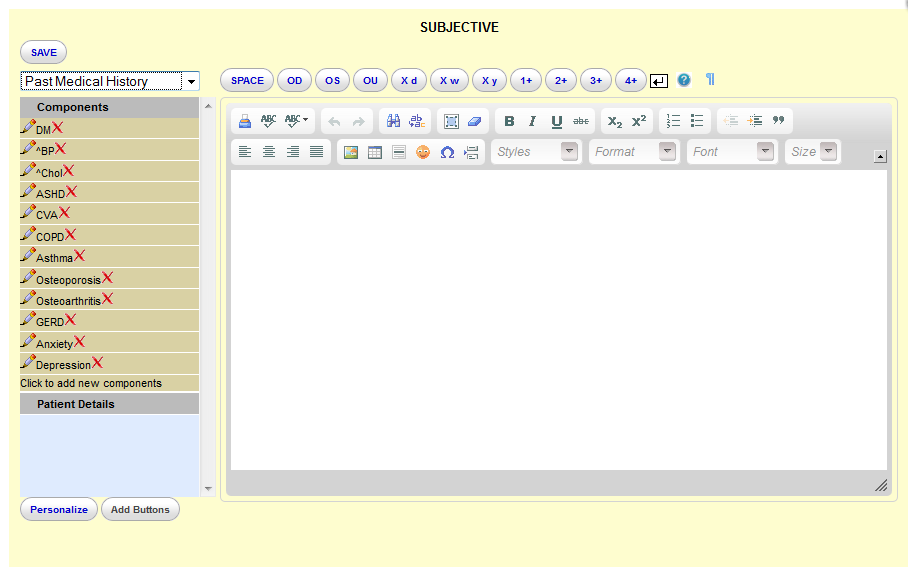
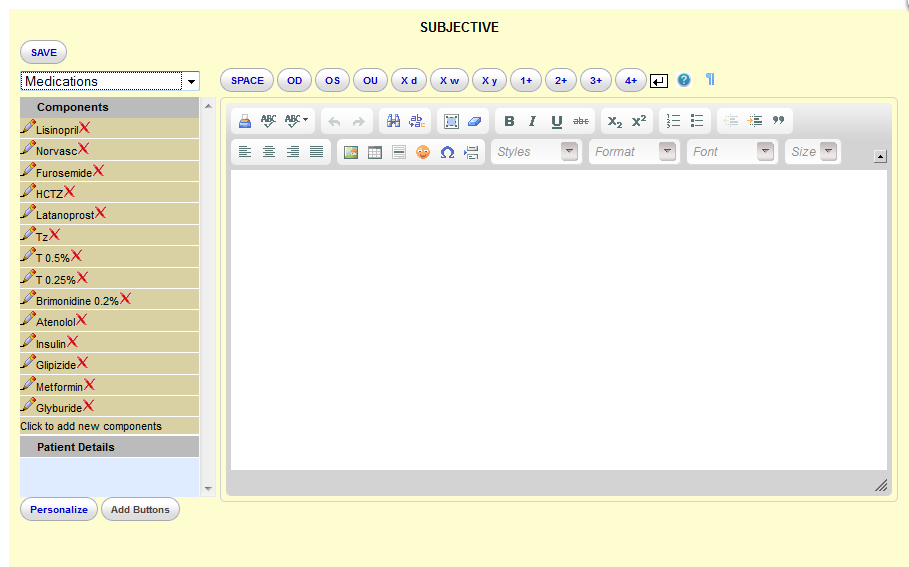
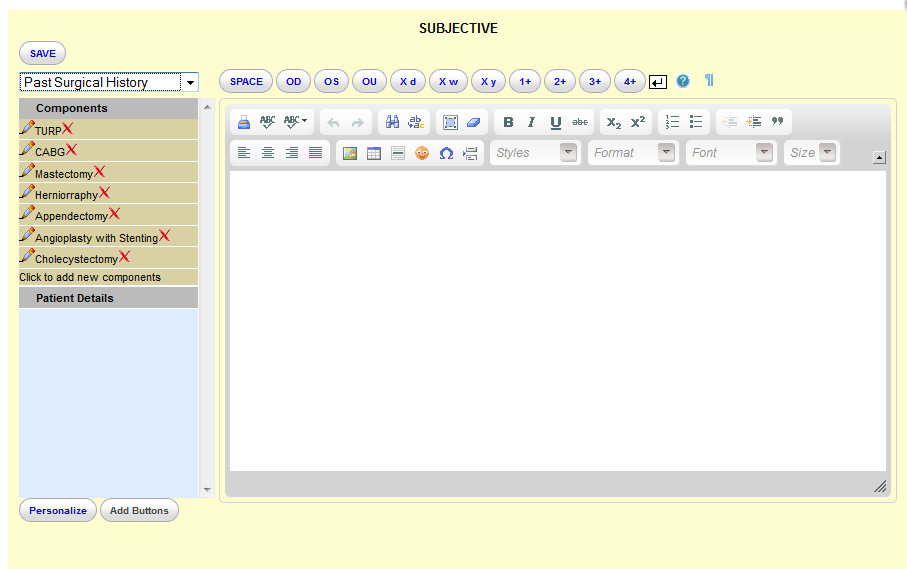
The Components can be re-ordered using Drag and Drop. To prevent the Component from appearing in the editor, stay within the non-text area (background).
Layout
Exam
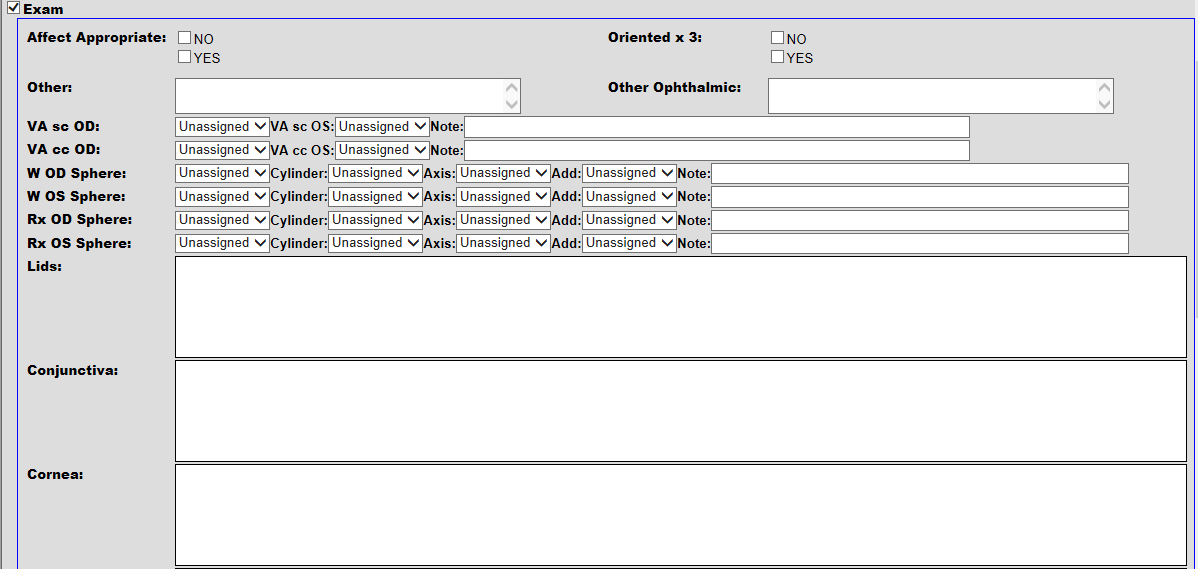
The Visual Acuities, old prescription and the Refraction were constructed with Listboxes and drop down menus. Notes were included for entries such as contact lens correction, pinhole, and built-in prisms.
Form and Components
Layout
Impression and Plan
Both these sections are identical to that in the Comprehensive Ophthalmic Exam above, hence no screenshots were provided.
OTHER NON-TYPIST FORMS
Other forms requiring minimal typing can be constructed with portions of the the last form in this article.
SHORTCUT
That wasn't so bad, was it? This exercise requires patience and perseverance, not a ton of heavy duty cogitation. Now that you know how to construct a Layout Based Visit Form, go roll your own and impress your friends!
Import
If your friends are well acquainted with your many fine attributes and there is no need to impress them, the NT Eye form with the Components and Lists and the 8 Eye forms can be imported with the files listed below:
Try it on a test copy of OpenEMR before touching your own data.
Backup all your data before importing!
The importation of the Non-Typist Comprehensive Exam must be done in the exact order given below; otherwise the form will be missing Components and Lists. Strict adherence to the protocol below ensures a properly functioning form.
The Components, then the Lists followed by the Non-Typist form will be imported. The last importation will be for the other eight Ophthalmic forms.
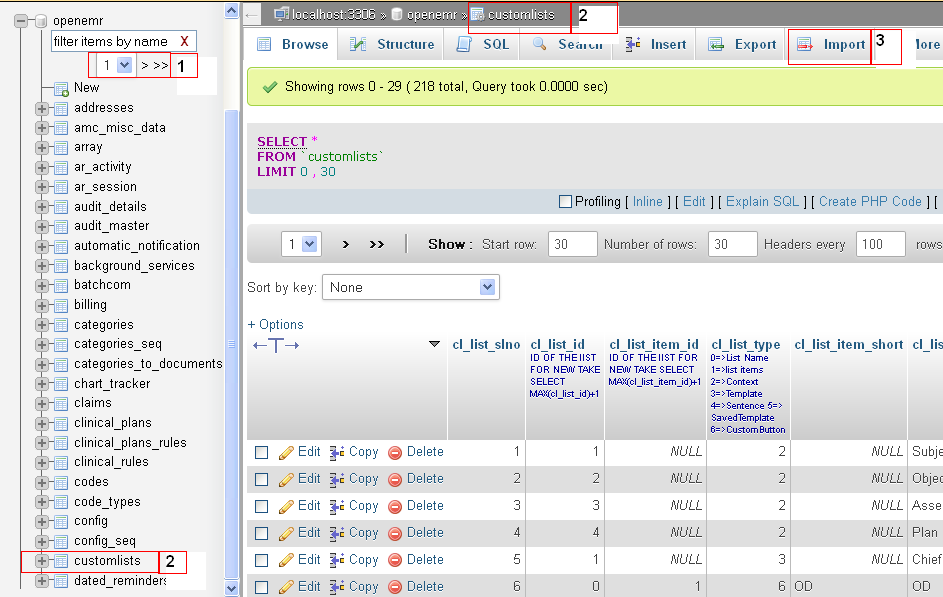
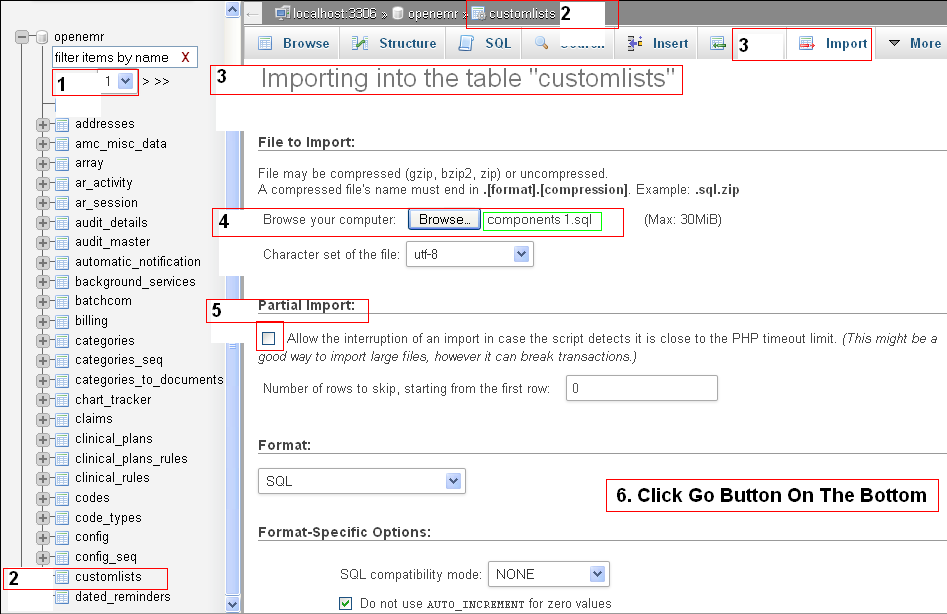
Go to Administration->Other->Database->page 1->customlists. Click the Import tab. Click the Browse button and choose the components file. Uncheck the Partial Import box and click Go.
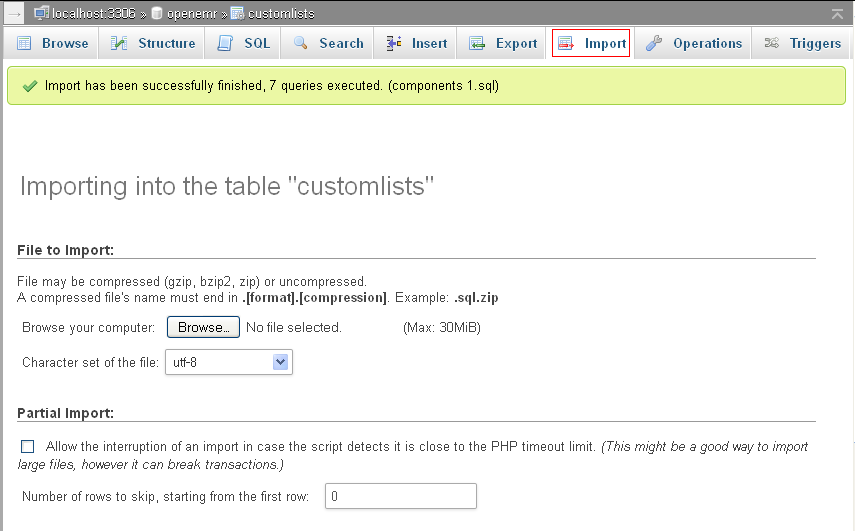
If there is an apple green banner, it will tell you that the import was successful.
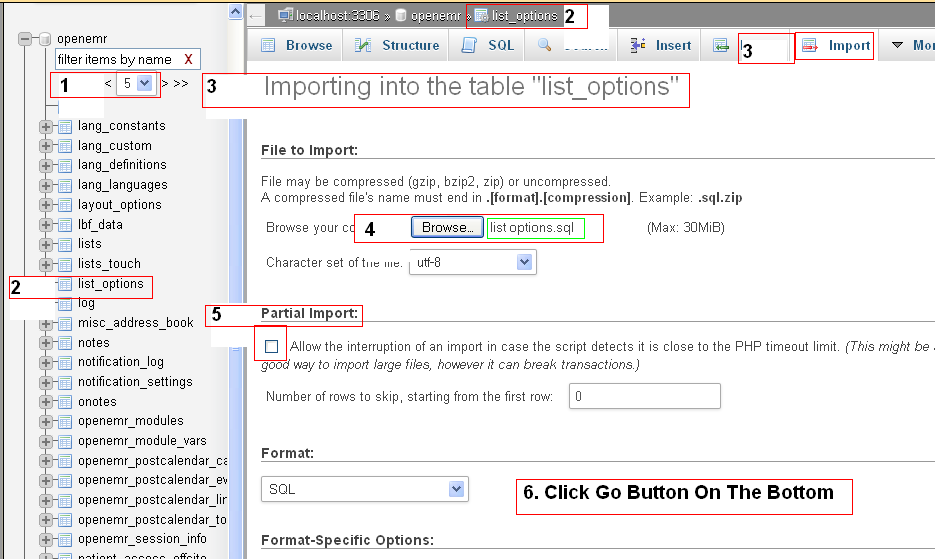
Next go->page 5->list_options. Click the Import tab. Click the Browse button and choose the list options file. Uncheck the Partial Import box and click Go. The green banner should appear again.
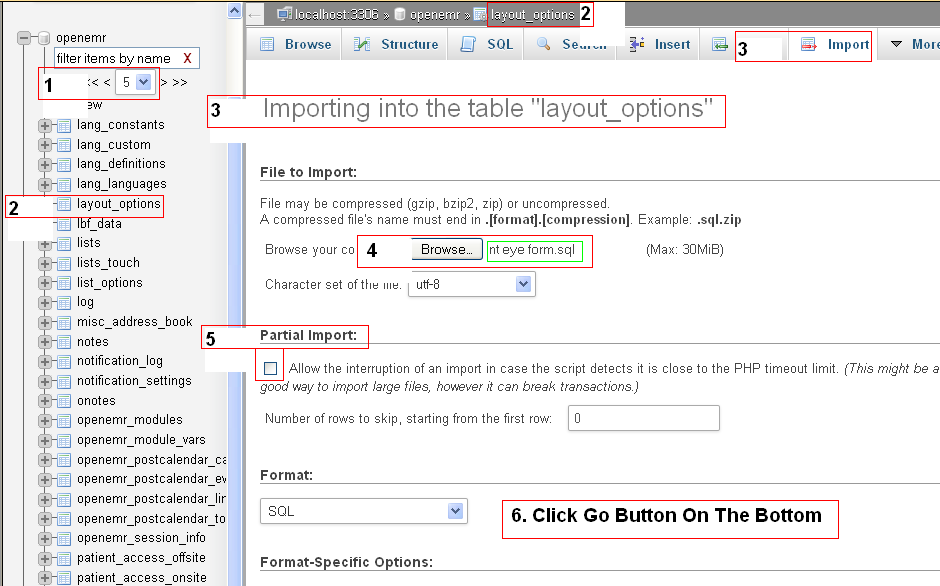
Now it is time to import the Non-Typist form. Stay on page 5->layout_options. Click the Import tab. Click the Browse button and choose the nt eye form file. Uncheck the Partial Import box and click go. Look for the green banner again.
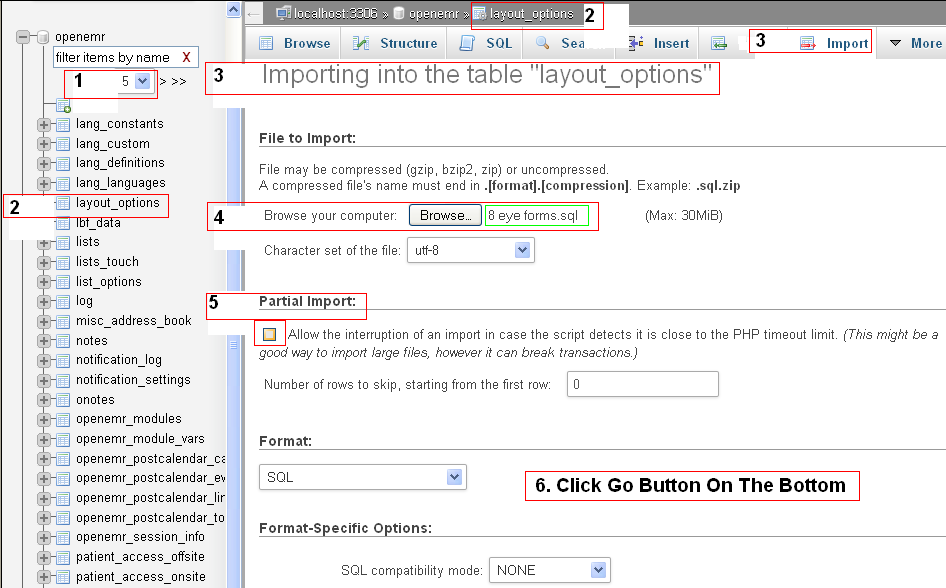
Finally we will import the 8 Ophthalmic forms. Remain on page 5 and in layout_options. Click the Import tab. Click the Browse button and choose the 8 eye forms file. Uncheck the Partial Import box and click Go. Four green banners of success. Kudos to you!
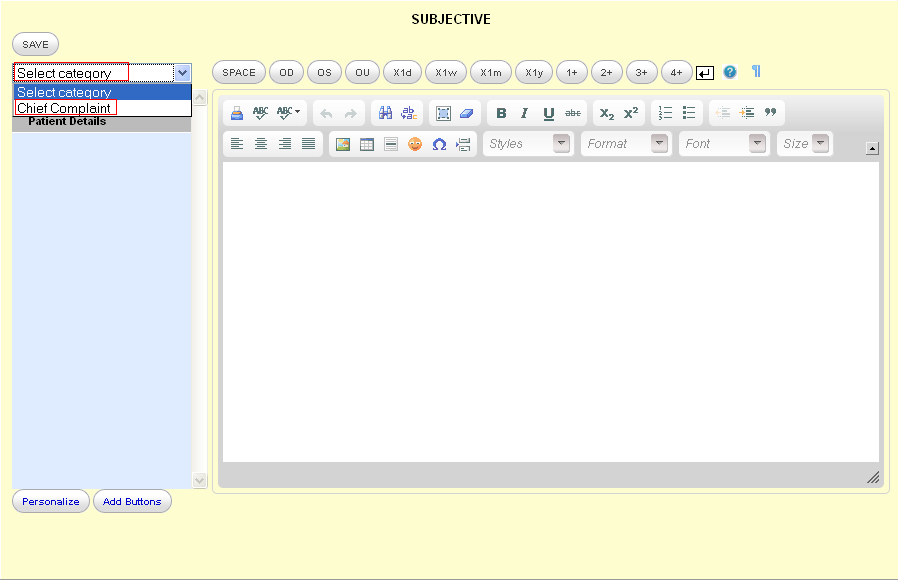
The result of the importation should render 9 Ophthalmic forms, 20 sets of Components and 6 sets of Lists. Go to the Layout Based tab of the encounter, click the desired form and record your History and Physical.
Missing Custom Buttons and Components
If the Custom Buttons are missing, they will have to be rebuilt by clicking Add Buttons and using this dialog.
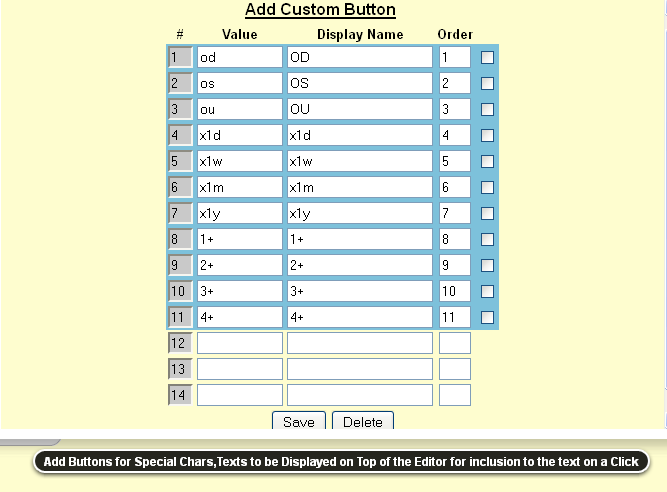
If the Components don't appear automatically, they need to be coaxed into appearing. Go to the NT form, click each field to bring up the WYSIWYG editor and click Personalize on the bottom left. Rebuild the Custom Buttons before working on the Components. If the Components have been brought back into view, adding Custom Buttons will cause them to go into hiding again, therefore do the Custom Buttons first.
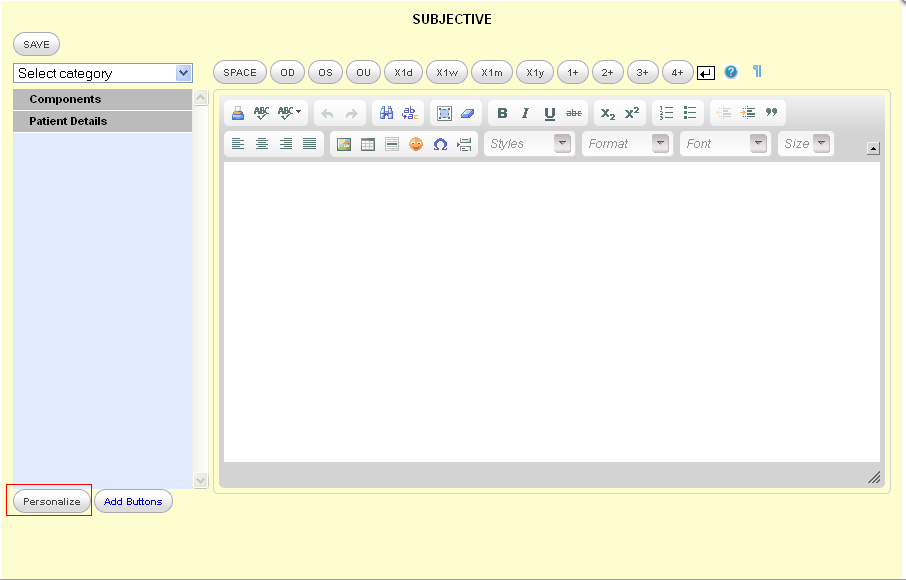
Move the desired Category to the box on the right and Save.
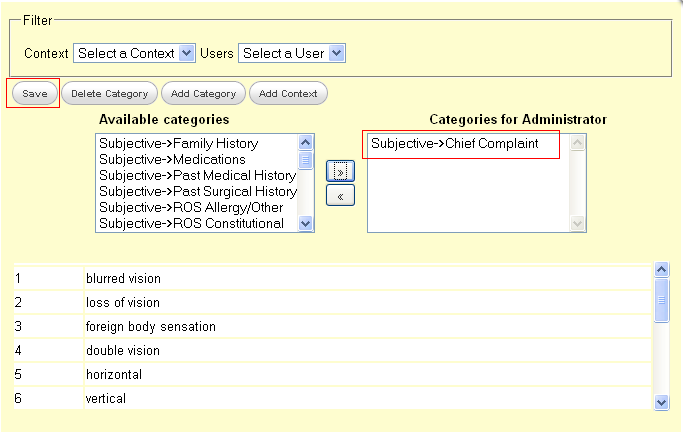
Exit both the dialog box and the editor. Go back to the field, bring up the editor again to ensure that the Components are present by clicking Select Category and the specific item.
