Difference between revisions of "Using the Sample NationNotes Form"
m (→Write a NationNotes Note: fiddling pics) |
m (→Toolbar icons: fiddling layout) |
||
| Line 57: | Line 57: | ||
== Toolbar icons == | == Toolbar icons == | ||
[[File:Nn-tb-00-toolbar.png]] | [[File:Nn-tb-00-toolbar.png|center]] | ||
''' Editing Tools''' | ''' Editing Tools''' | ||
| Line 64: | Line 64: | ||
[[File:Nn-tb-01.png]] | [[File:Nn-tb-01.png]] | ||
:Print, Spell Check, SCAYT (Spell Check As You Type; needs one-time config). | |||
[[File:Nn-tb-02.png]] | [[File:Nn-tb-02.png]] | ||
:Undo, Redo | |||
:Search, Replace | |||
:Select All - equivalent to Ctrl+a; highlights all content in the note | |||
::Eraser - removes all formatting from any highlighted materials | |||
[[File:Nn-tb-05.png]] | [[File:Nn-tb-05.png]] | ||
:"Image" - intended to insert an image file, the code behind this tool is problematic; use the workaround described below. | |||
:Table - inserts a table with the ability to set the basic parameters | |||
:Horizontal line - inserts horizontal line | |||
:Insert special character - shows table of most of the usual alphanumeric, computer and Western European special characters | |||
:Page break - advance to next page, when printing. | |||
| Line 95: | Line 87: | ||
[[File:Nn-tb-06.png]] | [[File:Nn-tb-06.png]] | ||
:Bold, Italic, Underline, Strikethrough | |||
:Sub/ Superscripts | |||
:Numbered/ Bulleted list | |||
:Increase/ decrease indent, block quote | |||
[[File:Nn-tb-07.png]] | [[File:Nn-tb-07.png]] | ||
:Alignment, styles, format, font, size | |||
== Program A Special Character Button == | == Program A Special Character Button == | ||
Revision as of 06:18, 12 September 2013
Part 3, Using the Sample NationNotes LBV Form
- All custom configurations of the WYSIWYG editor (adding Components, Buttons, Personalizing the editor) may be done at any time. However, the editor must be restarted before they take effect.
Write a NationNotes Note
1. Start an encounter with a patient
2. Select LBV Form "DetoxAdmit" from left Navigation Menu or "Layout Based" tab in encounter frame
3. Click in "Nsg Admit Note" NationNotes field
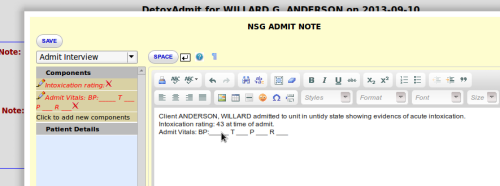
4. In the WYSIWYG editor, at top left dropdown list, Select Category, "Admit Interview"
- The Components which have been configured for Nursing Notes are now available
5. Type note in editor
- Optionally, click on individual Components to insert content to note
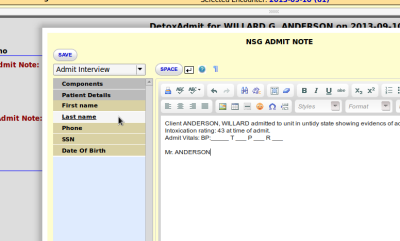
- Optionally, click on Patient Details to add patient data to the note
6. Apply formatting, special characters etc as desired using toolbar icons
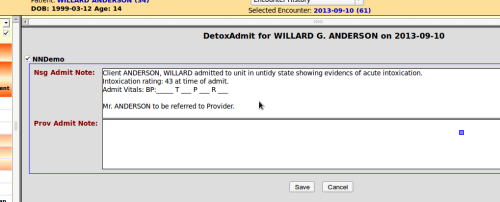
7. Click "Save" button at top left to transfer the content of the editor to the corresponding NN field on the LBV form.
- The LBV form is then used in the normal fashion.
- To change the contents of a saved NN field, evoke the WYSIWYG editor by clicking inside the NN field.
Toolbar icons
Editing Tools
These tools perform the indicated functions in the customary manner.
- Print, Spell Check, SCAYT (Spell Check As You Type; needs one-time config).
- Undo, Redo
- Search, Replace
- Select All - equivalent to Ctrl+a; highlights all content in the note
- Eraser - removes all formatting from any highlighted materials
- "Image" - intended to insert an image file, the code behind this tool is problematic; use the workaround described below.
- Table - inserts a table with the ability to set the basic parameters
- Horizontal line - inserts horizontal line
- Insert special character - shows table of most of the usual alphanumeric, computer and Western European special characters
- Page break - advance to next page, when printing.
Formatting Tools
These tools perform the indicated functions in the customary manner: highlight the text to be affected then click the icon.
- Bold, Italic, Underline, Strikethrough
- Sub/ Superscripts
- Numbered/ Bulleted list
- Increase/ decrease indent, block quote
- Alignment, styles, format, font, size
Program A Special Character Button
[sshot nn-tb-08]
2. Click button "Add Buttons" to invoke "Add Custom Button" panel
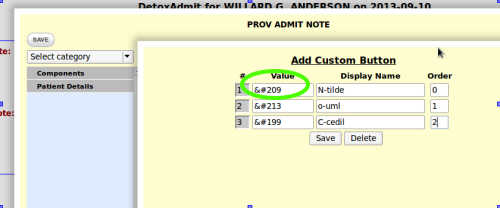 3. Enter html code ot
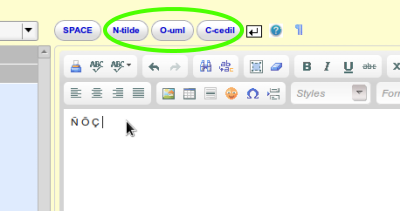
- New buttons will be lined up along the top of the WYSIWYG editor between the "Space" button and the "Enter Key" icon
- Their order is determined by the Order value in the Add Custom Button dialog, numbered from 0 (zero).
- This function provides the same characters as the "Special Characters" toolbar button.
- Buttons remain in the editor for use in any OpenEMR NationNote field.
- Accepts html codes for special characters, or plain text.
- "Value" = html code or text
- html = ascii code with &# added to front. Doesn't handle Extended ASCII
- plain text is limited to 10 chars.
- link to the code snippet to extend the str$ len
- "Display Name" = label text in the custom button.
[sshot nn-tb-09]
Embed Image in NationNote
- The embedded image function accessed from the toolbar icon does not perform as advertized. Use this workaround.
1. Obtain a graphic and upload it to OpenEMR client computer
2. Open the picture with any graphics application capable of copy/ paste operation
- For MS Windows, Paint is suitable
- For Linux (Ubuntu/ Mint etc), Pinta or the Gimp
3. Edit/ resize picture if desired
4. Copy/paste image from graphics editor directly into the WYSIWYG editor.
- Templates can only be shared from Available Categories to the user who is logged in, not from the logged in user to
another user.
1. Log into OpenEMR
2. Open new encounter with any patient
3. Open a LBV form that has a NationNotes field in it
4. Click in the NN field to activate the WYSIWYG Editor
5. Click "Personalize" button to open an unnamed panel which has two Category text areas in its lower portion.
6. Click on each of the Available Categories to see the Components each one contains.
[sshot nn-13-availCats]
7. With the desired Category selected, click the ">>" button to share it with the current user.
8. Click "Save" button.
[sshot nn-14]
9. Click black X to close the panel
10. Reopen editor, select Category and see shared Templates
[sshot nn-15]
Delete a NationNotes field
A NationNotes field may be removed from a LBV form simply by changing its data type in the Edit Layout screen. This simply produces a different object on the LBV form, with the same label and parameters (except for size values) as the former NN field.
If the data type of the field is changed back to NationNotes then it may be reassigned to its former List (Context).
All Categories and Components that have been configured for all NationNotes Contexts are stored in the database table "customlists". They may be permenently deleted by removing them from that table. This is PERMANENT and irreversable so be sure you know it's what you want to do.
1. On Left Navigation Menu: Administration/ Other/ Database
2. In table list in left database window click link on table named "customlists"
3. In right hand window displaying the table, click tab "Browse"
[sshot]
- Column, "cl_list_item_long" displays the user defined names of the list items.
- Column, "cl_list_type" which explains the type of objects contained in the table.
- 2 = Context
- 3 = Template (aka Category)
- 4 = Sentence (aka Component)
- 6 = CustomButton
[sshot nn-17]
4. Click in left column checkboxes to select the desired list item(s) to delete
5. At bottom of table, click red X in line, "With all Selected:" [sshot nn-18]
6. Click button "Yes" or "NO" when panel appears containing list items selected for deletion, asking "Do you really want to", [sshot nn-19]
