ClaimRev Clearinghouse Module
ClaimRev Clearinghouse Module
Overview
- This module provides these features:
- Eligibility
- On the patient dashboard is an option to check eligibility for a patient. The detailed results are returned there. What comes back is payer specific but normally will include deductibles and other benefit information .
- Real-time Eligibility
- When an appointment is created, an eligibility request is sent to the clearinghouse. A detailed response is presented on the patient dashboard that lets you know if coverage is found.
- Claim Processing
- Claims can be sent from the billing manager to the clearinghouse. The module currently will download the response files of 999 and 277 and save them to the proper directories.
- Claim search screen is available with-in the module to quickly check status of claims in the processing system.
- Eligibility
Sign Up
Contact
Brad Sharp
Website
Phone
Configure Module
Register the module
- On the top menu click "Modules->Manage Modules"
- Click on the Unregistered button and look for ClaimRev Clearinghouse Connector
- Click "Register" on the far right
- Click on the Unregistered button and look for ClaimRev Clearinghouse Connector
Install the module
- Click on the Registered button and look for ClaimRev Clearinghouse Connector
- Click Install then Enable on the far right
Setup Globals
- On the top menu click "Admin->Config". On the right you should now see the option ClaimRev Connect
- In the ClaimRev Connect option you now have several options
- ClaimRev Environment -> This should be set to P
- Client ID -> This available in the ClaimRev Portal under the menu option "Client Connect"
- ClaimRev Client Secret -> This available in the ClaimRev Portal under the menu option "Client Connect"
- X12 Partner Name -> This defaults to ClaimRev and we will discuss the details of this later
- Eligibility Service Type Codes -> This is a comma delimited list of service type codes for eligibility checks. This list defaults to 30 which means Health Benefit Plan Coverage to see other options visit the link https://x12.org/codes/service-type-codes.
NOTE: Not all payers will accept all possible codes. - Auto Send Claim Files -> When checked, the module will send claim files to ClaimRev
- Add module menu item -> This needs to be checked and the menu option will appear in the top menu under "Modules". You must log out and back in of OpenEMR to to see this take affect.
- Add ClaimRev Eligibility Card To Patient Dashboard -> This places the eligibility card on the patient dashboard so that viewed and checked.
- Use Facility for Eligibility -> This uses the facility record when sending eligibility checks, when not checked the provider record is used instead.
- Turn on Real-Time Eligibility -> This will watch for new appointments, and when a new appointment is created the eligibility check is created for that appointment. The results are displayed in the patient dashboard.
- Eligibility Age To Stale -> Recommended value is 30, which would mean that if eligibility was checked 25 days ago and the patient is back again, then eligibility will not be checked. However, if it has been over 30 days then an eligibility check will be created.
- Turn on Eligibility Send Service -> This option must be checked to actually send the eligibility to ClaimRev
- Once you're ready click Save to save the configuration.
- In the Billing option on the side you'll need to check Automatically SFTP Claims To X12 Partner, while our module doesn't sFTP the files to our system, OpenEMR will not put the files in the X12 tracker unless this has been enabled.
- In the ClaimRev Connect option you now have several options
Setup X12 Partners
Click on the menu options Admin->Practice-Practice Settings. On the right click on X12 Partners, then click Add New Partner.
- Partner Name -> Put ClaimRev or the value you put in X12 Partner Name when setting up globals.
- ID Number (ETIN)-> Go ahead and put your tax ID here.
- User logon Required Indicator (ISA01~ use 00 or 03) -> Put 00
- User password required Indicator (ISA03~ use 00 or 01) -> Put 00
- Usage Indicator (ISA15) -> Set this to Production
- SFTP Options -> The module uses a REST API and does not use SFTP the options here are unimportant. I have found putting . in the following options can help prevent error/warning messages. Leave blank but if you get warnings or error messages come back to this.
- SFTP Login Credentials
- SFTP Pass Credentials
- SFTP Host
- SFTP Local Directory
- SFTP Remote Directory
- SFTP Port -> this gets validated differently and putting 0 could stop the error messages.
- SFTP Options -> The module uses a REST API and does not use SFTP the options here are unimportant. I have found putting . in the following options can help prevent error/warning messages. Leave blank but if you get warnings or error messages come back to this.
- Leave fields not called out specifically as empty or default.
Module Usage
Home
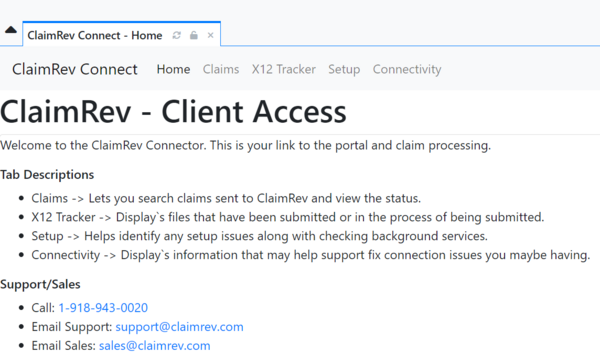
Once you've then menu option under globals, logged out and back in you should see new the new menu Modules->ClaimRev Connect. Clicking on this menu will take you to this screen.
Claims
This tab lets you search for claims sent to ClaimRev. This is a lite version of what is available in the ClaimRev Portal. This is meant for a quick check when your staff wants to check on a patient claim quickly.
X12 Tracker
When a file is sent to ClaimRev it must be in this table to actually go out the door. This screen helps give insight on if you're file available and has or has not been sent.
Setup
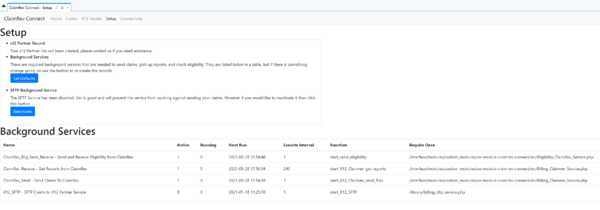
This is a help screen to check and fix potential problems. We check to make sure the x12 Partner record is created. We also give insight into the background services that must be run in order for the module to function as planned.
Under the option SFTP Background Service Click the button that says Deactivate, this will create a fake sftp service that doesn't interfere with sending claims through the ClaimRev REST Service. We have found while the primary sFTP service is activated there will be a race condition and claims won't be sent properly. If everything is configured properly, the button text will change to Reactivate and mock service will be listed in the table below. Under the column Require Once you will see this label: /interface/modules/custom_modules/oe-module-claimrev-connect/src/SFTP_Mock_Service.php. If you don't see the mock service claims will probably not be sent.
Connectivity
This tab helps discover any connection issues you may have. It will let you know if a security token is created. It should be "YES" and account code is set for default.
ClaimRev Portal
The ClaimRev Portal is your complete look into the claims you have billed. Here you can:
- Get detailed reports
- Make changes to the claim in the editor
- Check claim status
- Download ERA
- Get human readable ERA Reports


