XAMPP and OpenEMR Installation in OS X
Introduction
OpenEMR cannot run without a Web server, database and PHP. The user will find that installing and configuration each component to be more complex than installing the stack. It is far simpler to delete then reinstall applications if they are all in one folder. For the new user, it may be necessary to have multiple attempts before success can be achieved. Upgrading is also facilitated by the central location of the stack and OpenEMR.
Two readily available bundles are XAMPP and MAMP. XAMPP was chosen over the MAMP because fewer steps are required; it's easier to set the MySQL root password; port settings are pre-configured and there is a new backup feature.
Perhaps in the future we will have a XAMPP OpenEMR Package like that for Windows; then almost no one will have difficulties with installation or configuration.
XAMPP
- Download XAMPP from the middle of this webpage.
- Click on the DMG file. Drag and drop the file into the Application folder to install.

- Do not start Apache nor MySQL until completion of OpenEMR installation and setting the time zone as explained below.
OpenEMR
Download
1. Download OpenEMR from sourceforge:
- openemr-4.2.0.zip (MD5 sum: ee7e750d18e604ac9fef5fa86691bfef)
2. Extract the downloaded OpenEMR archive, and then move this directory to the htdocs directory.
WEB GUI
1. Open up web-browser and point it to the installation script at http://localhost/openemr .
- The first screen gives some general instructions and ensures file and directory permissions are set up correctly. It should tell you all your file system permissions are good, and have a 'Continue' button on the bottom of the form. If it does, Click the 'Continue' button. Otherwise, If there are errors on this screen, then follow instructions to fix. (screenshot below)

2. The next page is 'OpenEMR Setup' 'Step 1', which asks whether setup should create the database.
- Leave the setting set to 'Have setup create the database', and click the 'Continue' button. (screenshot below)

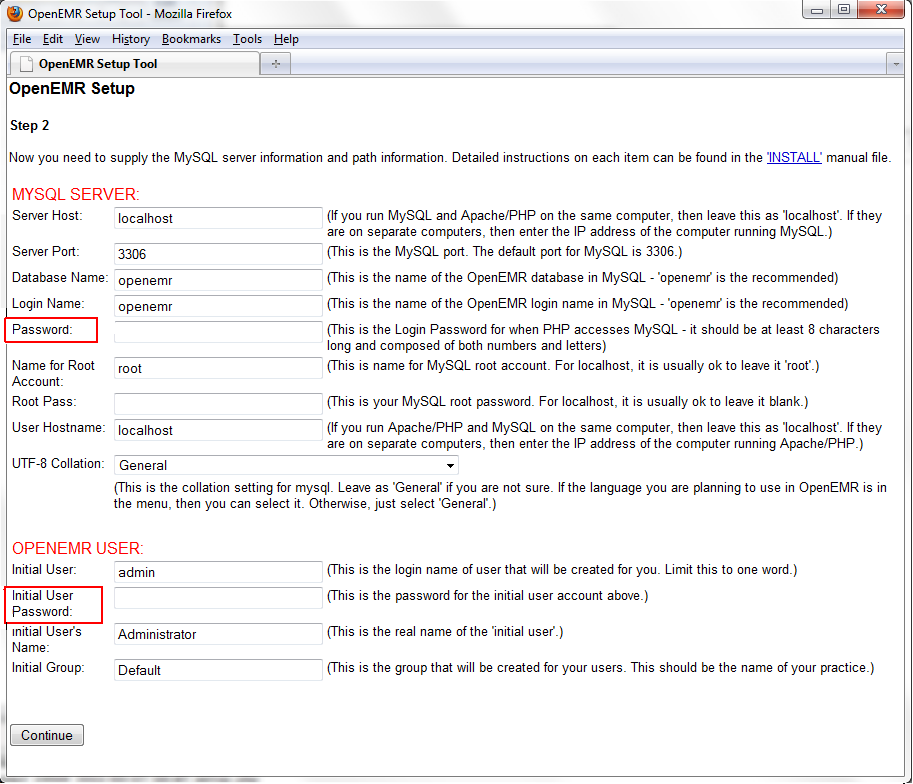
3. The next page is 'OpenEMR Setup' 'Step 2'. It has a list of options used to setup the database, along with OpenEMR user and OpenEMR path information.
- Most users will just need to enter a 'Initial User Password' for the OpenEMR User and a 'Password' for the sql user (these fields are in red rectangles in below screenshot). Some users may also have to enter the password of the 'root' user in the mysql server. (screenshot below)
4. The next page is 'OpenEMR Setup' 'Step 3'. On this page you should see logs of OpenEMR connecting and creating the database.
- At the bottom of the page, it should read 'Next step will install and configure access controls (php-GACL).' Click the 'Continue' button. (screenshot below)

5. The next page is 'OpenEMR Setup' 'Step 4'. On this page, OpenEMR configures access controls (php-GACL).
- You should see logs of OpenEMR installing and configuring php-GACL. you should see 'Success!' in green lettering four times. At the bottom of the page, it should read 'Next step will configure PHP.'. Click the 'Continue' button. (screenshot below)

6. The next page is 'OpenEMR Setup' 'Step 5'. On this page is displayed recommendations of how to configure your php.ini config file.
- Read and follow the instructions carefully. At the bottom of the page, it should read "Next step will configure Apache web server.". We suggest you print this screen for future reference. Click the 'Continue' button. (screenshot below)

7. The next page is 'OpenEMR Setup' 'Step 6'. On this page is displayed recommendations and warnings regarding directories Apache should NOT allow the outside world to see, as these directories contain Protected Health Information.
- Read and follow the instructions carefully. We suggest you print this screen for future reference. Click the 'Continue' button. (screenshot below)

8. The next page is 'OpenEMR Setup'. This is the final configuration page.
- This final installation screen gives additional instructions. This information is personalized for your setup, so we suggest you print this screen for future reference. At the bottom of the page is your OpenEMR username and password, along with a link to OpenEMR. (screenshot below)

- OpenEMR after installation: (screenshot below)

Patch
Download the most recent patch. Instruction to do this can be found on the OpenEMR Patches page.
Time Zone
- To set the time zone, find the time zone identifier here.
- Go->/Applications/XAMPP/xamppfiles/etc/php.ini (configuration settings) and under Module Settings and change the continent and city. Keep the forward slash after the continent and use the underline if there is a space in the name of the city.

XAMPP Control
- Go to Application/XAMPP and open XAMPP Control to turn on Apache and MySQL.

- Verify that Apache is running by typing local host into the browser address bar.

- Click Englisch to navigate to the webpage in English.


- Verify that MySQL is running by navigating from left side bar to Tools and click phpMyAdmin.

Meaningful Use 2
Guide
- See the OpenEMR 4.2.0 User Guide
Securing MySQL
- Refer to this video tutorial.
Securing OpenEMR
- See the Securing OpenEMR Guide