Difference between revisions of "Windows Backup And Restore Made Easy"
| Line 13: | Line 13: | ||
Two pieces of information are necessary before construction of the tool. | Two pieces of information are necessary before construction of the tool. | ||
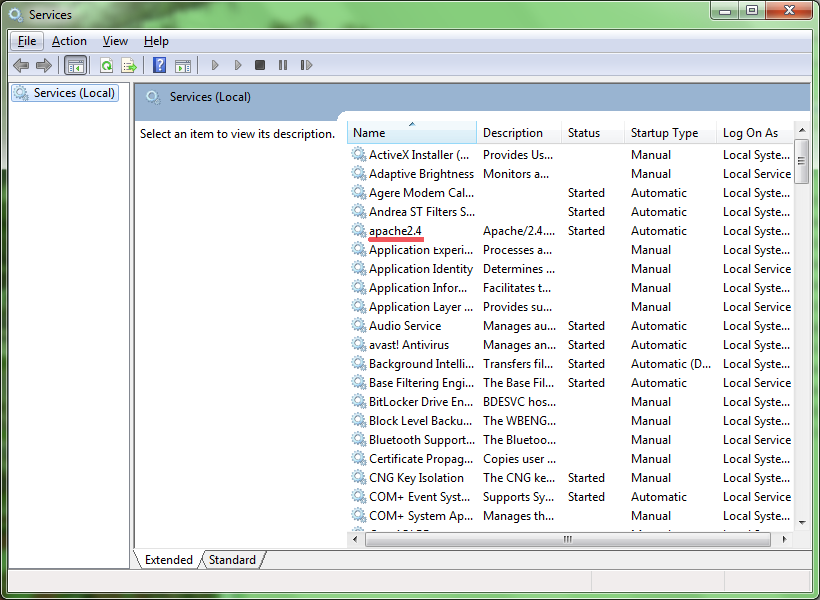
1) The version of Apache must be known. A quick way to find out, go to Control Panel->Systems and Security-> <nowiki>Administrative Tools->Services. In the list of Services, look for the number next to Apache | 1) The version of Apache must be known. A quick way to find out, go to Control Panel->Systems and Security-> <nowiki>Administrative Tools->Services. In the list of Services, look for the number next to Apache.</nowiki> | ||
[[File:WINDOWS BACKUP AND RESTORE MADE EASY, figure 1.png]] | |||
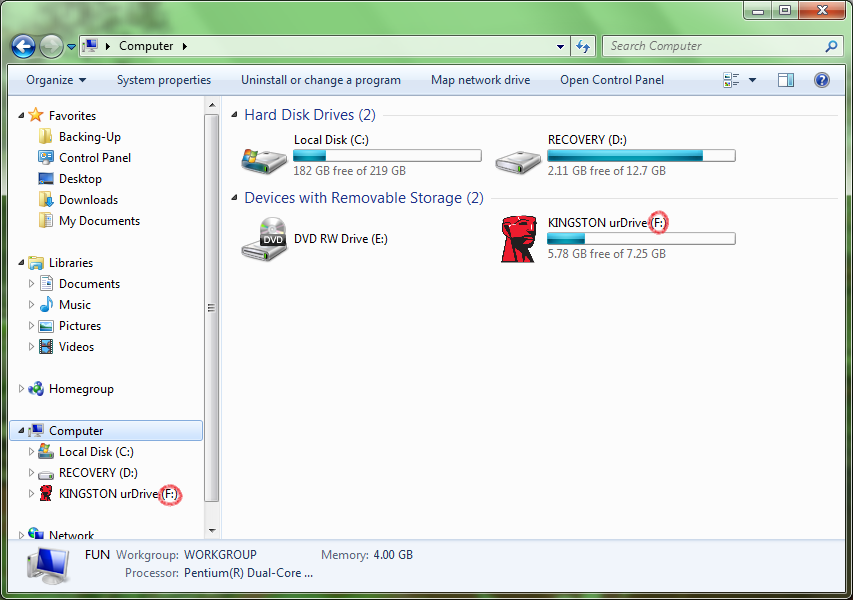
2) You will need to know the letter drive of the backup device. Insert the device. Go to Windows Explorer, under <nowiki>Computer is the letter of the drive | 2) You will need to know the letter drive of the backup device. Insert the device. Go to Windows Explorer, under <nowiki>Computer is the letter of the drive.</nowiki> | ||
[[File:WINDOWS BACKUP AND RESTORE MADE EASY, figure 2.png]] | |||
| Line 23: | Line 26: | ||
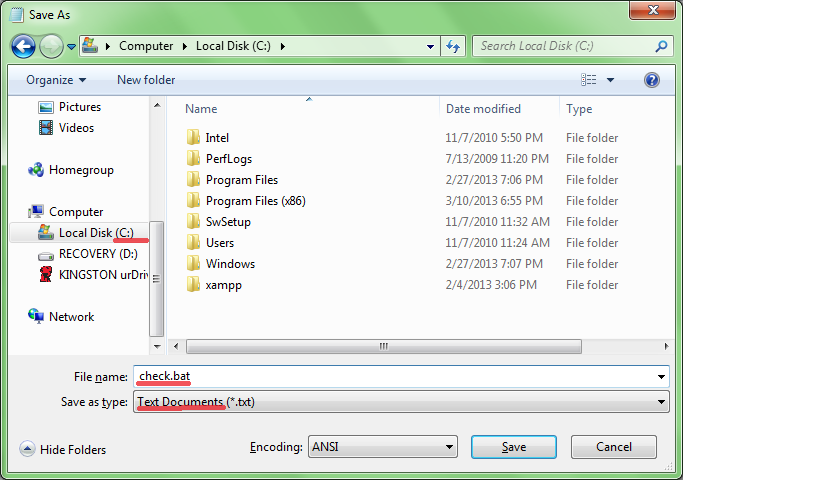
2) Under the File tab, choose Save As, type in check.bat as the File Name and use the default Text Documents as | 2) Under the File tab, choose Save As, type in check.bat as the File Name and use the default Text Documents as | ||
<nowiki>the Save As Type. Save to C-drive. Click Save | <nowiki>the Save As Type. Save to C-drive. Click Save.</nowiki> | ||
[[File:WINDOWS BACKUP AND RESTORE MADE EASY, figure 3.png]] | |||
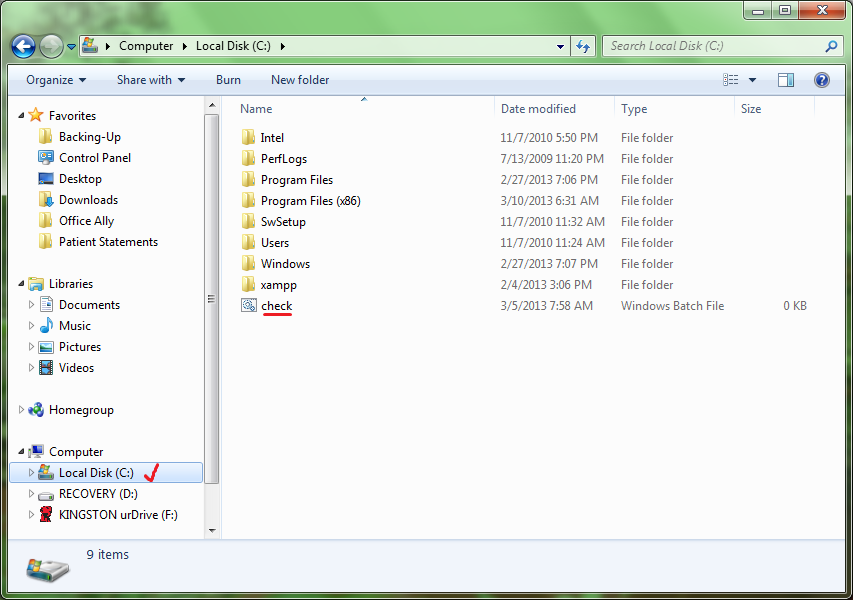
3) Verify that it is in C-drive by going to Windows Explorer and then to C-drive. | |||
[[File:WINDOWS BACKUP AND RESTORE MADE EASY, figure 4.png]] | |||
4) Open Notepad again, copy and paste the following set of commands: | 4) Open Notepad again, copy and paste the following set of commands: | ||
| Line 41: | Line 48: | ||
net start "mysql" | net start "mysql" | ||
5) Change the version of Apache if it is not 2.4 in lines 2 and 5 of the script and the drive letter if it is not F | 5) Change the version of Apache if it is not 2.4 in lines 2 and 5 of the script and the drive letter if it is not F | ||
| Line 51: | Line 58: | ||
7) In the Save As Type bar, click the drop down menu and choose All Files. Click Save. If you use the default of | 7) In the Save As Type bar, click the drop down menu and choose All Files. Click Save. If you use the default of | ||
<nowiki>Text Documents, you will have only a document of the instructions and not the actual command to execute the backup | <nowiki>Text Documents, you will have only a document of the instructions and not the actual command to execute the backup.</nowiki> | ||
[[File:WINDOWS BACKUP AND RESTORE MADE EASY, figure 5.png]] | |||
8) Go to the Desktop. If you see an icon with two cogged,intermeshing wheels, then the text file was successfully | 8) Go to the Desktop. If you see an icon with two cogged,intermeshing wheels, then the text file was successfully | ||
<nowiki>converted into a command file | <nowiki>converted into a command file.</nowiki> | ||
[[File:WINDOWS BACKUP AND RESTORE MADE EASY, figure 6, jpg.jpg]] | |||
'''BACKUP''' | '''BACKUP''' | ||
| Line 64: | Line 72: | ||
2) Double click the backup.cmd icon on your Desktop. | 2) Double click the backup.cmd icon on your Desktop. | ||
3) Command Prompt will appear and start the backup and save it to your device | 3) Command Prompt will appear and start the backup and save it to your device. Flash drives, SD card<nowiki> and external hard drives have been used successfully as backup media. DVD's have not been tested. To change the drive of the destination device, right click on the backup.cmd icon and choose Edit.</nowiki> | ||
<nowiki>and external hard drives have been used successfully as backup media. DVD's have not been tested. To change the drive of the destination device, right click on the backup.cmd icon and choose Edit.</nowiki> | |||
4) When Command Prompt has completed the task, it will close automatically and a new folder, XAMPP, will appear on | 4) When Command Prompt has completed the task, it will close automatically and a new folder, XAMPP, will appear on | ||
<nowiki>the backup device.</nowiki> | <nowiki>the backup device.</nowiki> | ||
[[File:WINDOWS BACKUP AND RESTORE MADE EASY, figure 7.png]] | |||
'''RECOVERY''' | '''RECOVERY''' | ||
| Line 76: | Line 83: | ||
2) Go to C:->XAMPP->XAMPP Control and double click that file. The orange icon has a symbol that looks like a dog | 2) Go to C:->XAMPP->XAMPP Control and double click that file. The orange icon has a symbol that looks like a dog | ||
<nowiki> bone in the middle of it | <nowiki> bone in the middle of it.</nowiki> | ||
[[File:WINDOWS BACKUP AND RESTORE MADE EASY, figure 8.png]] | |||
3) Under Modules Service click the red x changing it to a green check mark to install Apache and then under Actions, | 3) Under Modules Service click the red x changing it to a green check mark to install Apache and then under Actions, | ||
<nowiki>click Start to begin the service. Do the same for MySql. You have to "turn on the lights" before getting back to work. Both modules are ready to use when the PID(s) and Port(s) are populated with numbers | <nowiki>click Start to begin the service. Do the same for MySql. You have to "turn on the lights" before getting back to work. Both modules are ready to use when the PID(s) and Port(s) are populated with numbers.</nowiki> | ||
[[File:WINDOWS BACKUP AND RESTORE MADE EASY, figure 9.png]] | |||
4) If you are interested in verification of the accuracy of the backup using just the copy on the destination device, | 4) If you are interested in verification of the accuracy of the backup using just the copy on the destination device, | ||
<nowiki>you may need to use XAMPP Start and XAMPP Stop if XAMPP Control does not work. The copy on the device runs only at 80% speed compared to that installed on C-drive, but it is still a very handy feature if verification is the | <nowiki>you may need to use XAMPP Start and XAMPP Stop if XAMPP Control does not work. The copy on the device runs only at 80% speed compared to that installed on C-drive, but it is still a very handy feature if verification is the | ||
only objective. | only objective.</nowiki>. | ||
[[File:WINDOWS BACKUP AND RESTORE MADE EASY, figure 10.png]] | |||
5) Log on by typing in http://localhost/openemer in the URL bar. Now it is back to work we go. | 5) Log on by typing in http://localhost/openemer in the URL bar. Now it is back to work we go. | ||
| Line 90: | Line 103: | ||
The elegant script and technical advice have been graciously supplied by cverk of the OpenEMR Forum. It would not | The elegant script and technical advice have been graciously supplied by cverk of the OpenEMR Forum. It would not | ||
have possible for us to construct the tool without the invaluable technical assistance of Kevin Yeh, M.D., of | have possible for us to construct the tool without the invaluable technical assistance of Kevin Yeh, M.D., of | ||
IntegralEMR. Pieter W. Blankevoort, M.D.,(a.k.a. the LBV Guru) was kind enough to take time from his medical | IntegralEMR. Pieter W. Blankevoort, M.D.,(a.k.a. the LBV Guru) was kind enough to take time from his medical | ||
practice on a sunny isle to brainstorm. | practice on a sunny isle to brainstorm. | ||
Good luck and smooth sailing. | Good luck and smooth sailing. | ||
Revision as of 14:58, 15 March 2013
BACKUP AND RESTORE MADE EASY
METHOD COMPARISONS
This process of backup is a refinement and simplification of Joe Holzer's method. Knowledge of programming and of Command Prompt is not required.
In reference to the built-in backup utility, once constructed properly, this method is just as simple to use. Comments on OpenEMR Forum stressed that browser-based backups are not reliable. In a recently restored backup after using the native tool, all the scanned documents were missing and the LBV forms had to be re-configured. Recovery with this method does not necessitate the unbundling of the backup file, copying and replacing of the openemr\sites\default folder and the rebuilding of the MySql database.
Unlike the Joe Holzer method the entire XAMPP directory is replicated, not just the four htdocs\openemr folders and the MySql database. Recovery does not require that XAMPP-OpenEMR be downloaded and the files to be copied onto the download.
PREPARATORY STEPS
Two pieces of information are necessary before construction of the tool.
1) The version of Apache must be known. A quick way to find out, go to Control Panel->Systems and Security-> Administrative Tools->Services. In the list of Services, look for the number next to Apache.
2) You will need to know the letter drive of the backup device. Insert the device. Go to Windows Explorer, under Computer is the letter of the drive.
TOOL CONSTRUCTION
1) Open Notepad to create an empty folder.
2) Under the File tab, choose Save As, type in check.bat as the File Name and use the default Text Documents as
the Save As Type. Save to C-drive. Click Save.
3) Verify that it is in C-drive by going to Windows Explorer and then to C-drive.
4) Open Notepad again, copy and paste the following set of commands:
net stop "mysql"
net stop "apache2.4"
cmd /c cd C:\
if exist C:\check.bat xcopy C:\xampp\*.* F:\xampp\ /d /e /c /i /f /h /k /y
net start "apache2.4"
net start "mysql"
5) Change the version of Apache if it is not 2.4 in lines 2 and 5 of the script and the drive letter if it is not F
in line 4.
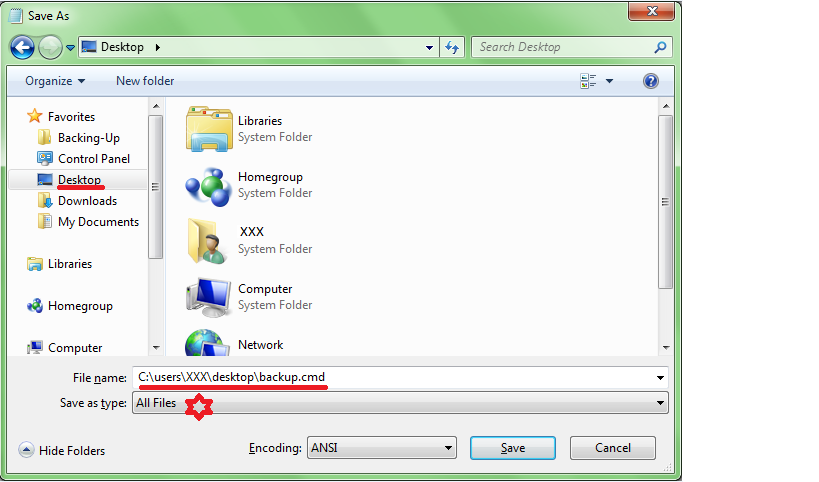
6) It is very important that these next 2 steps are executed exactly as stated to avoid problems. Under the File tab, choose Save As. In the File Name bar, type in C:\users\XXX\desktop\backup.cmd where XXX is the name of the account that you signed into at the Windows Welcome Screen.
7) In the Save As Type bar, click the drop down menu and choose All Files. Click Save. If you use the default of
Text Documents, you will have only a document of the instructions and not the actual command to execute the backup.
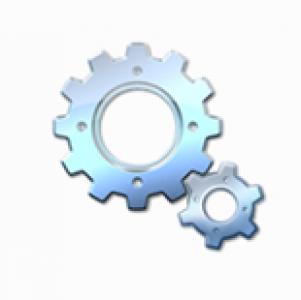
8) Go to the Desktop. If you see an icon with two cogged,intermeshing wheels, then the text file was successfully
converted into a command file.
BACKUP
1) Log off OpenEMR.
2) Double click the backup.cmd icon on your Desktop.
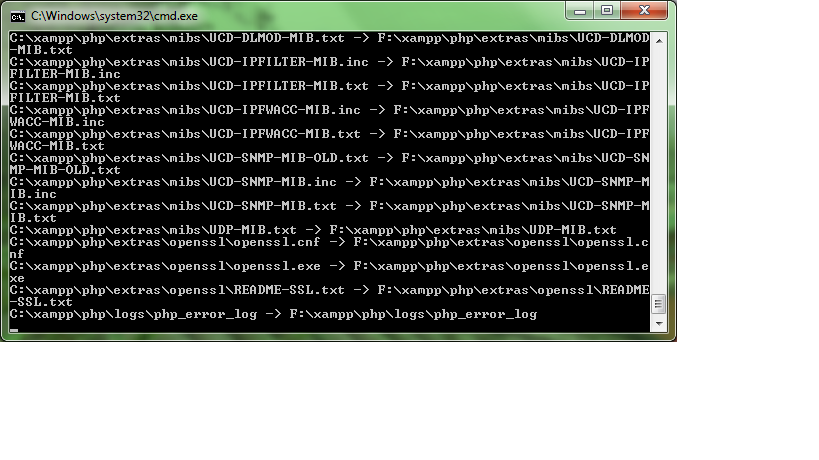
3) Command Prompt will appear and start the backup and save it to your device. Flash drives, SD card and external hard drives have been used successfully as backup media. DVD's have not been tested. To change the drive of the destination device, right click on the backup.cmd icon and choose Edit.
4) When Command Prompt has completed the task, it will close automatically and a new folder, XAMPP, will appear on
the backup device.
RECOVERY
1) Send the XAMPP folder to C-drive.
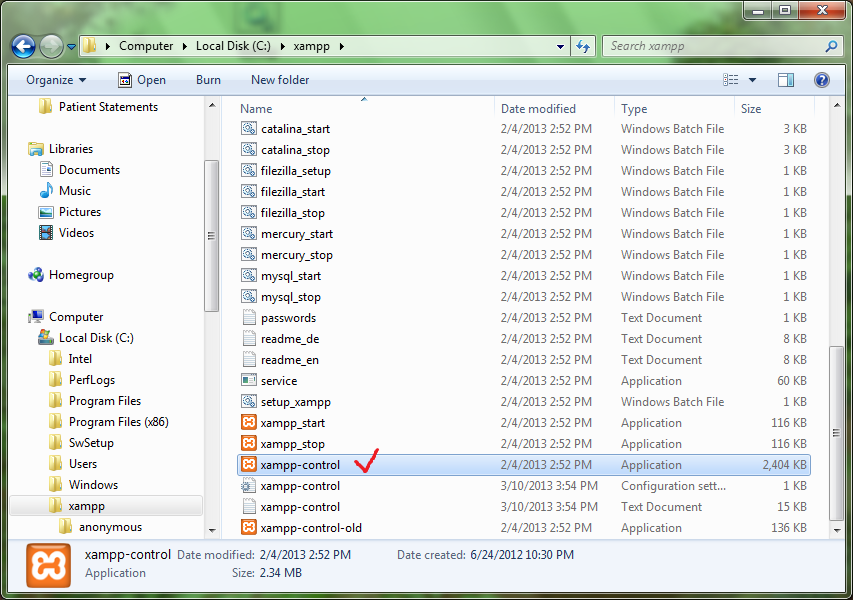
2) Go to C:->XAMPP->XAMPP Control and double click that file. The orange icon has a symbol that looks like a dog
bone in the middle of it.
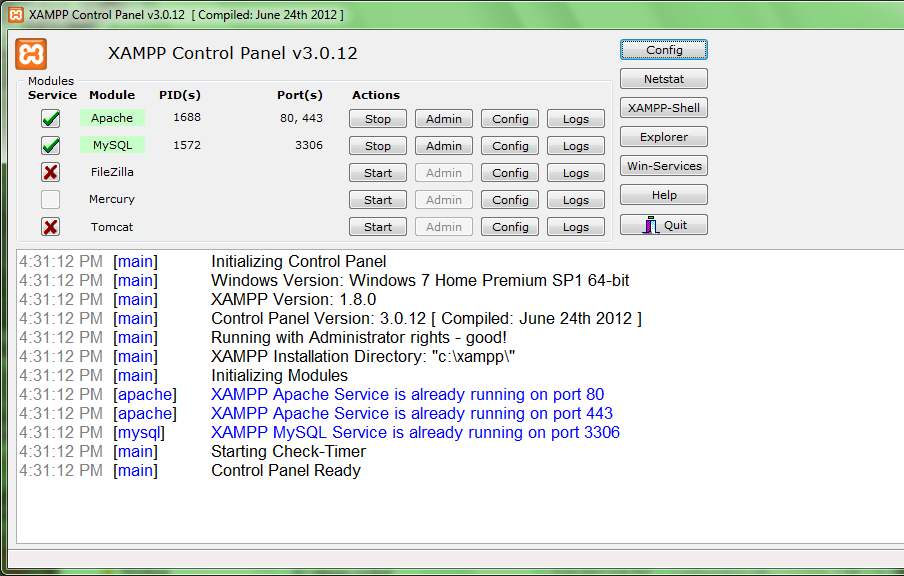
3) Under Modules Service click the red x changing it to a green check mark to install Apache and then under Actions,
click Start to begin the service. Do the same for MySql. You have to "turn on the lights" before getting back to work. Both modules are ready to use when the PID(s) and Port(s) are populated with numbers.
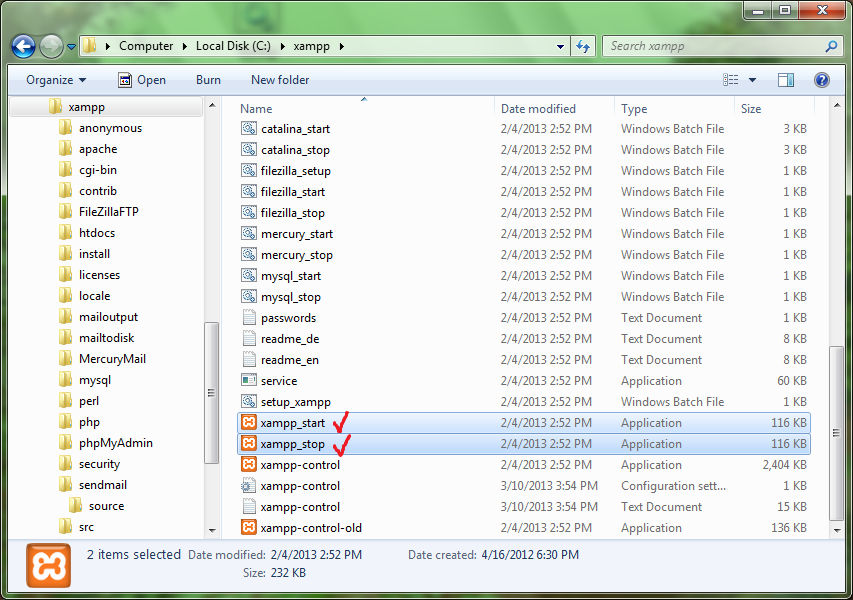
4) If you are interested in verification of the accuracy of the backup using just the copy on the destination device,
you may need to use XAMPP Start and XAMPP Stop if XAMPP Control does not work. The copy on the device runs only at 80% speed compared to that installed on C-drive, but it is still a very handy feature if verification is the
only objective..
5) Log on by typing in http://localhost/openemer in the URL bar. Now it is back to work we go.
The elegant script and technical advice have been graciously supplied by cverk of the OpenEMR Forum. It would not
have possible for us to construct the tool without the invaluable technical assistance of Kevin Yeh, M.D., of
IntegralEMR. Pieter W. Blankevoort, M.D.,(a.k.a. the LBV Guru) was kind enough to take time from his medical
practice on a sunny isle to brainstorm.
Good luck and smooth sailing.