Difference between revisions of "Patient Portal Chat"
Harley Tuck (talk | contribs) (added chat page) |
Harley Tuck (talk | contribs) m (→Chat Workflow: nobbut formatting) |
||
| Line 6: | Line 6: | ||
= Chat Workflow = | = Chat Workflow = | ||
0. Arrive at the Portal Chat screen in the expected manner: Miscellaneous/ Portal Dashboard * click the 'Chat' button | 0. Arrive at the Portal Chat screen in the expected manner: Miscellaneous/ Portal Dashboard | ||
* click the 'Chat' button | |||
[[Image:PortalDashChat00.png|center]] | |||
'''The tab is named 'Secure chat'.''' | |||
The tab is named 'Secure chat'. | |||
[[Image:PortalDashChat01.png]] | [[Image:PortalDashChat01.png]] | ||
| Line 97: | Line 23: | ||
1. Select the chat recipient(s) (round rectangle at top left) | 1. Select the chat recipient(s) (round rectangle at top left) | ||
* All clinic patients with portal accounts will be listed here. | |||
* when at least one chat recipient is selected they will all be listed in 'Current Recipients' section (see later image) | |||
* Right column (arrow) : all portal users who are currently online will be listed here. In this case it shows the user who is writing this documentation. | * Right column (arrow) : all portal users who are currently online will be listed here. In this case it shows the user who is writing this documentation. | ||
2. Type the chat message into the text area (oval at center bottom) | |||
'''Note: you may send a simple text message or click 'Edit' (rectangle) and format a more complex message including sending graphic content | |||
[[Image:PortalDashChat03Edit.png|center]] | |||
[[Image:PortalDashChat03Edit.png| | |||
| Line 154: | Line 41: | ||
3. Click red 'Send' button (or green ‘Send it’ above, in edit window) | 3. Click red 'Send' button (or green ‘Send it’ above, in edit window) | ||
* Once sent a message will appear i[[Image:Image4.png|right]]n the central area of the main chat window showing messaging history. | * Once sent a message will appear i[[Image:Image4.png|right]]n the central area of the main chat window showing messaging history. | ||
* Note the multiple recipients listed in ‘Current Recipients’ area | * Note the multiple recipients listed in ‘Current Recipients’ area | ||
[[Image:PortalDashChat05MsgHx.png]] | [[Image:PortalDashChat05MsgHx.png]] | ||
| Line 174: | Line 49: | ||
4. Once a message is sent you may | 4. Once a message is sent you may click 'Clear History' (arrow previous pic) to delete the message history | ||
[[Image:PortalDashChat04clrHx.png|center]] | |||
[[Image:PortalDashChat04clrHx.png]] | |||
| Line 187: | Line 59: | ||
5. Back at the chat home screen: | 5. Back at the chat home screen: | ||
* Click 'Home' to exit Chat and return to Portal Dashboard | |||
[[Image:PortalDashChat055.png]] | [[Image:PortalDashChat055.png]] | ||
= As seen by the patient in the portal: = | = As seen by the patient in the portal: = | ||
Revision as of 21:40, 26 January 2023
Introduction
OpenEMR’s Patient Portal includes a chat tool which resembles a customary social media chat client. However it only communicates between the portal and a clinic staff using the practice’s OpenEMR; messages cannot be routed to personal devices.
Chat Workflow
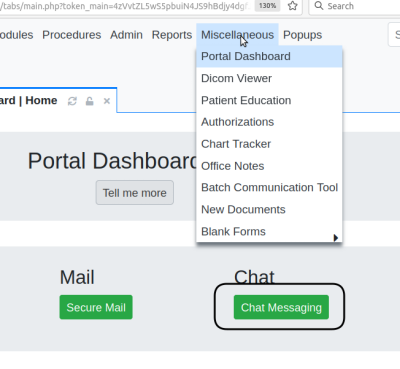
0. Arrive at the Portal Chat screen in the expected manner: Miscellaneous/ Portal Dashboard
- click the 'Chat' button
The tab is named 'Secure chat'.
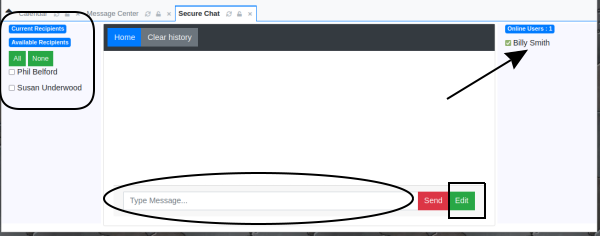
In image above:
1. Select the chat recipient(s) (round rectangle at top left)
- All clinic patients with portal accounts will be listed here.
- when at least one chat recipient is selected they will all be listed in 'Current Recipients' section (see later image)
- Right column (arrow) : all portal users who are currently online will be listed here. In this case it shows the user who is writing this documentation.
2. Type the chat message into the text area (oval at center bottom)
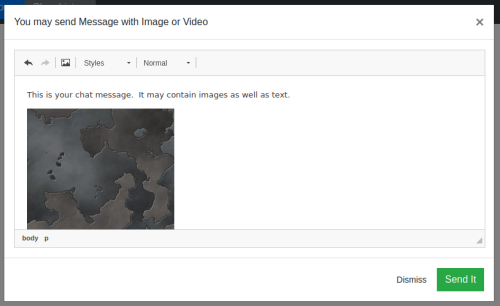
Note: you may send a simple text message or click 'Edit' (rectangle) and format a more complex message including sending graphic content
3. Click red 'Send' button (or green ‘Send it’ above, in edit window)
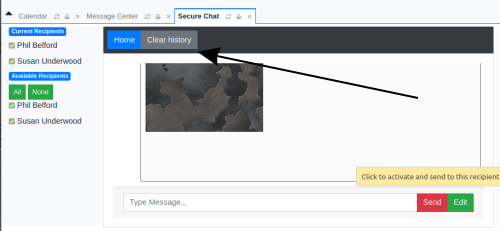
- Once sent a message will appear in the central area of the main chat window showing messaging history.
- Note the multiple recipients listed in ‘Current Recipients’ area
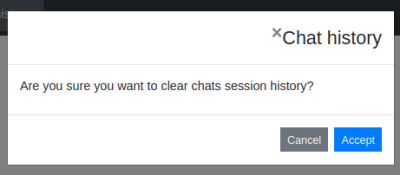
4. Once a message is sent you may click 'Clear History' (arrow previous pic) to delete the message history
5. Back at the chat home screen:
- Click 'Home' to exit Chat and return to Portal Dashboard
As seen by the patient in the portal:
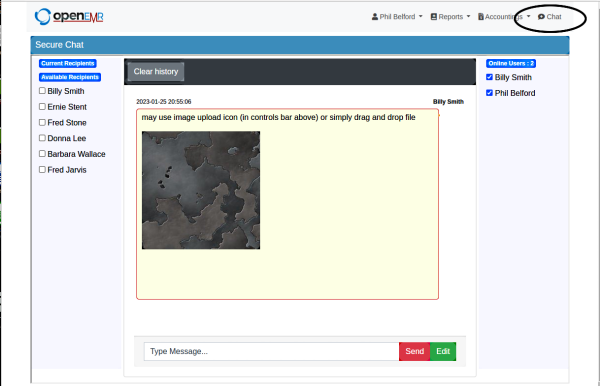
The portal chat screen strongly resembles the staff's portal dashboard chat screen and contains the same capabilities.
However, different from the other portal functions the patient must click their 'Chat' menu item to see the message (oval below)...
Differences in the portal:
- The patient sees in left column, all portal- approved practice staff (see Conclusion for a note about this)
- In right column the EMR is open in another browser so that logged in user is listed, and this pt Phil is logged in to this portal instance so his name is also shown.
Conclusion
Some good information cann be found in the forum post:
https://community.open-emr.org/t/secure-messaging-oddness/19846/3
Portal dev SJP plans to make a change in OpenEMR v7.0.1 that limits/ decreases the number of names in the mail recipient ‘TO:’ dropdown.
