OpenEMR 7.0 B10
OpenEMR 7.0.2 B10 Electronic health information (EHI) export
Public EHI Export Format Documentation
- Online ONC Certification public URL documentation for this export can be found at:
Setup Instructions
- To turn on the Patient Export Module as an administrator you should do the following:
Navigate to Modules -> Manage Modules
Open the Unregistered Modules tab.
Find the Electronic Health Information Exporter module and select the Register button to register the module. This will take you to the Registered tab with the **Electronic Health Information Exporter module** displayed.
Select the install button for the module.
Then select the Enable button. The module is now setup and installed. Log out of OpenEMR and log back in to update the menu system.
Navigate to Miscellaneous -> Electronic Health Information Export from the menu system. You will now see the EHI export interface.
Single Patient Export Instructions
To export a single patient do the following (Note this feature is ONLY available to users with the Administrator role, ie users that have the admin/super ACL).
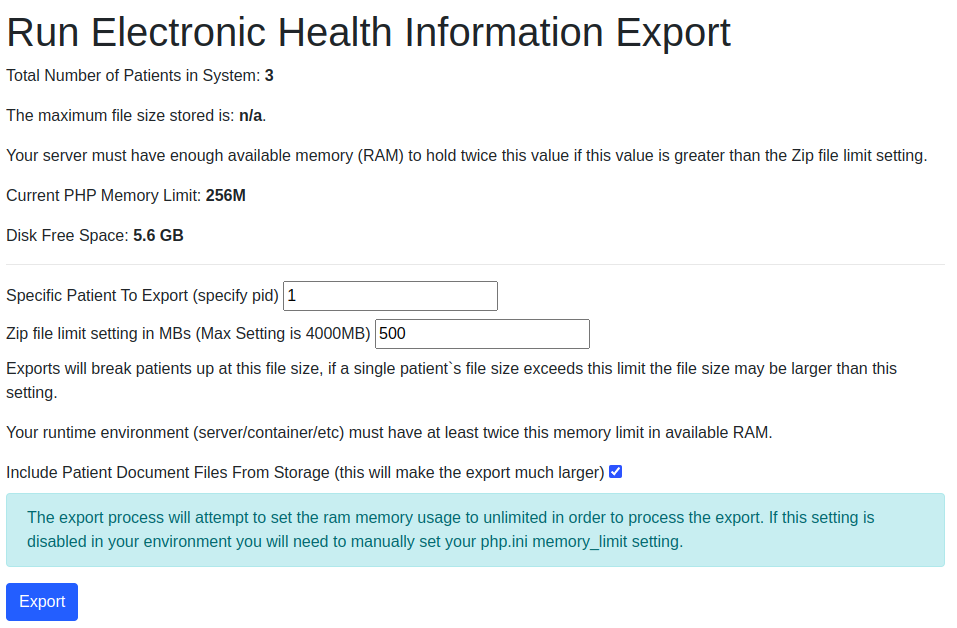
1. Navigate from the menu to Miscellaneous -> Electronic Health Information Export. Refer to the following screenshot for the rest of these instructions.
2. Enter in the patient pid (patient identifier) in the Specific Patient To Export (specify pid) textbox field.
3. With a single patient export, all patient data will be bundled into a single zip file so you can leave the Zip file limit setting in MBs (Max Setting is 4000MB) alone.
4. If you wish to exclude the patient digital documents as part of the export, you can uncheck the Include Patient Document Files From Storage checkbox.
5. Hit the Export button. The export processing page will display. Wait for the single export task to finish.
6. Select the download link for the zip file. The download will be listed as ehi-export-<unique-id&rt;.zip. Wait for the download to complete.
There is a hash value of the zip file that you can use to verify the integrity of the zip export.
Entire Patient Population Electronic Health Information Export Instructions
To export the entire patient population do the following (Note this feature is ONLY available to users with the Administrator role, ie users that have the admin/super ACL).
1. Ensure that your server has enough disk space and memory to handle the largest zip file that you choose. Plan on your server needing to use 3X the amount of memory that you use for a single zip file. You also need to have sufficient disk space to hold the zip files in your patient file storage (either CouchDB or the file system). That means if you choose the maximum 4GB zip file size, your server process needs to be able to consume up to 12GB of memory to process the patient population export and have at least as much disk space as what you currently have stored for patient documents in your OpenEMR server.
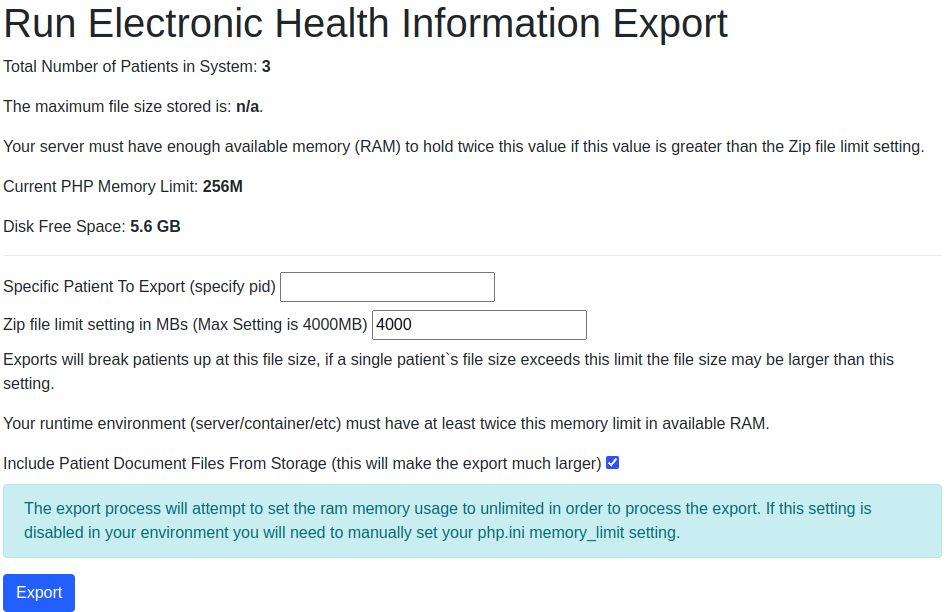
2. Navigate from the menu to Miscellaneous -> Electronic Health Information Export and refer to the following screenshot as you follow the instructions:
2. Leave blank the Specific Patient To Export (specify pid) textbox field.
3. Enter between 1 and 4000MB for Zip file limit setting in MBs (Max Setting is 4000MB). The export algorithm will calculate up the number of zip files to generate based on the following settings: The sum of each patient's document storage requirements + 100KB per patient for their database data. Patient documents are kept together within the same batch, this can cause a zip file to exceed the recommended zip file limit. This would be around 5,120 patients per zip if there are no documents involved, or about 217 patients (2.2MB for documents + 100KB for patients).
4. If you wish to exclude the patient digital documents as part of the export, you can uncheck the Include Patient Document Files From Storage checkbox.
5. Hit the Export button. The export processing page will display. An export task will display for each batch that is displayed. Tasks will run one at a time and progress will be updated on the progress being worked. Once a batch has completed it will show as completed and provide a download link to download the batch.
6. Select the download link for the zip file. The download will be listed as ehi-export-<unique-id&rt;.zip. Wait for the download to complete.
There is a hash value of the zip file that you can use to verify the integrity of each zip export.


