HOWTO: Activate the Patient Portal v6.0+
Introduction
Basic steps to activate the portal:
- Get SMTP server credentials
- Setup reCaptcha
- Set OpenEMR Globals
The Process
1. Get SMTP server credentials
You can operate your portal without SMTP but if omitted you will not be able to email patients' login credentials, which means they will not be able to self- register.
If you're reading through the forum about SMTP configuration you may see instructions how to use gmail's SMTP server. Unfortunately as of early 2022 that is no longer available.
Any SMTP server will do of course, but here are instructions to setting up mailgun, which has (as of mid 2022) a free membership that allows for a useful amount of traffic. Their config does involve making server settings that require sys-admin expertise.
https://community.open-emr.org/t/portal-self-registration/15866/5
2. Setup reCaptcha
A few patches after OpenEMR ver 6.0 the Portal globals started requiring reCaptcha.
Here's where you get that.
https://www.google.com/recaptcha/admin/create
3. Set OpenEMR Globals
Be sure to read the tooltips in the globals text areas, they have lots of good information!
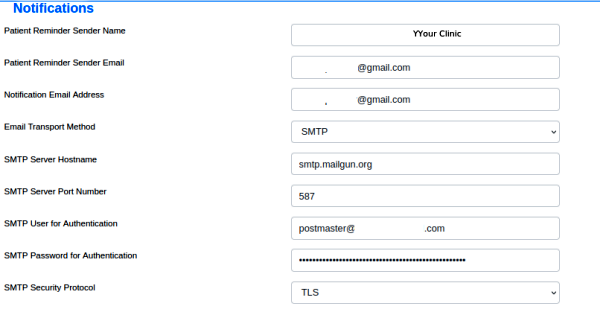
Admin/ Globals, tab: Notifications - SMTP credentials go here
Ports and other settings may be different than shown here
- Patient Reminder Sender Name - the name of your clinic/ practice
- Patient Reminder Sender Email - your practice address
- Notification Email Address
- Email Transport Method - select SMTP for this config method
- SMTP Server Hostname
- SMTP Server Port Number
- SMTP User for Authentication
- SMTP Password for Authentication
- SMTP Security Protocol
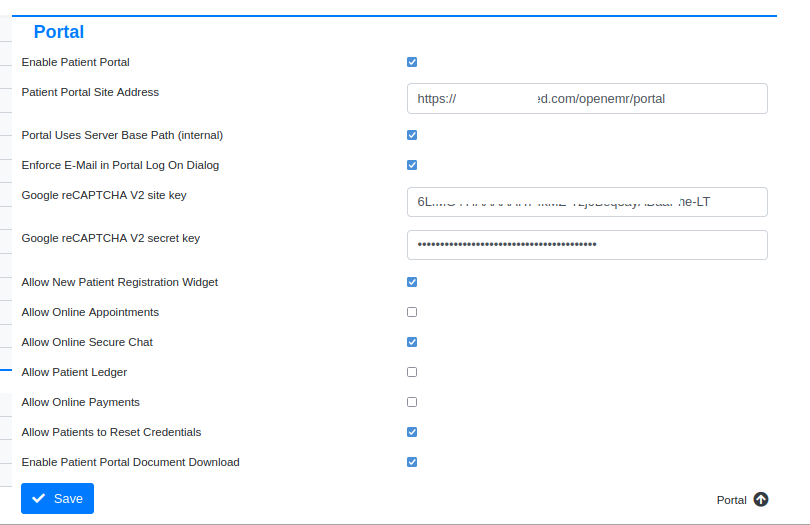
Activation and selections of options occurs in (main menu:) Administration/ Globals/ Portal
- Enable Patient Portal - turn it on
- Patient Portal Site Address - This is the base URL of the practice's OpenEMR; the portal is a sub-site in it. Surf to this URL to log in.
- Portal Uses Server Base Path (internal) - this setting is not completely evident. Per the OpenEMR forum, if you get a 'URL not found' when attempting to access the portal, switch the checkbox to 'off' if it is on, or 'on' if it is off.
- Enforce E-Mail in Portal Log On Dialog - require that the patient enter an email in addition to their login credentials
- Allow New Patient Registration Widget - activate the capability of patients to register themselves as patients in the practice's OpenEMR, by using the portal.
- Allow Online Appointments - let patients make appointments from the portal
- Allow Online Secure Chat - let patients communicate with clinic staff from the portal
- Allow Patient Ledger - let patients view their ledger in the portal
- Allow Online Payments - let patients make payments on account from the portal
- Allow Patients to Reset Credentials - let patients make new login credentials from the portal
- Enable Patient Portal Document Download - let patients download portal documents
4. Continue with configuration of the patient account
See the page, HOWTO_Activate_a_Patient's_portal_access_-_v6.0


