CDR in OpenEMR 5 - Create a CDR
Create a CDR
Introduction
Continuing from the first section of the tutorial, this document shows how to create a new Clinical Decision Reminder rule, a.k.a. 'CDR'. A CDR is an notification that is displayed when some clinical activity is due to be performed for a patient. When the activity is completed the CDR ceases to be displayed until it's due again.
OpenEMR CDRs allow for different types of completion events, or 'Target/ Action Groups'.
- when some datum is entered in the Lifestyle widget
- when some other sort of data is entered into the patient's record, for example taking a patient's weight
- any other arbitrary ("Custom") activity
Let's create a simple CDR for an 'Annual Wellness Check'. Since these CDRs are fairly complex to build, I will give the basic steps in each section then make Notes of things that may require consideration.
An Annual Wellness Check has no universally defined activities, like a "Blood Pressure Check" does. It's not monitored by the Lifestyle widget and it's not stored in the database in any discrete location, for e.g., the Vital Signs form. In our three types of CDRs, that would make it the third, a 'custom' activity. When the CDR alert appears, the staff does whatever tasks make up an Annual Wellness Check, and simply mark the CDR as complete.
We begin:
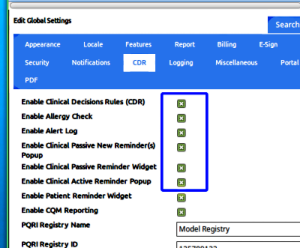
0. Turn on CDRs in Globals/ CDR
Note:
- All these steps to create a CDR require Administrator privileges.
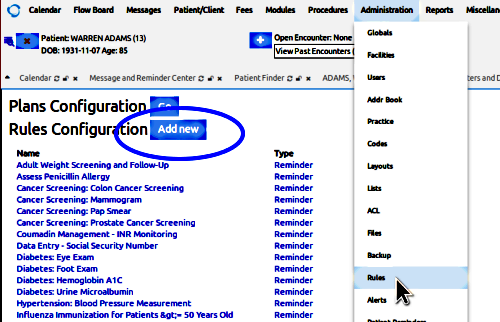
Then navigate to 'Administration/ Rules'; click 'Add New' (blue oval)
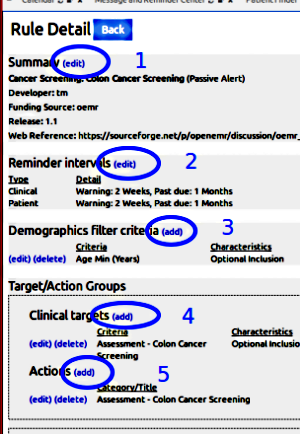
(Flash back to the previous tutorial and the Rule Detail screen...)
Sections are numbered in this picture with the step numbers in the instructions below
1. Click 'Summary - edit'
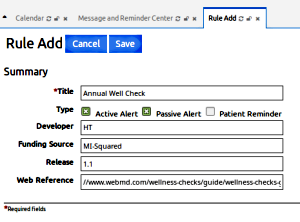
In the 'Rule Add' screen, fill in the Summary details.
- Title: Annual Wellness Check
- Type: make it Active AND Passive.
- Developer: your identifiers.
- Funding Source: where the project funding comes from
- Release: your document numbering convention
- Web Reference: URL to the authoritative guideline that informs this CDR.
Click 'Save' at top.
Notes:
- Active alerts generate a popup, but do not appear in the CR widget.
- Passive alerts have no popup; they only appear in the CR widget.
- The only way to mark a CDR as complete is through the CR widget entry
- Ergo, If you want a popup alert that can be marked complete, it needs to be both active and passive.
- A CDR that is only Active will popup while it's due then stop when past due.
- Developer, Funding Source, Release, Web Reference - all MU2 requirements; have no clinical effect if omitted
2. Click 'Reminder Intervals - (edit)'
The dialog:
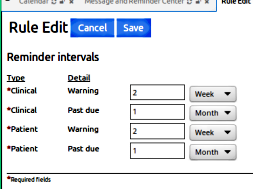
Set the reminder intervals:
The 'Clinical' CDR shows the “Due” warning for 2 weeks
then "Past Due" for a month.
Notes:
- The 'Patient' intervals need to be filled in, but they apply to a different module.
Click 'Save'
3. Click 'Demographics Filters - (edit)'
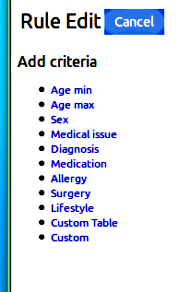
The dialog:
The filters available for CDRs are:
- Age min - enter a number, and select Units of months or years (see next picture)
- Age max - same as 'Age Min'
- Sex - just select the gender
- Medical issue - enter the issue name (e.g., 'asthma'); keep it simple; it finds a text match in the list of all patients' recorded medical issues
- Diagnosis - click in Diagnosis text area for a search dialog on the diagnosis code
- Medication - enter the med name for a text match of all patients' medications
- Allergy - text match of all pts' allergies
- Surgery - text match of all pts' surgery issues
- Lifestyle - In Lifestyle dropdown: select lifestyle element from dropdown
Value text area: enter a value to match in that element,
or alert on any value in that element - Custom Table - (only mySQL database experienced folk should muck about with this one)
- Table dropdown: select the OpenEMR database table to look in for the filter datum
- Column dropdown: Select the column in that table containing the filter datum
- Value: Select in dropdown the relationship indicator (= , >=, < etc)
- Enter the value to compare
- Frequency: Select in dropdown the relationship indicator (= , >=, < etc)
- Enter the frequency of occurrence
- Value: Select in dropdown the relationship indicator (= , >=, < etc)
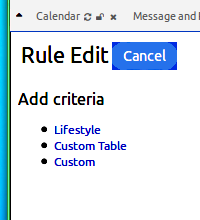
- Custom - select custom rule filter category and action item. See special section below.
Click on the filter you want your CDR to use and fill in the details.
Click 'Save'
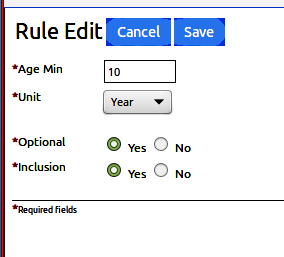
For our example we're going to do Annual Wellness Checks on everybody who's older than 10 years old, as shown in this picture of the 'Age Min' dialog.
Notes:
- The filter dialogs are all similar in format to the 'Age Min' dialog:
filter specification at top; 'Optional/ Inclusion' selectors on bottom. - Optional/ Inclusion settings: Optional = is this filter necessary to evaluate this rule
Inclusion: is this filter to be present (= Yes) or absent (= No) - Re: Optional = 'Yes' setting, per an OpenEMR discussion forum thread the GUI unintentionally reverses the values so "Optional = Yes" really means "No, not optional"
----- Special Section: 'Custom' filter -----
If the default filters above do not include your desired treatment target, a custom one may be created.
Custom filters have two components:
- Clinical Rule Action Category - what SORT of action completes the CDR
- Clinical Rule Action Item - what SPECIFIC action completes the CDR
Some 'custom' Categories and Items have been created already:
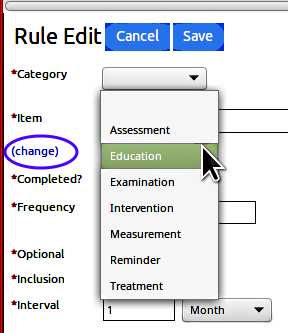
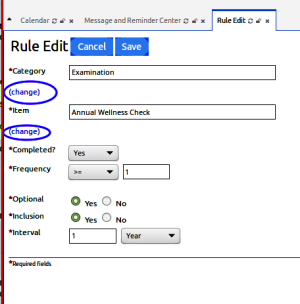
Click '(change)' , left oval.
The text area changes to a dropdown list.
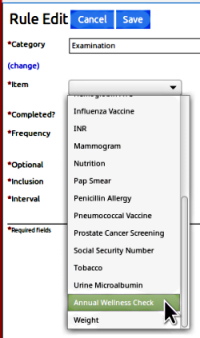
The list of default 'custom' Items is rather long; survey them before you decide to create your own.
1) Decide what you want to call your custom Category and Item.
For our 'Annual Wellness Check' example we're going to use the existing 'Examination' Category and create a new 'Annual Wellness' Item.
2) Navigate to Administration/ Lists
3) Select the list: 'Clinical Rule Action Item' (oval)
4) Fill in:
- Item ID
- Title
- Order (just the next value in the sequence; here it's 170)
Click 'Active' checkbox
(it's the right hand column of green checkboxes- see next picture)
Click 'Save' at bottom.
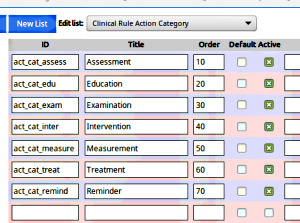
If you want to make a new custom Category you'd open the list 'Clinical Rule Action Category' and enter the Category identifiers in the same fashion.
(see there's the 'Active' checkbox column.)
5) Return to 'Administration / Rules, your new Rule Detail
After setting Demographics Filter Criteria proceed to:
Target / Action Groups
4. Click 'Clinical Targets - (edit)'
The dialog:
These are the same lists we saw in Demographics Filters but they're used differently here.
For our example select 'Custom'
Add a target category:
Click '(change)' (in blue oval at left)
We're using 'Examination'
Add a target Item:
Click (change)
there's our Annual Wellness Check item at the bottom
Set the rest of the items as seen in the previous picture:
- Completed = Does this CDR need to be completed to stop triggering? Yes it does
- Frequency: do exam at least once; may be more if desired
- Optional/ Inclusion: yes
- Interval: repeat every year.
Click 'Save' at top.
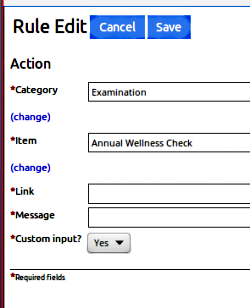
5. Click 'Actions – (edit)'
Add the action:
- Category: same as Clinical target
- Item: same as Clinical target
- Link: [researching] (not actually required)
- Message: [researching] (not actually required)
- Custom Input: yes (allows entry of the completion note)
Click 'Save' at lower left
Note:
- A CDR can detect and act upon multiple target/ action groups. For an example see Administration / Rules, "Weight Assessment and Counseling for Children and Adolescents (Passive Alert)"
And that is the new CDR created.
Of course you'll want to look at your new CDR.
Open the Patient Finder and select any patient over 10 years old.
There's the active alert popup (oval)
and there's the passive alert in the CR widget (arrow).
