Difference between revisions of "OpenEMR 6.x Billing - Claims Workflows"
Harley Tuck (talk | contribs) m (→Step One: Generate Claims In OpenEMR: formatting) |
Harley Tuck (talk | contribs) m (→Introduction: wrapping it up) |
||
| (24 intermediate revisions by the same user not shown) | |||
| Line 1: | Line 1: | ||
= Introduction = | = Introduction = | ||
OpenEMR's billing module is deep and complex; this document only shows the claims and invoice- related activities. Being as comprehensive as they are, the billing workflows depend on settings and data from other parts of the EMR in order to accurately fulfill their missions. Those requirements will not be detailed here, but they do need to be in place for claims to be successfully processed. | |||
* Be sure the Facility and Practice settings, Patient demographics and insurance information are correct<br> | |||
OpenEMR's billing module is | [[List_of_OpenEMR_Data_Fields_Required_For_Insurance_Claims]] | ||
* The encounter(s) to be billed must be complete; see <br> | |||
[[HOWTO:_Create_A_Claim-_Ready_Encounter]] | |||
Being as comprehensive as they are, the | |||
* The encounter | |||
* And, of course, the practice must have an account with a compatible clearinghouse<br/> | * And, of course, the practice must have an account with a compatible clearinghouse<br/> | ||
OpenEMR | A few things to remember:<br> | ||
* I am not an accountant or a billing professional! So I have borrowed terminology extensively from the billing documentation for older versions of OpenEMR . Particularly, [[Accounting_%26_Receivables_4.1]] | |||
* If you have ANY billing questions go to the forum at https://community.open-emr.org/c/clinical-users/6 and ask the day-to-day users. Many forum readers have been using the OpenEMR billing module for many years and are happy to share their experience. | |||
* Also: most of the dropdown lists seen in this module may be customized. See other instructions in the wiki on using the List Editor. | |||
The entire claim processing workflow can be arbitrarily divided into six major steps which I have placed into the following two wiki pages: | |||
Page 1, | Page 1, Claims Creation - this wiki page<br> | ||
* Generate Paper Claims | |||
** CMS 1500 | |||
** Pt Invoicing | |||
* EDI: Generate X12 Claims In OpenEMR | |||
* EDI: Upload X12 Files To Clearinghouse | |||
<br> | |||
Page 2, [[OpenEMR_6.x_Billing_-_Process_Payments]]<br> | |||
* Manual Payments | |||
** Search for Payments | |||
** Patient payments or EOBs | |||
* EDI: Claims Response Files | |||
* EDI: Apply ERAs | |||
Please DM me on the forum if you have any questions about this documentation, or to point out any errors of fact I may have committed here! | |||
* HTuck - MI-Squared.com | |||
= Claims Creation = | |||
Claim creation is the same no matter what format they will be sent out as; x12 files, paper CMS1500 forms or postal- mailed invoices. | |||
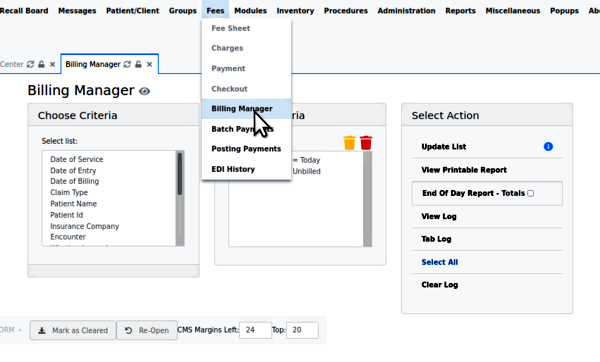
Having in place all the prerequisites mentioned above, the claims submission process all begins here: from the OpenEMR main menu, click 'Fees/ Billing Manager'; see the opening screen. | Having in place all the prerequisites mentioned above, the claims submission process all begins here: from the OpenEMR main menu, click 'Fees/ Billing Manager'; see the opening screen. | ||
''Note: unlike many OpenEMR functions, the Billing Manager may be operated without a patient record open.'' | ''Note: unlike many OpenEMR functions, the Billing Manager may be operated without a patient record open.'' | ||
[[Image:bl01.png]] | |||
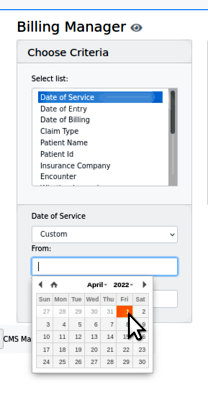
1. Search for the claims - the search criteria will open different types of smaller panels in which to specify the search terms: | 1. Search for the claims - the search criteria will open different types of smaller panels in which to specify the search terms: | ||
| Line 68: | Line 61: | ||
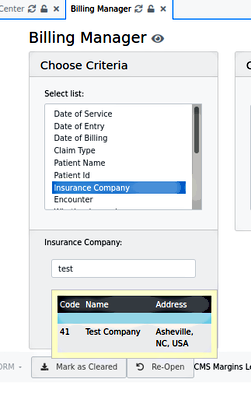
* The list- formatted data will show what has been configured in the EMR. See here the insurance company provided by 'Practice Settings/ Insurance Companies' | |||
[[Image:bl03.png|center]] | |||
*The list- formatted data will show what has been configured in the EMR. See here the insurance company provided by 'Practice Settings/ Insurance Companies' | |||
| Line 122: | Line 71: | ||
* Any simple text criteria will merely have a text input area (not pictured)<br/> | * Any simple text criteria will merely have a text input area (not pictured)<br/> | ||
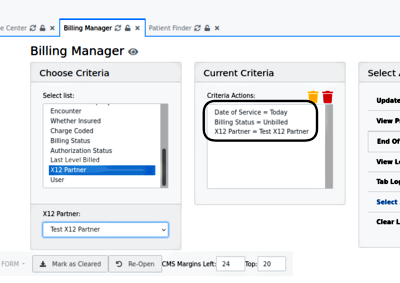
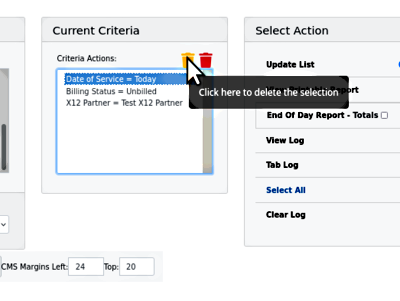
As they are input, the search terms are added to 'Current Criteria' (round rectangle) | As they are input, the search terms are added to 'Current Criteria' (round rectangle) | ||
[[Image: | [[Image:Bl04.png]] | ||
| Line 139: | Line 85: | ||
If you want to remove any terms from the Current Criteria, the yellow trash can deletes the selected one (here, Date of Service); the red can deletes them all. | |||
[[Image:bl05.png|center]] | |||
| Line 152: | Line 100: | ||
2. Click 'update list' to generate the list of claims | 2. Click 'update list' to generate the list of claims | ||
[[Image:bl06.png|center]] | |||
| Line 211: | Line 109: | ||
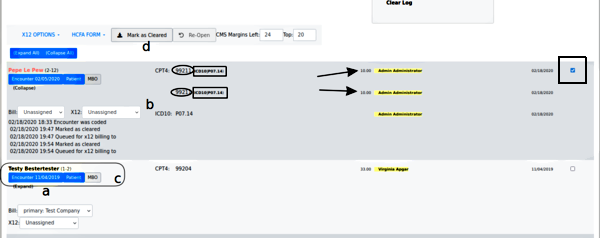
''Find the following lettered items in the picture below'' | ''Find the following lettered items in the picture below'' | ||
:a. look in the 'Expand' link to see the claim history (the display opens up, as Pepe's item shows) | |||
''Note: a red patient name (e.g., Pepe's) means something is wrong in insurance info... in this case his has no insurance company selected.'' | |||
''Note: a red patient name (e.g., Pepe's) means something is wrong in insurance info... his has no insurance company selected.'' | |||
:b. check that each claim has all the required elements:<br> | |||
* 'Bill' Insurance and 'X12' entities are selected | |||
* the CPT4 or other service code (oval) given for the service(s) rendered in that encounter | |||
* the justifying ICD10 diagnosis code (rectangle) for each CPT code | |||
* the fee (arrow) for each CPT code | |||
* the rendering provider (yellow highlight) for each line item | |||
* Date of Service<br/> | |||
:c. each claim component may be edited from this claim listing** click on 'Encounter' (left blue button under name) to open the encounter summary form to fix things wrong with the encounter/ fee sheet | |||
* click on 'Patient' (right blue button next to insurance company name) for demographics or insurance company information errors<br/> | |||
[[Image:bl07.png|center]] | |||
:d. you can reopen claims that have been marked as billed but not yet submitted | |||
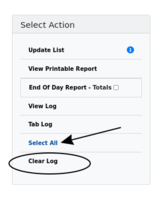
3. Click 'Clear Log' (oval below) before validating this batch of claims | 3. Click 'Clear Log' (oval below) before validating this batch of claims | ||
[[Image:bl07-clearLog.png|center]] | |||
| Line 249: | Line 141: | ||
Once the claims being processed have been validated and all necessary components verified, the claims may be sent out, either by electronic or paper media. | |||
== Generate Paper Claims == | |||
Once you have selected the claims to be submitted, proceed with which sort of claim will be generated: CMS 1500 claim forms or Patient invoices. | |||
<br> | |||
=== CMS 1500 === | |||
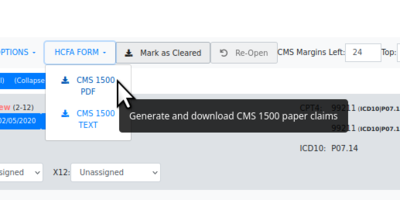
# HCFA claims - Click the 'HCFA FORM' dropdown | |||
# then select desired claim file format, .txt or .pdf | |||
[[Image:Bl08-claim-genHCFA.png]] | |||
| Line 262: | Line 162: | ||
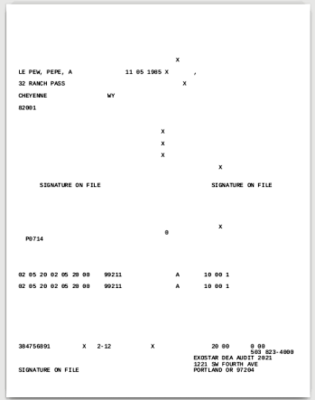
* The file will be saved in the browser's designated local download location. | |||
* The data is laid out on the page to fit into the text areas on the form | |||
* It may be sent to a printer which has been loaded with the authorized pre- printed HCFA claim forms. | |||
[[Image:bl08-claimHCFApdf.png|center]] | |||
=== Patient Invoicing === | |||
Once all the payments from the insurance companies have been received and entered for an account, you can generate invoices from OpenEMR's EOB page to directly bill patients for the remaining amounts. | |||
'''''Note: any user with 'Accountant' or 'Administrator' ACL may generate invoices''''' | |||
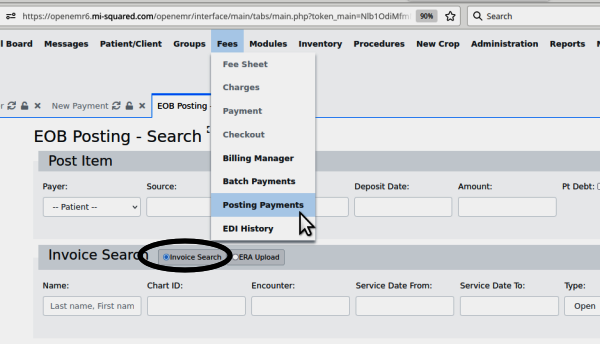
1. Open the EOB page to generate invoices, at the main menu item: 'Fees/ Posting Payments' | |||
[[Image:inv1-eob00.png|center]] | |||
| Line 283: | Line 189: | ||
In the 'Invoice Search' section note radio button 'Invoice Search' (oval) | |||
selected by default | |||
[[Image:inv1-eob01.png]] | |||
2. Search for invoices by: | |||
* Patient Name | |||
* Chart ID (PID or External ID) | |||
* Encounter number | |||
* Service date From/ To - get all invoices in that range | |||
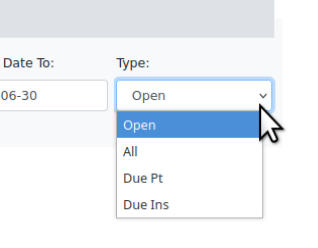
* Type: see the list in picture | |||
[[Image:inv1-eob02.png|center]] | |||
| Line 305: | Line 214: | ||
3. Enter search criteria click 'Search' (blue button in previous pic) | |||
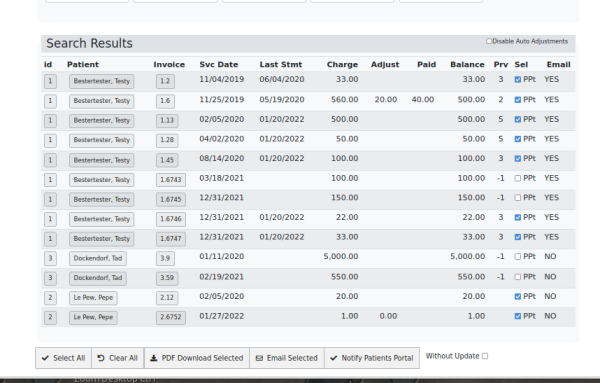
4. See list of invoices matching the search | |||
'''''** remember: the ad-hoc simulated data pictured here do not accurately represent properly constructed claims **''''' | |||
The columns are self explanatory, except 'Prv' which older -version docs say 'indicates the number of insurance companies for which this invoice is awaiting payment.' | |||
[[Image:inv1-eob03.png]] | |||
5. Select the checkboxes (column 'Sel') of the invoices to be printed. | |||
6. Per the button bar at the bottom:<br> | |||
* 'Select all' - invoices displayed | |||
* Clear all - that have been selected | |||
* PDF Download Selected - print to pdf the selected invoices into the current user's Downloads directory from where they can be printed out for postal mailing. | |||
* Email Selected - to patient, if patient email notifications have been set up | |||
* Notify Patients Portal - what it says: send a message to the patients' portal account. | |||
[[Image:inv1-eob05.png|center]] | |||
'''''Note: see the wiki page https://www.open-emr.org/wiki/index.php/Accounting_%26_Receivables_4.1#Patient_Invoices_and_Payments''''' | |||
'''''for another description of this process.''''' | |||
Alternatively one may click on the invoice number (3d column in previous pic) to see its details, to make adjustments or whatever, then print the invoice for sending. | |||
: | [[Image:inv1-eob04]] | ||
== EDI: Generate X12 Claims In OpenEMR == | |||
The electronic version of paper invoicing is, of course, generating and submitting x12 claim files to a clearinghouse.<br> | |||
[[Image:bl08.png]] | |||
To continue from the Billing Manager workflow last pictured above in step 3 of first section, 'Claims Generation' in this page: | |||
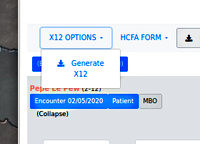
1. Instead of clicking 'HCFA Form', click 'X12 Options' | |||
then: | |||
:'Generate X12' | |||
''Find the lettered items in the list below, in the following picture'' | |||
[[Image:bl09.png|right]] | |||
:a. First: click x12 Options/ Validate Only | |||
| Line 364: | Line 293: | ||
:The X12 file displays. | |||
Click ' | :b. Click 'Logs' button (oval lower right) to see if any problems have been registered in the claim validation logs. | ||
| Line 381: | Line 310: | ||
The validation log is another place to find what errors exist in the claim file that will prevent it from being accepted by the clearinghouse or insurance company. | |||
The errors may be either corrected from the claim list and re- validated til clear of errors, or simply unselect the claims from the list. That claim will be excluded from the batch file but will re-appear next time a search is done that includes it. | |||
[[Image:bl11.png|right]] | |||
To finish the claim generation process: | |||
2. Click x12 options/ validate and clear (check the logs if desired) | |||
3. Click x12 options/ continue - to obtain the batch file for upload to clearinghouse (not pictured; is a simple file download dialog) | |||
--- or automatically upload it to clearinghouse if SFTP is configured. | |||
== EDI: Upload X12 Files To Clearinghouse == | |||
= | |||
This step varies widely depending on the clearinghouse. They all have similar functionalities because they're performing the same task but the mechanics differ significantly.* As mentioned, if an SFTP connection is being used, when the 'X12 Options/ Continue' button is clicked the transfer to the clearinghouse will happen automatically and a message to that effect will be displayed (not pictured). | This step varies widely depending on the clearinghouse. They all have similar functionalities because they're performing the same task but the mechanics differ significantly.* As mentioned, if an SFTP connection is being used, when the 'X12 Options/ Continue' button is clicked the transfer to the clearinghouse will happen automatically and a message to that effect will be displayed (not pictured). | ||
| Line 414: | Line 338: | ||
>>> On to the next page [[OpenEMR_6.x_Billing_-_Process_Payments]] <<< | |||
= Conclusion = | |||
That's it for the out- going claim data of the billing process. Next section we look at handling the incoming information- and hopefully money- from the submitted claims. | |||
Revision as of 18:59, 2 August 2022
Introduction
OpenEMR's billing module is deep and complex; this document only shows the claims and invoice- related activities. Being as comprehensive as they are, the billing workflows depend on settings and data from other parts of the EMR in order to accurately fulfill their missions. Those requirements will not be detailed here, but they do need to be in place for claims to be successfully processed.
- Be sure the Facility and Practice settings, Patient demographics and insurance information are correct
List_of_OpenEMR_Data_Fields_Required_For_Insurance_Claims
- The encounter(s) to be billed must be complete; see
HOWTO:_Create_A_Claim-_Ready_Encounter
- And, of course, the practice must have an account with a compatible clearinghouse
A few things to remember:
- I am not an accountant or a billing professional! So I have borrowed terminology extensively from the billing documentation for older versions of OpenEMR . Particularly, Accounting_&_Receivables_4.1
- If you have ANY billing questions go to the forum at https://community.open-emr.org/c/clinical-users/6 and ask the day-to-day users. Many forum readers have been using the OpenEMR billing module for many years and are happy to share their experience.
- Also: most of the dropdown lists seen in this module may be customized. See other instructions in the wiki on using the List Editor.
The entire claim processing workflow can be arbitrarily divided into six major steps which I have placed into the following two wiki pages:
Page 1, Claims Creation - this wiki page
- Generate Paper Claims
- CMS 1500
- Pt Invoicing
- EDI: Generate X12 Claims In OpenEMR
- EDI: Upload X12 Files To Clearinghouse
Page 2, OpenEMR_6.x_Billing_-_Process_Payments
- Manual Payments
- Search for Payments
- Patient payments or EOBs
- EDI: Claims Response Files
- EDI: Apply ERAs
Please DM me on the forum if you have any questions about this documentation, or to point out any errors of fact I may have committed here!
- HTuck - MI-Squared.com
Claims Creation
Claim creation is the same no matter what format they will be sent out as; x12 files, paper CMS1500 forms or postal- mailed invoices.
Having in place all the prerequisites mentioned above, the claims submission process all begins here: from the OpenEMR main menu, click 'Fees/ Billing Manager'; see the opening screen.
Note: unlike many OpenEMR functions, the Billing Manager may be operated without a patient record open.
1. Search for the claims - the search criteria will open different types of smaller panels in which to specify the search terms:
- All date criteria have date pickers
- The list- formatted data will show what has been configured in the EMR. See here the insurance company provided by 'Practice Settings/ Insurance Companies'
- Any simple text criteria will merely have a text input area (not pictured)
As they are input, the search terms are added to 'Current Criteria' (round rectangle)
If you want to remove any terms from the Current Criteria, the yellow trash can deletes the selected one (here, Date of Service); the red can deletes them all.
2. Click 'update list' to generate the list of claims
Find the following lettered items in the picture below
- a. look in the 'Expand' link to see the claim history (the display opens up, as Pepe's item shows)
Note: a red patient name (e.g., Pepe's) means something is wrong in insurance info... in this case his has no insurance company selected.
- b. check that each claim has all the required elements:
- 'Bill' Insurance and 'X12' entities are selected
- the CPT4 or other service code (oval) given for the service(s) rendered in that encounter
- the justifying ICD10 diagnosis code (rectangle) for each CPT code
- the fee (arrow) for each CPT code
- the rendering provider (yellow highlight) for each line item
- Date of Service
- c. each claim component may be edited from this claim listing** click on 'Encounter' (left blue button under name) to open the encounter summary form to fix things wrong with the encounter/ fee sheet
- click on 'Patient' (right blue button next to insurance company name) for demographics or insurance company information errors
- d. you can reopen claims that have been marked as billed but not yet submitted
3. Click 'Clear Log' (oval below) before validating this batch of claims
Once the claims being processed have been validated and all necessary components verified, the claims may be sent out, either by electronic or paper media.
Generate Paper Claims
Once you have selected the claims to be submitted, proceed with which sort of claim will be generated: CMS 1500 claim forms or Patient invoices.
CMS 1500
- HCFA claims - Click the 'HCFA FORM' dropdown
- then select desired claim file format, .txt or .pdf
- The file will be saved in the browser's designated local download location.
- The data is laid out on the page to fit into the text areas on the form
- It may be sent to a printer which has been loaded with the authorized pre- printed HCFA claim forms.
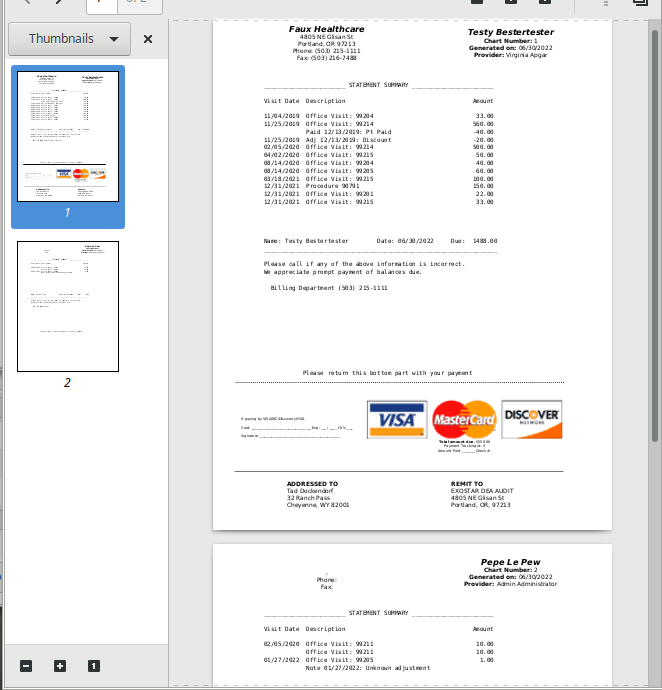
Patient Invoicing
Once all the payments from the insurance companies have been received and entered for an account, you can generate invoices from OpenEMR's EOB page to directly bill patients for the remaining amounts.
Note: any user with 'Accountant' or 'Administrator' ACL may generate invoices
1. Open the EOB page to generate invoices, at the main menu item: 'Fees/ Posting Payments'
In the 'Invoice Search' section note radio button 'Invoice Search' (oval)
selected by default
2. Search for invoices by:
- Patient Name
- Chart ID (PID or External ID)
- Encounter number
- Service date From/ To - get all invoices in that range
- Type: see the list in picture
3. Enter search criteria click 'Search' (blue button in previous pic)
4. See list of invoices matching the search
** remember: the ad-hoc simulated data pictured here do not accurately represent properly constructed claims **
The columns are self explanatory, except 'Prv' which older -version docs say 'indicates the number of insurance companies for which this invoice is awaiting payment.'
5. Select the checkboxes (column 'Sel') of the invoices to be printed.
6. Per the button bar at the bottom:
- 'Select all' - invoices displayed
- Clear all - that have been selected
- PDF Download Selected - print to pdf the selected invoices into the current user's Downloads directory from where they can be printed out for postal mailing.
- Email Selected - to patient, if patient email notifications have been set up
- Notify Patients Portal - what it says: send a message to the patients' portal account.
Note: see the wiki page https://www.open-emr.org/wiki/index.php/Accounting_%26_Receivables_4.1#Patient_Invoices_and_Payments
for another description of this process.
Alternatively one may click on the invoice number (3d column in previous pic) to see its details, to make adjustments or whatever, then print the invoice for sending.
EDI: Generate X12 Claims In OpenEMR
The electronic version of paper invoicing is, of course, generating and submitting x12 claim files to a clearinghouse.
To continue from the Billing Manager workflow last pictured above in step 3 of first section, 'Claims Generation' in this page:
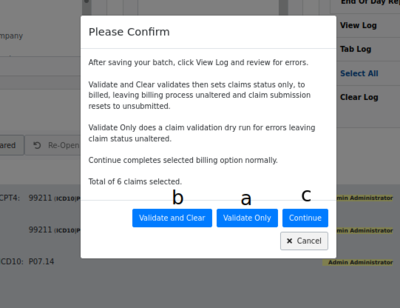
1. Instead of clicking 'HCFA Form', click 'X12 Options'
then:
- 'Generate X12'
Find the lettered items in the list below, in the following picture
- a. First: click x12 Options/ Validate Only
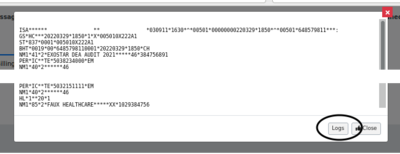
- The X12 file displays.
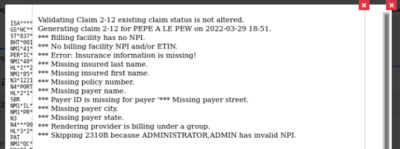
- b. Click 'Logs' button (oval lower right) to see if any problems have been registered in the claim validation logs.
The validation log is another place to find what errors exist in the claim file that will prevent it from being accepted by the clearinghouse or insurance company.
The errors may be either corrected from the claim list and re- validated til clear of errors, or simply unselect the claims from the list. That claim will be excluded from the batch file but will re-appear next time a search is done that includes it.
To finish the claim generation process:
2. Click x12 options/ validate and clear (check the logs if desired)
3. Click x12 options/ continue - to obtain the batch file for upload to clearinghouse (not pictured; is a simple file download dialog)
--- or automatically upload it to clearinghouse if SFTP is configured.
EDI: Upload X12 Files To Clearinghouse
This step varies widely depending on the clearinghouse. They all have similar functionalities because they're performing the same task but the mechanics differ significantly.* As mentioned, if an SFTP connection is being used, when the 'X12 Options/ Continue' button is clicked the transfer to the clearinghouse will happen automatically and a message to that effect will be displayed (not pictured).
- Otherwise, the claim files need to be uploaded manually, typically through a web portal of some sort.
- I (author HT) have worked with Trizetto, Availity and Office Ally. I personally found Office Ally to be the least versatile in the services they offer but also the least difficult to learn and to work with. The other two are much more full- featured services but their customer interaction interface is exceedingly complex, especially in interpreting response files.
>>> On to the next page OpenEMR_6.x_Billing_-_Process_Payments <<<
Conclusion
That's it for the out- going claim data of the billing process. Next section we look at handling the incoming information- and hopefully money- from the submitted claims.
