Difference between revisions of "CQMs – record and export (MU3)"
From OpenEMR Project Wiki
| (One intermediate revision by the same user not shown) | |||
| Line 3: | Line 3: | ||
== C1 (record and export) == | == C1 (record and export) == | ||
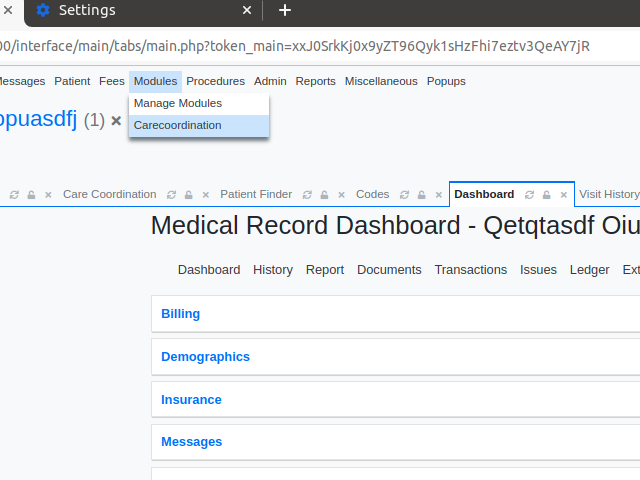
* Once a user has input or imported data that they would like to export, they will go to Modules-> Carecoordination | |||
[[File:Carecoordination-step1.png|Modules -> Carecoordiantion|Step 1: Go to Modules -> Carecoordination]] | [[File:Carecoordination-step1.png|Modules -> Carecoordiantion|Step 1: Go to Modules -> Carecoordination]] | ||
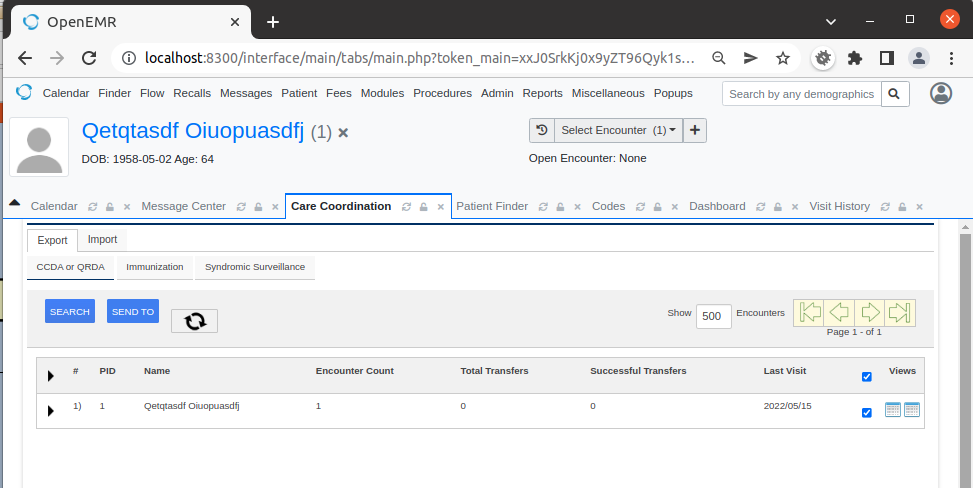
* Then they tick the checkbox of the person they would like to export and click the SEND TO button. | |||
[[File:Carecoordination-step2.png|Modules -> Carecoordiantion|Step 2: Choose person and click SEND TO button]] | [[File:Carecoordination-step2.png|Modules -> Carecoordiantion|Step 2: Choose person and click SEND TO button]] | ||
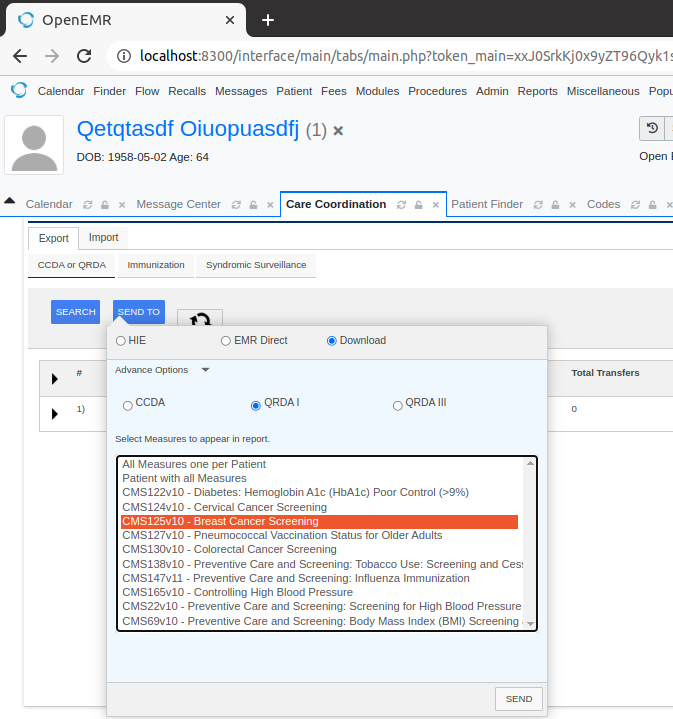
* Then they click the Download radio button, and then click the QRDA I radio button and finally select All Measures one per Patient or Patient with all Measures or select an individual meaure or a combination of measures by clicking additional measures while holding the Ctrl key. Finally they click the SEND button which downloads the file to their device. | |||
[[File:Carecoordination-step3.png|Modules -> Carecoordiantion|Step 3: Download QRDA I individual measure]] | |||
== Notes == | == Notes == | ||
Latest revision as of 20:02, 24 May 2022
Clinical Quality Measures 2015 Edition Health IT Certification
C1 (record and export)
- Once a user has input or imported data that they would like to export, they will go to Modules-> Carecoordination
- Then they tick the checkbox of the person they would like to export and click the SEND TO button.
- Then they click the Download radio button, and then click the QRDA I radio button and finally select All Measures one per Patient or Patient with all Measures or select an individual meaure or a combination of measures by clicking additional measures while holding the Ctrl key. Finally they click the SEND button which downloads the file to their device.
Notes
For a very good explanation of eCQMs and much of the terminology surrounding them the following document from CMS was a valuable read: https://www.cms.gov/files/document/blueprint-ecqm-specifications-testing-standards-tools-community.pdf (Accessed on March 23, 2022).
Found the implementation and requirements guide here: https://ecqi.healthit.gov/sites/default/files/2022-CMS-QRDA-III-Eligible-Clinicians-and-EP-IG-V1.1-508.pdf


